
Working with resource strings
Resource strings store the text displayed in the Xperience administration interface and on the live site.
- For the administration application, the system’s default resource strings are stored in the cms.resx file located in the project’s CMSResources folder. See: Modifying the default UI strings used by the administration interface
- For the live site application, the default resource string files used by the system are stored as embedded resources in application assemblies (delivered via the NuGet integration packages). See: Modifying the default UI strings on the live site
- You can define custom resource strings for use on the live site or in the administration interface. See: Adding your own strings
- You can define component-specific resource strings to localize page builder and form builder components. See: Localizing builder components
- You can edit the resource strings that the system stores in the database in the Localization application on the Resource strings tab.
Resource string priority
When loading resource strings, the system uses the following priority:
- database (Localization application) – highest priority
- site and component specific resx files
- resx files of custom modules
- custom.resx – detected based on a naming convention. Not present by default.
- cms.resx
If there are duplicate strings with the same key in all five sources, the system uses the one stored in the database.
To change the priorities, you can add the following key to your project’s configuration file:
<add key="CMSUseSQLResourceManagerAsPrimary" value="false" />
When this key is added, the priorities are as follows:
- site and component specific resx files
- resx files of custom modules
- custom.resx – detected based on a naming convention. Not present by default.
- cms.resx
- database
Modifying the default UI strings used by the administration interface
If you want to modify text in the Xperience administration interface, use one of the following options:
Override resource strings in the Localization application.
Create a cms.resx file in your administration project’s CMSResources folder and store your strings in this file.
- The file’s content must have a valid XML structure for the .resx file format, including header information. You can copy the general structure from the default cms.resx file.
- To customize strings in non-English resource files, your custom file must use a name in format cms.<culture code>.resx (for example, cms.fr-fr.resx for French).
In both cases, the keys used to identify the strings must be the same as in the default cms.resx file.
Modifying the default UI strings on the live site
The default resource string files used by the system are stored as embedded resources in application assemblies (delivered via the NuGet integration packages). The live site localization strings are split into the following files:
- KenticoResources.resx – general strings used by the Xperience integration.
- Kentico.Builder.resx – strings shared by both the form and page builder.
- Kentico.PageBuilder.resx – strings for the page builder UI.
- Kentico.FormBuilder.resx – strings for default form components and the form builder UI.
- Kentico.Components.resx – strings for default selector components and widgets.
If you need access to these strings for the purpose of localization, contact us at partners@kentico.com or support@kentico.com.
To modify or translate these strings, use the following process:
Create the ~/App_Data/Global/Resources folder in your live site application (if necessary).
Create a file with a name identical to one of the resx files listed above in the folder.
- For non-English resource files, create a subfolder matching the culture code of the target culture. For example: ~/App_Data/Global/Resources/es-es
Place the localized or modified strings into the file. The keys used to identify the strings must match those used the original file.
- The system prioritizes strings stored in these files over the default ones.
The application now prioritizes resource strings located under ~/App_Data/Global/Resources.
Accessing the Localization application
Editing of resource strings in the Localization application is only possible for two types of users:
- Users with the Global administrator privilege level
- Users who belong to roles with the Localize strings permission for the Localization module
Note: The Localize strings permission allows users to edit or override all global resource strings. You cannot use the permission model to restrict access to a certain subset of resource strings, for example on instances containing multiple independent websites.
Adding your own strings
If you need to translate custom strings used on your website such as form labels, display names of objects or other static text into other languages, you can create a new resource string:
- Open the Localization application.
- Choose the default culture in the Culture selector.
- Click New string.
- Type the name of the resource string into the Key field.
- Typethe text for the key into the Translation field of the corresponding language.
- Click Save.
A new string in the default culture is now displayed in the list.
You can also create new resource strings directly when editing text fields in the administration interface. See Localizing text fields.
Xperience Localization application
Text values used within ASP.NET Core live site applications must be stored within localized resource files. For this purpose, you cannot use the Localization application of the Xperience administration interface (i.e., resource strings stored in the database).
Such strings can only be placed into fields in the administration using localization macros.
Translating resource strings into other languages
Open the Localization application.
Edit () the resource string.
If you do not see the desired language, use the Show translation for radio buttons to change the category of cultures.
Translate the string into the desired language in the corresponding Translation field.
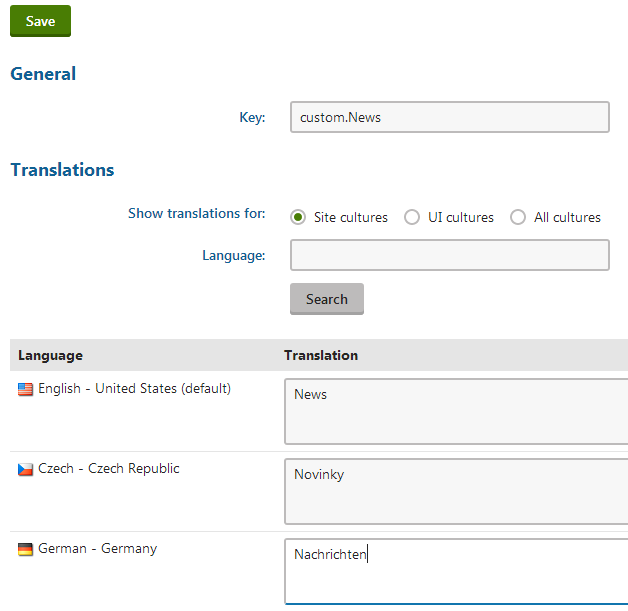
Click Save.
The resource string and its translation are now created and stored in the database.
Retrieving resource strings via API
If you need to retrieve the value of a resource string in your custom code, use CMS.Helpers.ResHelper.GetString. The method retrieves a localized string associated with the given resource string name. For example:
using CMS.Helpers;

...

// Loads the value of the 'stringKey' resource string (in the default culture)
string localizedResult = ResHelper.GetString("stringKey");