
Setting up content tree-based routing
Content tree-based routing handles URL generation and routing for pages of appropriately configured page types. Upon creation, each page is granted a URL based on its position in the content tree and the configuration of its ancestor nodes. For a detailed overview of this feature, see Content tree-based routing.
This page describes both necessary and optional steps you need to perform on the side of the MVC application to fully integrate the routing feature into your project.
There are two main approaches you can use when configuring content tree-based routing:
- Basic – requires you to provide MVC view files to define the output format of pages. A corresponding controller and view model are handled for you by the system.
- Advanced – builds upon the basic routing scheme. Allows you to provide a custom controller and view model to handle requests for specific page types and sections of the content tree in an individual manner.
Both routing schemes require a page type with the URL feature enabled. The URL feature indicates that you want pages created from this page type to be accessible using a URL. When used with content tree-based routing, it configures the system to automatically generate URLs for new pages. See Creating page types.
Additionally, when handling page types with the page builder feature enabled, there are a couple of additional prerequisites to keep in mind when setting up the routing scheme. See the page builder section for more information.
Setting up basic routing
The basic routing scheme is the simplest form of routing. You only need to provide a view formatting of the page output. The controller, view model, and all routing logic is handled for you by the system.
In your MVC project, create a view under Views/Shared/PageTypes. The view needs to be named after the class name of the created page type. Replace the period (‘.’) separator between the page type namespace and code name with an underscore (‘_’). Based on this convention, the system automatically matches requests for pages of a particular page type to the corresponding view.
- For example: assuming you have a page type called MySite.Article (namespace.codename), name the view “MySite_Article.cshtml”. The full path to the view is then: ~/Views/Shared/PageTypes/MySite_Article.cshtml
Implement the view according to your requirements. The system provides access to the requested page data via the Page property of a generic IPageViewModel<TPage> view model. Substitute the TPage generic with one of the following types:
Use the Page property to access only the specific page’s data. Do not use the properties of the TreeNodeCollection type (Page.Children, Page.AllChildren, Page.Links, Page.CultureVersions, Page.DocumentsOnPath).
CMS.DocumentEngine.TreeNode – a general class representing the requested page in the system. Allows you to directly access properties common to all pages, such as DocumentName, DocumentPublishFrom, etc. To access fields specific to your given page type, use the GetValue method, or generate a wrapper class for the page type.
  @using CMS.DocumentEngine

  @* Declares the generic model using the 'TreeNode' class *@
  @model Kentico.Content.Web.Mvc.Routing.IPageViewModel<TreeNode>

  @* Renders the name of the page *@
  @Model.Page.DocumentName

  @* Accesses the 'Text' field of the page type *@
  @Html.Raw(Model.Page.GetValue("Text"))
Generated wrapper class – a class generated by the system that provides direct access to all custom fields of the page type.
  @* Includes the namespace of the generated page type wrapper class *@
  @using CMS.DocumentEngine.Types.MySite

  @model Kentico.Content.Web.Mvc.Routing.IPageViewModel<Article>

  @* Renders the name of the page *@
  @Model.Page.DocumentName

  @* Fields declared for the specific page type can be accessed directly from the generated wrapper class.
     This line of code loads data from the 'Text' field of the page type. *@
  @Html.Kentico().ResolveUrls(Model.Page.Text)
Accessing other page data
In addition to the Page property, the IPageViewModel also provides the following properties:
- Metadata – allows you to access the metadata of the page.
- Security – allows you to evaluate the permissions and authentication requirements of the page. See Implementing page permission checks for details.
When a page matching this page type is requested, the system automatically displays the view using a default controller and the generic view model. The system also ensures all contextual data of the requested page (matching the URL of the request).
Output caching support
Output caching is not supported for the basic routing scheme. If you wish to use output caching, you need to use a custom controller as described in the advanced section.
If you desire more granular control over the processing logic and the data passed into the view, use the advanced routing mode.
Setting up advanced routing
When developing views for pages with more advanced content or functionality, you can provide your own controller together with a view model. For example, use the advanced routing scheme for pages where data stored within a single page in Xperience is insufficient (e.g., when displaying additional lists of related articles, a catalog of products, etc.). This grants you full control over the data and processing logic. You can execute arbitrary code within the controller, pass additional data required by the view, or switch between different views as needed.
When configuring advanced routing, you need to perform the following steps:
- Decide which page types and sections of the content tree will be managed using your route.
- Implement the controller logic (together with view models and views).
- Register the controllers in the system together with the routes for which they are responsible.
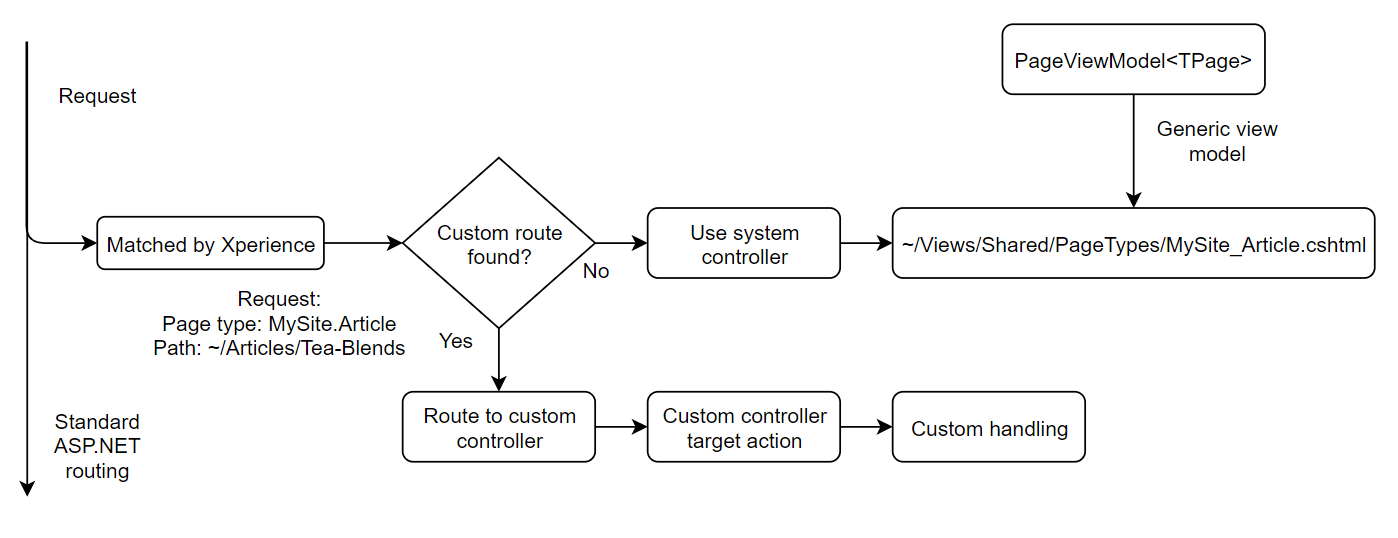
Advanced page routing overview
Under the advanced routing scheme, requests are still matched by a system route. However, instead of routing the request to a hidden controller, the system reroutes the request to a matching custom controller. A matching controller is found using the page type and node alias path (location in the content tree) of the requested page. You provide this information using the RegisterPageRoute assembly attribute (Kentico.Content.Web.Mvc.Routing namespace).
The RegisterPageRoutes attributes takes the following required parameters:
- string ClassName– the class name of the page type this controller handles. The class name is in the namespace.codename format. Both are set during page type creation. Generated classes expose the class name under the CLASS_NAME constant.
- Type ControllerType– the System.Type of the controller assigned to handling the requests for the page type.
When a controller is registered using only these required parameters, the system invokes the controller’s Index action in response to all requests matched with pages of the supplied page type.
To further tailor the response, you can provide additional parameters when registering the route:
- string Path – the node alias path of an item in the content tree for which you want to use this controller. Use this property if you wish to provide special handling for a particular page.
- If there are multiple matches to a single request, the longest (most specific) path wins.
- If not specified, the registered controller is used to respond to all requests for pages of the corresponding page type.
- string ActionName – allows you to target which controller action responds to the matched request. If not specified, the default Index action is used.
The following diagram compares the basic and advanced routing schemes:
The registration parameters can be combined to, for example:
- have multiple page types handled by a single controller and action
- have multiple page types handled by a single controller and different actions
- have a single page type handled by different controllers depending on the location of specific pages in the content tree
Multiple identical registrations
Multiple identical registrations (e.g., you registered multiple controllers with the same path and action for a single page type) are not supported. If the system detects duplicate registrations, it fails with an exception during application startup.
Examples
The following are examples of custom route registrations:
Multiple page types - single controller - single action
// Requests for all pages of the 'Coffee', 'Brewer' and 'ElectricGrinder' page types are handled using the 'Detail' action of the Product controller
[assembly: RegisterPageRoute(Coffee.CLASS_NAME, typeof(ProductController), ActionName = "Detail")]
[assembly: RegisterPageRoute(Brewer.CLASS_NAME, typeof(ProductController), ActionName = "Detail")]
[assembly: RegisterPageRoute(ElectricGrinder.CLASS_NAME, typeof(ProductController), ActionName = "Detail")]
Multiple page types - single controller - different actions
// Requests for all pages of the 'ArticleSection' page type are handled using the 'Index' action of the Articles controller
[assembly: RegisterPageRoute(ArticleSection.CLASS_NAME, typeof(ArticlesController))]
// Requests for all pages of the 'Article' page type are handled using the 'Show' action of the Articles controller
[assembly: RegisterPageRoute(Article.CLASS_NAME, typeof(ArticlesController), ActionName = "Show")]
Single page type - multiple controllers - each for a different page in the content tree
// Requests for a page of the 'ProductSection' page type located at '/Store/Brewers' is handled using the 'Index' action of the Brewers controller
[assembly: RegisterPageRoute(ProductSection.CLASS_NAME, typeof(BrewersController), Path = "/Store/Brewers")]
// Requests for a page of the 'ProductSection' page type located at '/Store/Grinders' is handled using the 'Index' action of the Grinders controller
[assembly: RegisterPageRoute(ProductSection.CLASS_NAME, typeof(GrindersController), Path = "/Store/Grinders")]
// Requests for a page of the 'ProductSection' page type located at '/Store/Coffees' is handled using the 'Index' action of the Coffees controller
[assembly: RegisterPageRoute(ProductSection.CLASS_NAME, typeof(CoffeesController), Path = "/Store/Coffees")]
Implementing a custom route
As described in the previous section, a custom route is nothing but a controller that takes over when the request matches certain criteria. When the system delegates handling to such a controller, the rest of the processing logic is completely in your hands. You can run any custom code within the controller, pass any type of required data to the view, or switch between completely different views based on the current scenario.
The development process for custom routes follows standard MVC practices:
Create a new controller class in your project.
Implement the Index action and any other required actions.
If you need to access the data of the currently requested page, use the Retrieve<TPageType> method of the IPageDataContextRetriever service. The method takes either CMS.DocumentEngine.TreeNode or a page type wrapper class as its generic parameter and returns an IPageDataContext<TPageType> object. Use the object’s properties to access the page data:
Page – an object representing the page of the type provided in the generic parameter.
Use the Page property to access only the specific page’s data. Do not use the properties of the TreeNodeCollection type (Page.Children, Page.AllChildren, Page.Links, Page.CultureVersions, Page.DocumentsOnPath).
Metadata – provides access to the metadata of the page.
Security – allows you to evaluate the permissions and authentication requirements of the page. See Implementing page permission checks for details.
 private readonly IPageDataContextRetriever dataRetriever;

 public ArticlesController(IPageDataContextRetriever dataRetriever)
 {
     // Initializes an instance of a service that provides data context of pages matching the requested URL
     this.dataRetriever = dataRetriever;
 }

 public ActionResult Show()
 {
 ...
     // Gets the page of the Article page type matching the currently requested URL
     var article = dataRetriever.Retrieve<Article>().Page;
 ...
 }
Create any required view model classes used to pass data from the controller to the view.
Create views required by the controller actions.
The output must be a full HTML page, so the view must include the following:
- Full HTML markup, including the html, head and body elements
- Links to all necessary resources, such as stylesheets and scripts
Use MVC layouts with the view for any shared output code (for example your site’s main layout).
Register the route in the system.
The registered controller takes over for the default system controller when the request matches the criteria specified in the route registration attribute.
Handling page builder-enabled page types
For page types that use content tree-based routing and also have the page builder feature enabled, you need to ensure certain prerequisites depending on the employed routing scheme and the use of page templates.
When using basic routing and
- The page is based on a page template:
- You do not need to create a view corresponding to the page type under the ~/Views/Shared/PageTypes/className.cshtml location. However, if a matching view is detected, it takes precedence over the page template.
- The page is not based on a page template:
- The view for the corresponding page type (~/Views/Shared/PageTypes/className.cshtml) needs to include page builder scripts and styles (either directly or through the assigned layout).
When using advanced routing and
- The page is based on a page template:
The controller action handling the request needs to return a TemplateResult object. You do not need to provide any additional information to the constructor. The page to render is retrieved from information provided by the router when handling the request.
return new TemplateResult();
- The page is not based on a page template:
- The view needs to include page builder scripts and styles to ensure page content is loaded correctly (either directly or through the assigned layout).
Handling POST actions
Content tree-based routing does not handle POST requests. You need to manually register corresponding routes for all POST actions in your project.
For example, you can use attribute routing to target POST actions within controllers handling advanced routes. Targeting specific actions lowers the risk of accidentally registering routes that capture a broader spectrum of requests than intended, resulting in potential routing issues.
Accessing the data of the current page
The data of the current page (name, custom fields, etc.) is not by default accessible from within POST actions. Common POST requests do not contain sufficient information to identify the page from which they originate.
To access the page data in POST actions, you need to include information about the current page into the data submitted by the corresponding form by calling the Html.Kentico().PageData extension method within the given form tag.
@using Kentico.Web.Mvc
@using Kentico.PageBuilder.Web.Mvc

@using (Html.BeginForm("HandlePost", "RouteController", FormMethod.Post))
{
    ...

    @Html.Kentico().PageData()

    <input type="submit" value="Submit" />
}
The method renders a hidden form field that persists information about the current page. The page data can be retrieved via the IPageDataContextRetrieverservice in the corresponding POST action.
Obtain an instance of the IPageDataContextRetriever service (we recommend using dependency injection) and call its Retrieve<TPageType> method. Specify a TreeNode object or a page type wrapper class as the generic parameter. The method returns an IPageDataContext<TPageType> object that contains the current page object in its Page property.
Use the Page property to access only the specific page’s data. Do not use the properties of the TreeNodeCollection type (Page.Children, Page.AllChildren, Page.Links, Page.CultureVersions, Page.DocumentsOnPath).
You can also access the metadata and evaluate the permissions and authentication requirements of the page via the object’s Metadata and Security properties.
// Contains an instance of the IPageDataContextRetriever service (e.g., obtained via dependency injection)
private readonly IPageDataContextRetriever pageDataContext;

// Gets the page of the Article page type where the widget is placed
var article = pageDataContext.Retrieve<Article>().Page;
Retrieving generated page URLs using the API
URLs generated for pages can be retrieved using the API. See Getting page URLs to learn about the available options.