
Creating pages with editable areas
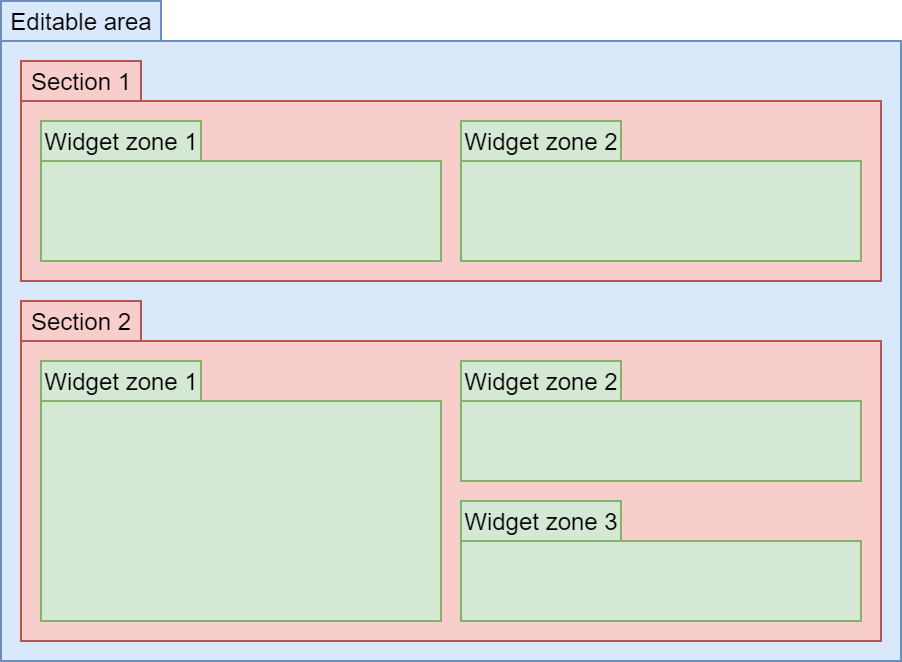
After you enable the page builder feature in your live site application, create pages with editable areas where content editors can add content through widgets. Content editors can arrange widgets using predefined layouts to achieve their desired result without having to resort to coding. You can adjust the visual arrangement of widgets on a page through the following components:
- Editable areas – defined directly in the views of your site’s pages. They are the top-level layout component and contain one or more sections.
- Sections– customizable components that specify the visual layout of widget zones. In the Pages application, content editors can choose which sections to add within editable areas, and thus adjust the structure of the page. A section may contain multiple widget zones. See Developing page builder sections.
- Widget zones – components that allow content editors to insert widgets. Widget zones are defined in the views of sections.
Creating a page
- Open the Xperience administration interface.
- In the Page types application, set up a page type with the Page builder and URL features enabled.
- If your site uses custom routing based on URL patterns, specify a URL pattern for the page type.
- The URL pattern of the page must match the route template under which the pages are served by the live site application. For example, if you use the /Home URL pattern, the page builder must be located on your site’s example.com/Home page.
- In the Pages application, create a page of the appropriate page type in the content tree.
Viewing the live URLs of pages
You can view the live site URLs of pageson the Properties -> URLstab in the Live URL field.
Initializing the page builder
The page builder needs to be initialized for individual pages to work. This initialization happens during the initialization of the page’s data context.
On sites that use content-tree based routing, page data context initialization is handled for you automatically by the system.
On sites where routing is handled by custom routes based on page type URL patterns, you need to initialize the page data context manually.
Manual initialization of the page data contextprivate readonly IPageRetriever pageRetriever; private readonly IPageDataContextInitializer pageDataContextInitializer; // Gets instances of required services using dependency injection public PageBuilderInitializationExample(IPageRetriever pageRetriever, IPageDataContextInitializer pageDataContextInitializer) { this.pageRetriever = pageRetriever; this.pageDataContextInitializer = pageDataContextInitializer; } public ActionResult Home() { // Retrieves a page from the Xperience database with the '/Home' node alias path TreeNode page = pageRetriever.Retrieve<TreeNode>(query => query .Path("/Home", PathTypeEnum.Single)) .FirstOrDefault(); // Responds with the HTTP 404 error when the page is not found if (page == null) { return HttpNotFound(); } // Initializes the page data context using the retrieved page pageDataContextInitializer.Initialize(page); return View(); }Pages protected by authorization
If the GET action of the controller that handles a page’s URL (route) is protected by an Authorize attribute, you may need to take additional steps to ensure that users can work with the page builder. With most configurations, any user can edit the page via the page builder, given the user has permissions necessary to modify the page in the content tree.
However, if the Authorize attribute has the Users or Roles parameter specified, only users fulfilling the authorization criteria have access to this page in the Pages application. In these cases, you need to include your content editors to allow them access.
The page builder needs to be initialized for individual pages to work. This initialization happens during the initialization of the page’s data context.
On sites that use content-tree based routing, the page data context initialization is handled for you automatically by the system.
On sites where routing is handled by custom routes based on page type URL patterns, you need to initialize the page data context manually.
Manual initialization of the page data contextprivate readonly IPageRetriever pagesRetriever; private readonly IPageDataContextInitializer pageDataContextInitializer; // Gets instances of required services using dependency injection public PageBuilderInitializationExample(IPageRetriever pagesRetriever, IPageDataContextInitializer pageDataContextInitializer) { this.pagesRetriever = pagesRetriever; this.pageDataContextInitializer = pageDataContextInitializer; } public ActionResult Home() { // Retrieves a page from the Xperience database with the '/Home' node alias path TreeNode page = pagesRetriever.Retrieve<TreeNode>(query => query .Path("/Home", PathTypeEnum.Single)) .FirstOrDefault(); // Responds with the HTTP 404 error when the page is not found if (page == null) { return NotFound(); } // Initializes the page data context (and the page builder) using the retrieved page pageDataContextInitializer.Initialize(page); return View(); }Pages protected by authorization
If the GET action of the view component that handles a page’s URL (route) is protected by an Authorize attribute, you may need to take additional steps to ensure that users can work with the page builder. With most configurations, any user can edit the page via the page builder, given the user has permissions necessary to modify the page in the content tree.
However, if the Authorize attribute has the Users or Roles parameter specified , only users fulfilling the authorization criteria have access to this page in the Pages application. In these cases, you need to include your content editors to allow them access.
Adding editable areas to views
Identify the locations on your website where you want editors to place widgets. Then define these locations by adding editable areas to the code of the corresponding views. The identifier of each editable area must be a string without white spaces that is unique within the context of the given page:
@using Kentico.PageBuilder.Web.Mvc
@using Kentico.Web.Mvc
<div>
    @Html.Kentico().EditableArea("area1")
</div>
You can optionally specify a default section for each area.
- Create an EditableAreaOptions object.
- Set the object’s DefaultSectionIdentifier property to match the identifier of the section which you want to use as default.
- Assign the object as a parameter of the EditableArea method used to render the given area.
The default section is automatically added into new areas and in cases where an editor removes the last section from an area.
<div>
    @{
        var optionsDefaultSection = new EditableAreaOptions
        {
            DefaultSectionIdentifier = "LearningKit.Sections.Col5050"
        };
    }
    @Html.Kentico().EditableArea("areaWithSection", optionsDefaultSection)
</div>
If you do not specify the default section for an area, it uses the default section configured for the entire page builder (either the system’s Default section with a single widget zone, or a custom section assigned when enabling the page builder feature).
Loading page builder scripts and styles
All pages with editable areas must contain scripts and CSS styles required by the page builder and its components. To add these resources to pages, call the following extension methods in your views:
PageBuilderScripts – renders required script tags and script file links. Call before the closing </body> tag of the page code.
PageBuilderStyles – renders links for the required stylesheet files. Call within the <head> tag of the page code.
  <html>
  <head>
      ...
      @Html.Kentico().PageBuilderStyles()
  </head>
  <body>
      ...
      @Html.Kentico().PageBuilderScripts()
  </body>
  </html>
For views with an assigned layout, we recommend using Razor sections. Sections allow you to call the methods in the appropriate part of the overall page code, but only for pages that contain editable areas.
The methods load scripts and styles used in the system’s editing interface, as well as those of individual page builder components (widgets, sections, inline property editors, page templates). See the linked documentation to learn how to correctly add custom scripts and styles for your own components.
Using jQuery scripts
By default, the system links two jQuery 3.5.1 bundles used in the page builder and its default components.
You can disable the use of jQuery for the page and form builder by setting the CMSBuilderScriptsIncludeJQuery key to false in the configuration file of your live site project (appsettings.json or web.config). All default features remain functional without jQuery.
If you wish to use jQuery, but require a different version (or link type) on your pages, you need to create your own bundle(s) with the corresponding path:
- ~/bundles/jquery
- ~/bundles/jquery-unobtrusive-ajax – bundle for using the jquery.unobtrusive-ajax.js JavaScript library (not to be confused with the jquery.validate.unobtrusive.js library)
When you register a bundle with one of these paths, the corresponding system bundle will no longer be linked automatically. You need to link your custom jQuery bundle manually (either within the used layout or directly in the page’s view) to ensure that the page builder works correctly.
After adding editable areas to views and ensuring that the pages contain the required scripts and styles, you can see the page builder with the editable areas in the Pages application.
Limiting components allowed in an editable area
You can define widget restrictions for certain areas. To limit which components (widgets or sections) can be added to a specific area:
- Create an EditableAreaOptions object.
- Assign a list of strings to the object’s AllowedWidgets and/or AllowedSections property.
- The strings must contain the identifiers of components you want to allow in the area (see Developing widgets and Developing page builder sections to learn more about component identifiers). For identifiers of the default system widgets, check the system widget reference.
- Assign the EditableAreaOptions object as a parameter of the EditableArea method used to render the given area.
The allowed components parameters work as a whitelist – you list the components that you want to allow in the editable area, and all others are automatically excluded. When allowed components are not specified, all registered components can be added to the area. You can also set the properties to the following special values:
- AllowedComponents.ALL – all components are allowed within the editable area.
- AllowedComponents.NONE – no components are allowed within the editable area (equivalent to an empty list of identifiers).
- Use the NONE option when limiting sections – this “locks in” the default section for the given area and completely prevents editors from adding further sections of any type.
Tip: Prepare the identifiers of allowed components as a string array, and then assign the array to the appropriate property of the EditableAreaOptions object.
<div>
    @{
            var optionsLimited = new EditableAreaOptions
            {
                AllowedWidgets = new[] { Kentico.Content.Web.Mvc.SystemComponentIdentifiers.FORM_WIDGET_IDENTIFIER,
                                        "LearningKit.Widgets.NumberWidget",
                                        "LearningKit.Widgets.SomeOtherWidget" },
                AllowedSections = AllowedComponents.ALL
            };
        }
        @Html.Kentico().EditableArea("limitedArea", optionsLimited)
</div>
When adding a new widget or section to the limited editable areas in the Pages application, editors can now only choose from the set of allowed components. When dragging widgets or sections between areas, the interface visually distinguishes between areas where you can and cannot drop the components.
The component limiting feature is intended as a way to set guidelines for content editors, not as a security measure. When you limit an area, existing instances of widgets and sections placed in the area are not validated or removed.
Identify the locations on your website where you want editors to place widgets. Then define these locations by adding editable areas to the code of the corresponding views. The identifier of each editable area must be a string without white spaces that is unique within the context of the given page:
@using Kentico.PageBuilder.Web.Mvc
@using Kentico.Web.Mvc
<div>
    @await Html.Kentico().EditableAreaAsync("area1")
</div>
You can optionally specify a default section for each area.
- Create an EditableAreaOptions object.
- Set the object’s DefaultSectionIdentifier property to match the identifier of the section which you want to use as default.
- Assign the object as a parameter of the EditableAreaAsync extension method (or its Tag Helper alternative) used to render the given area.
The default section is automatically added into new areas and in cases where an editor removes the last section from an area.
<div>
    @{
        var optionsDefaultSection = new EditableAreaOptions
        {
            DefaultSectionIdentifier = "LearningKit.Sections.Col5050"
        };
    }
    @await Html.Kentico().EditableAreaAsync("areaWithSection", optionsDefaultSection)
</div>
If you do not specify the default section for an area, it uses the default section configured for the entire page builder (either the system’s Default section with a single widget zone, or a custom section assigned when enabling the page builder feature).
Loading page builder scripts and styles
All pages with editable areas must contain scripts and CSS styles required by the page builder and its components. To add these resources to pages, call the following extension methods (or their Tag Helper alternatives) in your views:
Html.Kentico().PageBuilderScripts – renders required script tags and script file links. Call before the closing </body> tag of the page code.
Html.Kentico().PageBuilderStyles – renders links for the required stylesheet files. Call within the <head> tag of the page code.
  @using Kentico.Web.Mvc
  @using Kentico.PageBuilder.Web.Mvc

  <html>
  <head>
      ...
      @Html.Kentico().PageBuilderStyles()
  </head>
  <body>
      ...
      @Html.Kentico().PageBuilderScripts()
  </body>
  </html>
For views with an assigned layout, we recommend using Razor sections. Sections allow you to call the methods in the appropriate part of the overall page code, but only for pages that contain editable areas.
The helpers include scripts and styles used in the system’s editing interface, as well as those of individual page builder components (widgets, sections, inline property editors, page templates). See the linked documentation to learn how to correctly add custom scripts and styles for your own components.
Replacing default jQuery libraries
By default, the system links two jQuery bundles used in the form and page builder and their default components: jquery-3.5.1.js and jquery.unobtrusive-ajax.js (not to be confused with the jquery.validate.unobtrusive.js library).
You can disable the use of jQuery for the form and page builder by setting the CMSBuilderScriptsIncludeJQuery key to false in the configuration file of your live site project (appsettings.json or web.config). All default features remain functional without jQuery.
If you wish to use jQuery, but require a different version, specify the path to your custom jQuery bundles via the FormBuilderBundlesOptions options object. See Replacing the default jQuery libraries used by the form builder for more information.
After adding editable areas to views and ensuring that the pages contain the required scripts and styles, you can see the page builder with the editable areas in the Pages application.
Limiting components allowed in an editable area
You can define widget restrictions for certain areas. To limit which components (widgets or sections) can be added to a specific area:
- Create an EditableAreaOptions object.
- Assign a list of strings to the object’s AllowedWidgets and/or AllowedSections property.
- The strings must contain the identifiers of components you want to allow in the area (see Developing widgets and Developing page builder sections to learn more about component identifiers). For identifiers of the default system widgets, check the system widget reference.
- Assign the EditableAreaOptions object as a parameter of the EditableAreaAsync extension method used to render the given area.
The allowed components parameters work as a whitelist – you list the components that you want to allow in the editable area, and all others are automatically excluded. When allowed components are not specified, all registered components can be added to the area. You can also set the properties to the following special values:
- AllowedComponents.ALL – all components are allowed within the editable area.
- AllowedComponents.NONE – no components are allowed within the editable area (equivalent to an empty list of identifiers).
- Use the NONE option when limiting sections – this “locks in” the default section for the given area and completely prevents editors from adding further sections of any type.
Tip: Prepare the identifiers of allowed components as a string array, and then assign the array to the appropriate property of the EditableAreaOptions object.
<div>
    @{
        var optionsLimited = new EditableAreaOptions
        {
            AllowedWidgets = new[] { "LearningKit.Widgets.NumberWidget",
                                     "LearningKit.Widgets.SomeOtherWidget" },
            AllowedSections = AllowedComponents.ALL
        };
    }
    @await Html.Kentico().EditableAreaAsync("limitedArea", optionsLimited)
</div>
When adding a new widget or section to the limited editable areas in the Pages application, editors can now only choose from the set of allowed components. When dragging widgets or sections between areas, the interface visually distinguishes between areas where you can and cannot drop the components.
The component limiting feature is intended as a way to set guidelines for content editors, not as a security measure. When you limit an area, existing instances of widgets and sections placed in the area are not validated or removed.
Widget zone restrictions
Editable area restrictions of widgets are combined with any widget restrictions set for individual widget zones. Both sets of restrictions apply to create the final list of allowed widgets for the zone.
Accessing the page builder configuration of the current page
You can access the page builder configuration of the current page via the IPageBuilderDataContextRetriever service and its Retrieve method. The method returns an IPageBuilderDataContext object that contains the configuration in its Configuration property.
The configuration is stored in the following nested structure:
- Page – The root of the configuration
- EditableAreas – contains a list of all editable areas on the page
- Sections – contains section properties and all widget zones held within
- Zones – contains the identifier of the zone and a list of all widgets held within
- Widgets – contains widget metadata (the widget’s identifier, type, personalization variants, etc.)
- Zones – contains the identifier of the zone and a list of all widgets held within
- Sections – contains section properties and all widget zones held within
- EditableAreas – contains a list of all editable areas on the page
- PageTemplate – contains page template metadata (the template’s identifier and properties)
You can use the configuration if you wish to develop components that react to the presence of other components on the page.
Checking for rendering context
To check whether the currently processed component is being rendered on the live site or in the Pages application in the Xperience administration, use the EditMode property of the IPageBuilderDataContext object.
// Stores an instance of the IPageBuilderDataContextRetriever service (e.g., obtained using dependency injection)
private readonly IPageBuilderDataContextRetriever pageBuilderDataContext;

if (pageBuilderDataContext.Retrieve().EditMode)
{
    // Targeted custom logic
}