
Registering an instance in KIM
When you install a new Xperience instance on a machine, it is automatically registered within Kentico Xperience Installation Manager. In some cases though, you may need to register instances manually. For example, if you transfer or copy an instance onto the machine without going through the installation.
Registering an instance in KIM
Requirements:
- KIM is compatible with Xperience instances starting from the previous major version. For example, you can register instances of Kentico 12 or Xperience 13 in KIM 13.
- You can only register complete web projects that use the standard folder structure (including the solution file, CMS and Lib sub-folders etc.). For example, you cannot add deployments of the CMS folder as instances in KIM.
Click Register on the main toolbar.

Enter the following details:
- Name – identifying name of the instance displayed in the Name column in the list of instances.
- URL – the URL under which the instance is accessible.
- Physical path – path to the instance’s web project root folder in the file system.
- Show site selection after clicking Browse – if enabled, the tool displays a dialog containing all running sites stored in the instance’s database after clicking the Browse button (useful for multi-site instances or for MVC sites that run under a different presentation URL).
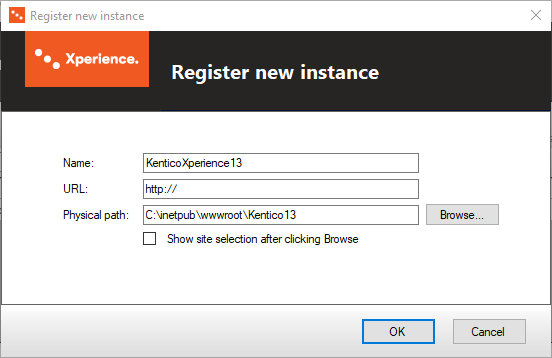
Click OK.
The KIM registers your instance and displays it in the list of managed instances.
Where is the information stored
Information about registered instances is stored in c:\ProgramData\KIM\kim.xml. The root <sites> element contains <item> elements that represent individual registered instances. The <item> elements have the following sub-elements representing properties of the registered instances:
- <guid> – unique identifier of the instance (not related to the application GUID in the web.config file of the given instance).
- <url> – URL under which the instance is accessible.
- <name> – identifying name of the instance displayed in the Name column in the list of instances.
- <version> – version of Kentico Xperience.
- <path> – path to the instance’s web project root folder in the file system.
- <created> – date and time when the instance was registered in Kentico Xperience Installation Manager.
- <hotfix> – number of the latest hotfix applied to the instance.
- <showlist> - indicates if a dialog box with available sites on the given instance is displayed after clicking the Browse button.
<?xml version="1.0"?>
<sites>
  <item>
    <guid>6085ee02-8fff-4978-abd1-1a0261a57724</guid>
    <url>http://localhost/Xperience13/</url>
    <name>Xperience13</name>
    <version>13.0</version>
    <path>C:\inetpub\wwwroot\XperienceSite</path>
    <created>2018-12-24T08:26:39</created>
    <hotfix>0</hotfix>
    <showlist>1</showlist>
  </item>
  ...
</sites>