Scheduling custom tasks
The process of scheduling a custom task includes:
- Configuring your local environment for scheduled task development
- Writing the code that performs the required actions
- Creating a new scheduled task in the Xperience administration interface
Configuring your local environment
Before you start developing scheduled tasks in your local environment, you must configure the scheduler to call the appropriate URLs when processing tasks from the system.
If you locally host the live site and administration applications without using a specific port, follow the steps described in Domain names for local development to configure either a domain alias or a Project URL. However, if the live site or administration applications in your local environment run on specific ports (e.g., when launched using IIS Express), you must set the following configuration keys for your applications:
Add the following configuration keys to the web.config file of the administration application. As the key’s values, enter the full local URLs of both the administration and live site application, including the port and virtual directory path (if present):
Administration application - web.config<appSettings> ... <!-- Sets the URL for the administration application that gets used by the scheduler --> <add key="CMSSchedulerAdministrationUrl" value="http://localhost:3000" /> <!-- Sets the URL for the live site application that gets used by the scheduler --> <add key="CMSSchedulerPresentationUrl" value="http://localhost:5000" /> ... </appSettings>The administration interface needs to have the live site URL available due to the ability to manually launch any scheduled task via the Scheduled tasks application.
Add the following key to the configuration file in the live site application. As the key’s value, enter the full local URL of the live site application, including the port and virtual directory path (if present):
Live site application - appsettings.json"CMSSchedulerPresentationUrl": "http://localhost:5000",Live site application - web.config<add key="CMSSchedulerPresentationUrl" value="http://localhost:5000" />
The scheduler is now configured for local development.
Writing the task code
You need to define each scheduled task as a class that implements the CMS.Scheduler.ITask interface.
Add the class as part of a custom assembly (Class Library project), and include the assembly into the appropriate solution. Depending on where you plan to execute the task, add the assembly to the Xperience administration application, the live site application, or both.
Preparing a custom assembly
Prepare a separate project for custom classes in your Xperience solution (or use an existing one):
- Open your Xperience solution in Visual Studio.
- Create a new Class Library project in the solution.
- The assembly in the example is named Custom, but you can use any other name (e.g. with a unique company prefix).
- Add the Xperience API libraries to the project:
- Right-click the solution in the Solution Explorer and select Manage NuGet Packages for Solution.
- Select the Kentico.Xperience.Libraries package.
- Install the package into the project (the version must match your MVC project’s Kentico.Xperience.AspNet.Mvc5 package and the exact hotfix version of your Xperience administration project).
- Reference the project from the main web application (live site or administration).
Defining the scheduled task class
Create a new class under your custom project. For example, name the class CustomTask.cs.
Edit the class and add using statements for the following namespaces:
 using CMS.Core;
 using CMS.Scheduler;
Make the class implement the ITask interface.
public class CustomTask : ITaskDefine the Execute method in the class:
 public class CustomTask : ITask
 {
     /// <summary>
     /// Executes the task.
     /// </summary>
     /// <param name="ti">Info object representing the scheduled task</param>
     public string Execute(TaskInfo ti)
     {
         string details = "Custom scheduled task executed. Task data: " + ti.TaskData;

         // Logs the execution of the task in the event log
         Service.Resolve<IEventLogService>().LogInformation("CustomTask", "Execute", details);

         // Returns a null value to indicate that the task executed successfully
         // Return an error message string with details in cases where the execution fails
         return null;
     }
 }
Save all changes and Rebuild your solution.
You must always include the Execute method when writing scheduled tasks. The system calls this method whenever the given task is executed, so it needs to contain all code implementing the required functionality.
In this example, the task only creates a record in the application’s event log so that you can confirm it is being executed:
- The TaskInfo parameter of the method allows you to access the data fields of the corresponding scheduled task object. The sample code adds the content of the TaskData field into the details of the event log entry.
- The string returned by the method is displayed in the administration interface as the result of the task’s most recent execution. You can leave it as null in this case.
Creating new scheduled tasks
- Sign in to the Xperience administration interface.
- Open the Scheduled tasks application.
- Select the Site for which you wish to schedule the task (or (global) if you want the task to run for all sites or affect global objects).
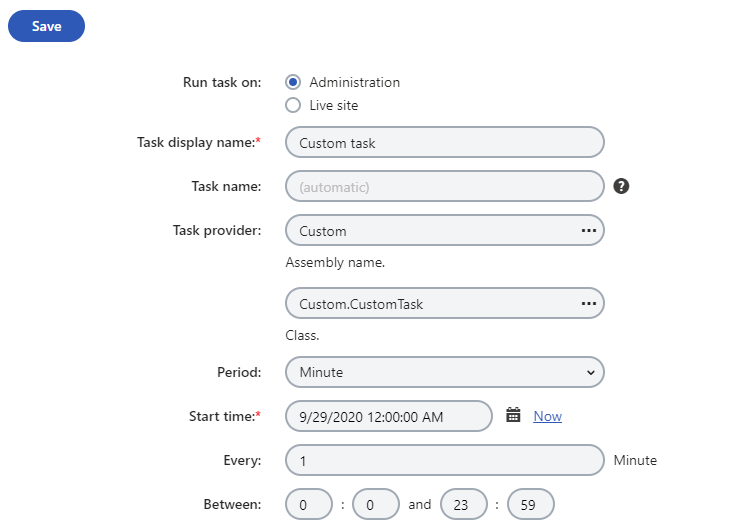
- Click New task and fill in the properties of the task.

- Click Save.
The system now executes the task regularly according to the specified interval.
Result
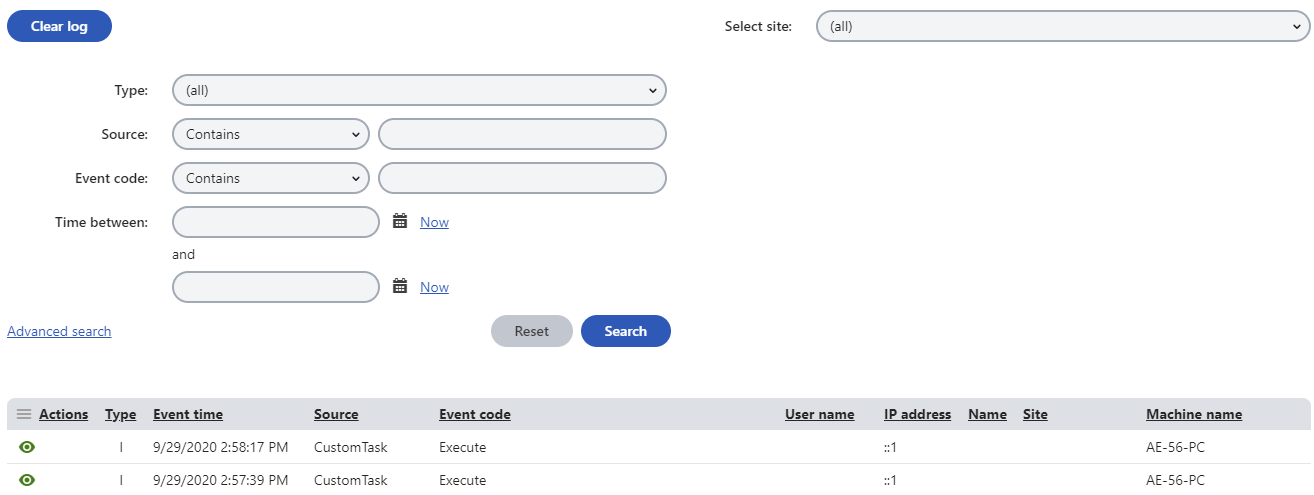
To check the result of this sample custom task, open the Event log application and look for entries with CustomTask as the Source.
