
Example - Integration connector
The default installation of Xperience provides a sample integration connector. The connector implements two subscriptions for outgoing tasks:
- Synchronization of user objects
- Synchronization of all pages on all websites in the system
The connector’s purpose is purely demonstrative – it only logs events in the Event log whenever a user object or a page is created, modified or deleted in the system.
Adding the sample connector to your project
Open your Xperience solution in Visual Studio.
Create a new Class Library project in the solution (or reuse an existing custom project).
- The assembly in the example is named Custom, but you can use any other name (e.g. with a unique company prefix).
Add references to the Kentico Xperience libraries:
- Right-click the custom project and select Add reference…
- Click Browse…
- Add references to the following libraries in the Xperience project’s Lib directory:
- CMS.Base.dll
- CMS.Core.dll
- CMS.DataEngine.dll
- CMS.DocumentEngine.dll
- CMS.EventLog.dll
- CMS.Membership.dll
- CMS.Synchronization.dll
- CMS.SynchronizationEngine.dll
Reference the custom class library project from the Kentico Xperience project.
Open the installation directory of your Kentico Xperience setup files (by default C:\Program Files (x86)\Kentico\<version>).
Expand the CodeSamples\CustomizationSamples\Classes\ sub-directory.
Copy the SampleIntegrationConnector.cs file into your custom project’s folder.
In Visual Studio, click Show all files at the top of the Solution Explorer.
Right-click the new file and select Include in Project.
Save all changes and Rebuild the solution.
Viewing the connector code
Open the added SampleIntegrationConnector.cs class to see how the sample connector is implemented:
public class SampleIntegrationConnector : BaseIntegrationConnector
{
    #region "Initialization (subscribing)"

    /// <summary>
    /// Initializes the connector name and registers subscriptions.
    /// </summary>
    public override void Init()
    {
        // Initializes the connector name (must match the code name of the connector object in the system)
        ConnectorName = GetType().Name;

        // Creates subscription for all user objects (predefined method)
        SubscribeToObjects(TaskProcessTypeEnum.AsyncSnapshot, UserInfo.OBJECT_TYPE);

        // Create subscription for all pages on all sites (predefined method)
        SubscribeToAllDocuments(TaskProcessTypeEnum.AsyncSimpleSnapshot, TaskTypeEnum.All);

        // Demonstrates how to create subscriptions manually
        // ObjectIntegrationSubscription objSubscription = new ObjectIntegrationSubscription(ConnectorName, TaskProcessTypeEnum.AsyncSnapshot, TaskTypeEnum.All, null, PredefinedObjectType.USER, null);
        // SubscribeTo(objSubscription);

        // DocumentIntegrationSubscription pageSubscription = new DocumentIntegrationSubscription(ConnectorName, TaskProcessTypeEnum.AsyncSimpleSnapshot, TaskTypeEnum.All, null, null, null, null);
        // SubscribeTo(pageSubscription);
    }

...
To be functional, every connector must have the ConnectorName property initialized in the Init() method. The value must match the code name of the connector object registered in the system. The sample connector uses the name of the ConnectorName – SampleIntegrationConnector.
Registering the connector
Open the Integration bus application in the Xperience administration interface.
Select the Connectors tab.
Click New connector.
Fill in the following properties:
- Display name: Sample integration connector
- Provider class - Assembly name: Custom (the name of the assembly containing your connector class)
- Provider class - Class: SampleIntegrationConnector
- Enabled: Yes (selected)
Click Save.
Testing the connector
Open the Settings application.
Select the Integration -> Integration bus category.
Adjust the settings as follows:
- Enable system integration bus: Yes (selected)
- Enable logging of outgoing tasks: Yes (selected)
- Enable processing of outgoing tasks: No (cleared)
The sample connector only generates outgoing tasks, so you can leave the handling of incoming tasks disabled. Disabling processing of outgoing tasks allows you to see the integration tasks in the user interface. If you enable processing, the system executes the tasks immediately, and you only see the results in the event log.
Click Save.
Try creating and modifying some pages and user accounts.
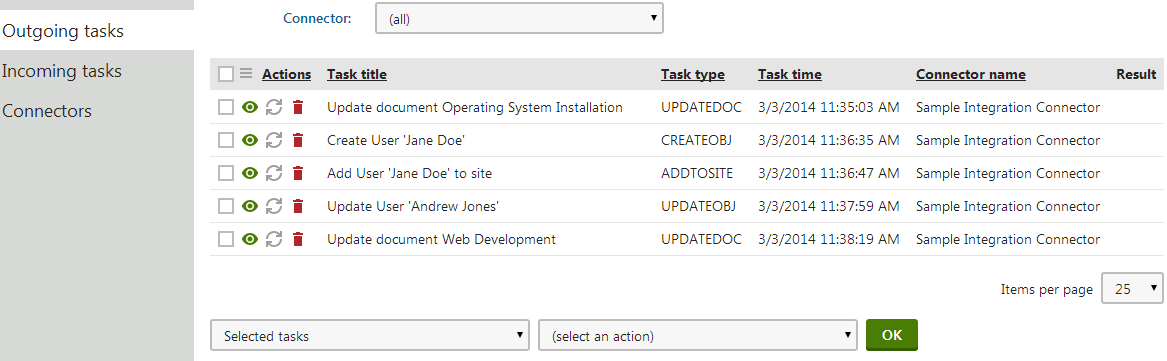
Open the Integration bus application. On the Outgoing tasks tab, you can see a list of tasks logged for your actions. The Synchronize () action is grayed out since processing of tasks is disabled in the system settings.
Go back to Settings -> Integration -> Integration bus, check Enable processing of outgoing tasks and click Save.
Return to Integration bus -> Outgoing tasks. The Synchronize () action is now enabled.
To execute all tasks:
- Select All tasks in the first selector below the list.
- Choose the Synchronize action.
- Click OK.
You can see the events logged by the integration tasks in the Event log application.
