
Using the Rich text widget
The Rich text widget is provided in Xperience by default. It allows content editors to add stylized text content to pages that use the page builder. The Rich text widget can be found only when editing pages in the Pages application on the Page tab.
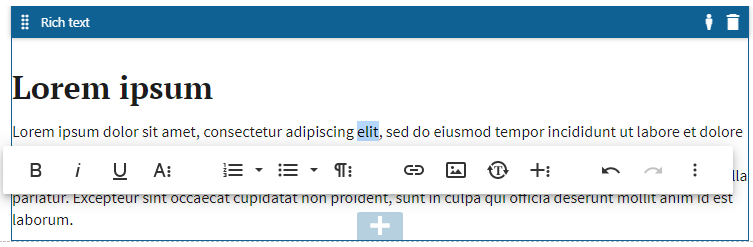
The toolbar of the Rich text widget is completely customizable with regards to its layout and functionality. It is possible that some functionality and buttons are not present in your project and the toolbar appearance is different than the screenshot on this page.
More editing options
The toolbar can be configured to include buttons that trigger an additional pop-up toolbar. Some functionality is therefore grouped under a single button. For example, subscript, superscript, text color, and other buttons are grouped under the More text button in the default implementation of the toolbar. Look for icons containing the More
 sign.
sign.
Inserting dynamic text
You can add personalized text to the widget by using the Dynamic text button. The following types of dynamic text are available:
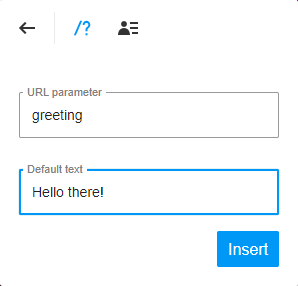
URL parameter
This option allows you to customize the text based on the value of a URL parameter (the parameter must be present in the URL when the page is displayed).
- Click on the Dynamic textbutton and select the URL parameter
 tab.
tab. - Fill in the form:
- URL parameter – the value of this parameter will be used in place of the dynamic text.
- Default text – if the URL parameter is not provided, this text will be displayed.
- Click Insert.
To see the result, navigate to the live site page and add a URL query string parameter to the URL of the page, for example: www.example.com/some-page?greeting=Hello
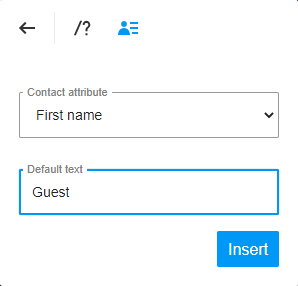
Contact attribute
This option allows you to include a personalized piece of text based on information about the current contact.
- Click on the Dynamic Textbutton and select the Contact attribute
 tab.
tab. - Fill in the form:
- Contact attribute – select a contact attribute that will be displayed (such as the email address, names, etc.).
- Default text – if the information about the current visitor is unknown, this text will be displayed instead.
Inserting images
To insert images into the content of the widget, click the Insert Image  button. You can select images from one of the following locations:
- Media – media files located in one of the site’s media libraries.
- Attachments – files attached to the page.
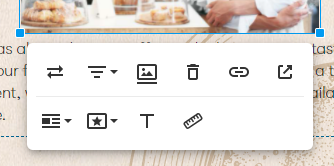
Once an image is added to the content, you can select it and modify its properties. For example, you can add a link or set alternative text for the image.
Automatically generated image alternative text
Appropriate alternative text values for images in your content improve the website’s accessibility and SEO capability. To help content editors set these values, you can ask your project administrators or developers to configure automatic generating of alternative text for images. This feature uses image recognition logic to provide alternative text in cases where it is not added manually.
For technical information about the image recognition, see Settings - Cognitive Services.
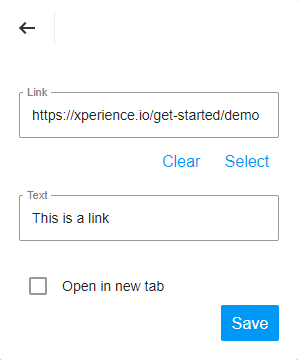
Inserting links
To insert links into the content of the widget, click the Insert Link button. You can either directly paste a URL to an external resource or you can click the Select button and use one of the following options:
- Pages – link to a page within the site’s content tree.
- Media – link to a media file located in one of the site’s media libraries.
- Attachments – link to a file attached to the page.
To remove the currently selected file or page from the selector, click the Clear button.
Example – Inserting links
Look at this short video to see how to link a page using the Rich text widget (demonstrated on our sample site):
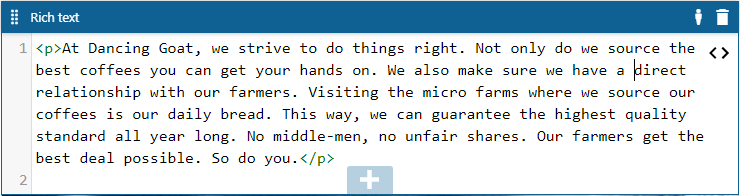
Displaying HTML source code
You can view and edit the HTML code of the content displayed by the Rich text widget, by clicking the Code View button. The code view button is located under the More misc button in the default implementation of the toolbar. To close the code view, click the code view button on the right side of the widget.
Be aware that any erroneous changes will result in invalid HTML in the output of the widget.
HTML sanitization
The rich text editor sanitizes the content’s HTML code, i.e., removes tags or attributes that can represent a security threat. This may in some cases modify or break your HTML code, for example when adding content via the editor’s Code View option.
To learn which HTML tags and attributes are allowed, see the default options described in HtmlSanitizer. After applying hotfix 13.0.92 or newer, the editor additionally allows ID and data-* attributes.