
Editing the content of multilingual websites
After a site administrator has specified cultures for a website, content editors can begin to translate page content directly or assign translation tasks to translation services.
When you open the Pages application on a multilingual website, you can see the language selector below the content tree. Use the selector to switch between language versions of the currently selected page.
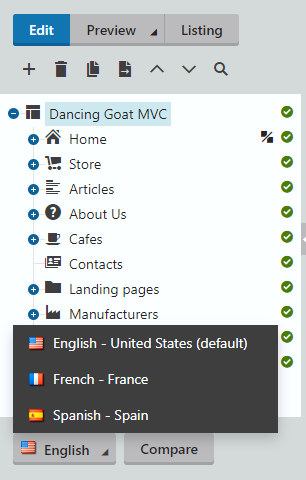
You can also click Compare to edit language versions side-by-side.
Creating multiple language versions of pages
The following example shows how to manually translate a page into the French language:
Open the Pages application.
Select the root page in the content tree and switch to the French culture. Since the French version of the page does not exist yet, you can create it through one of the following ways:
- Create empty page – creates a new page of the same type, but without any content.
- Copy content from another language – creates a copy of the page with content loaded from the selected language version. If Save the new page before editing is selected, the system adds the new page version and immediately saves the copied content.
- Translate using translation service – with this option, the content of the page’s new language version will be provided by an external translation service. See the Translating content using external services chapter to learn more.
Choose to Copy content from another language.
Select English - United States.
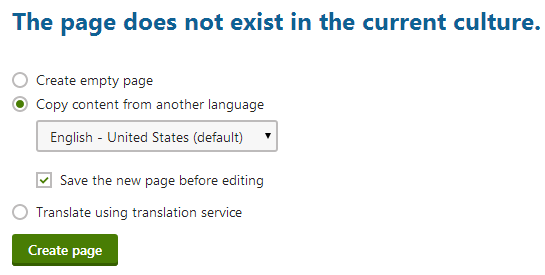
Click Create page.
The French version of the root page has now been created. You can now translate other pages on the website:
- Choose a page in the content tree (for example the Home page on the sample Dancing Goat MVC site).
- Select Copy content from another language, but this time disable the Save the new page before editing option.
- Click Create page.
- The editing form of the new page version opens. Change the Page name to: French Home
- Click Save.
- On the Page tab, adjust or translate the text within the widget content (for example, the sub-title text of the Banner widget on the sample Dancing Goat MVC site).
- Click Save.
You can modify the content or configuration of a page’s widgets on the Page tab to be different for each language version. It is also possible to translate content entered into the page’s fields on the Content tab, and even assign culture specific values for many of the page’s Properties.
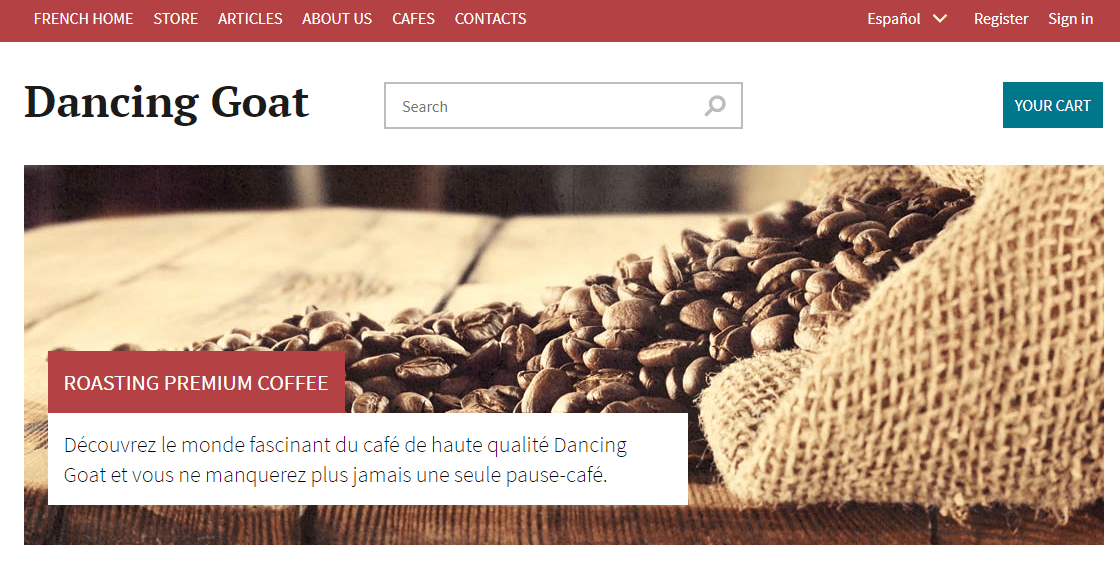
If you view the page on the live site, you can see the French version. On the sample Dancing Goat site, you can switch between languages using the language selection links at the top right of the website header.
Creating content for another language
When adding a new language to the website, always create a language version for at least the root page and the default home page. Otherwise, the system cannot display the site correctly.
In the Pages application, the content tree displays the Not translated page ( ) status icon next to pages that do not exist in the selected culture.
Using the default language version for untranslated pages
You can configure websites to display content from the default language for pages that are not available in the selected language.
- Open the Settings application in the Xperience administration interface.
- Select the Content category.
- Choose your Site from the drop-down list and enable the Combine with default culture setting.
- Click Save.
Note: To use the default language version for untranslated pages, your developers need to use the CombineWithDefaultCulture method of the DocumentQuery API when retrieving the pages from the database.
Now you can sign out and view the French version of the live website again. Pages that are not available in French are displayed in the default culture (English).