
Create and edit forms
You can create new forms in the Forms application:
- Open the Formsapplication.
- Select New form.
The system creates a new form and opens the Form Builder.
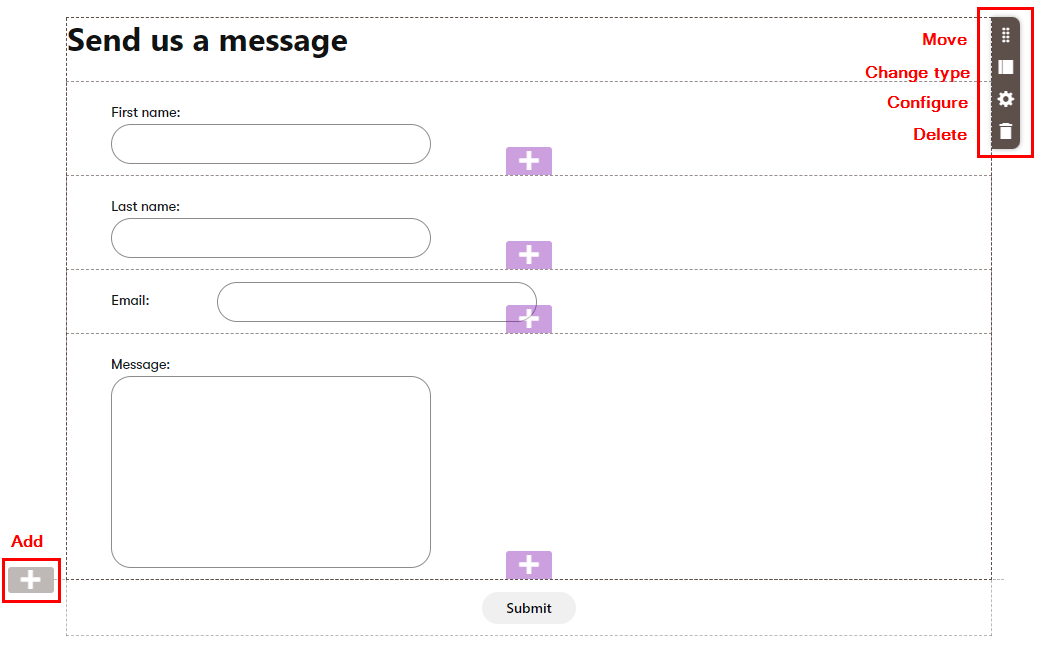
Form Builder is a graphical interface for designing forms in Xperience. Editors modify the overall form layout, add various types of fields, and adjust their position in the form. The resulting form appears as it will display on the live site.

Using Form Builder, editors can:
- Set form layout
- Add fields
- Move and reorder fields
- Delete fields
- Set the submit button text
- Configure form properties and behavior
- Actions after form submission
In addition to the Form Builder interface, the options panel on the right can be used to:
- Access form submissions collected from users
- Configure general form properties and behavior
- Choose actions that occur after the form is submitted
Set form layout
The layout of a form is composed of sections. Each section contains one or more zones to which you can add fields.
The system provides a Default section that organizes fields in a basic single-column layout. The project’s developers may prepare additional types of sections that allow you to create more advanced form layouts.
To edit the layout of a form, add or adjust sections using gray UI elements:
- Add section – select a gray plus button located on the left to insert a new section. The list of available section types depends on the implementation of your project.
- Move section – hover over a section and drag it by the handle among the section buttons on the right.
- Change section type – you can change the type of a section to adjust the form’s layout. Hover over the section you want to modify, select the Change section type button, and select the section type you wish to use.
- Configure section – opens a dialog where you can set values for properties that affect the content, appearance, or behavior of the section. The Configure button is only available for sections with configurable properties. Check with your project’s administrators or developers for more information about the available section types and their properties.
- Delete section – hover over the section you want to remove and select the delete button on the right. This also deletes all form fields in the section, which can lead to a loss of data in existing forms.
Changes made to sections are saved automatically. After creating the required form layout through sections, you can move fields between the resulting zones.
Add fields
Select the purple plus buttons in the form editing area to add new fields. The Fields dialog opens, which allows you to add fields from two categories:
- Featured – offers fields frequently included in forms, preconfigured for easy and quick use. Many featured fields automatically map the submitted information to the contact representing the visitor in the system (for visitors who give consent). See the contact attribute mapping section for more details.
- New field – allows editors to select a basic field type and configure the field from scratch. Information collected by these fields is not automatically used by the system (unless configured otherwise), but can be accessed in the form’s submissions.
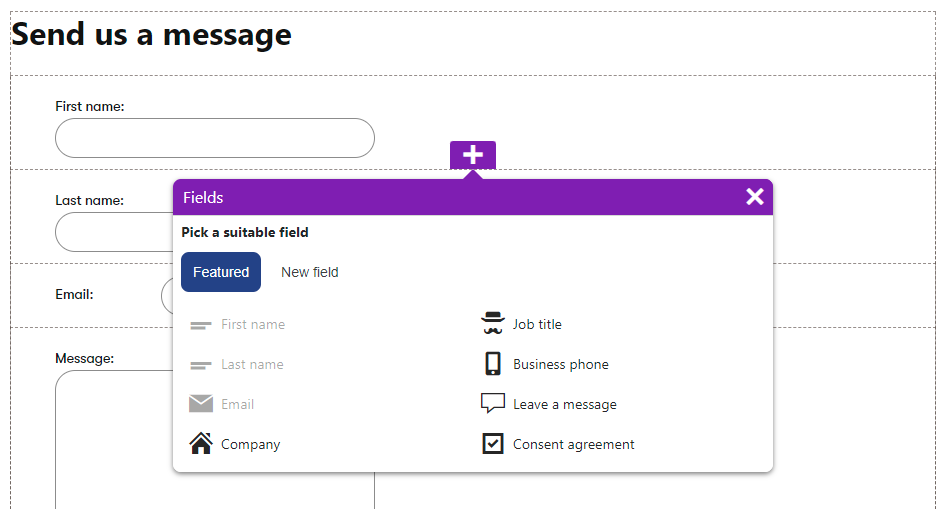
The form saves automatically each time a new field is added.
After creating a new field, we recommend setting an appropriate Name property based on the field’s purpose. By default, the Name is generated based on the type of the selected field type. Changing the value later once the form starts collecting data can be problematic.
See Field properties for details.
Hide featured fields
If any of the featured fields are not relevant for your forms, you can hide them from the Fields dialog that appears when adding new form fields:
- Switch to the Featured fields tab in the left-side navigation menu of the Forms application.
- Toggle the Visibility in forms switcher for the corresponding featured fields.
Field properties
Fields in the form are configurable. You can change a field’s label, tooltip, default value, and other properties depending on the field type via the properties dialog.
- Select the field you wish to configure.
- Open the properties dialog by selecting configure ().

- Select Apply to save your changes.
You can configure fields to behave as “smart fields,” which means they are only displayed on repeated views of a form as a replacement for other fields that the visitor has already filled in. For more information, see Use smart fields in forms.
Map form submission to contact attributes
Xperience can use the information collected via forms to update contacts representing website visitors in the system. If a visitor submits a form, the system automatically transfers the entered values into the data of a matching contact (for visitors who give consent). You can also use the same approach to update the data of existing contacts when a visitor provides new information.
Mapping links a form field to a specific contact attribute. You control how form fields are mapped via the Mapped to contact attribute field property.
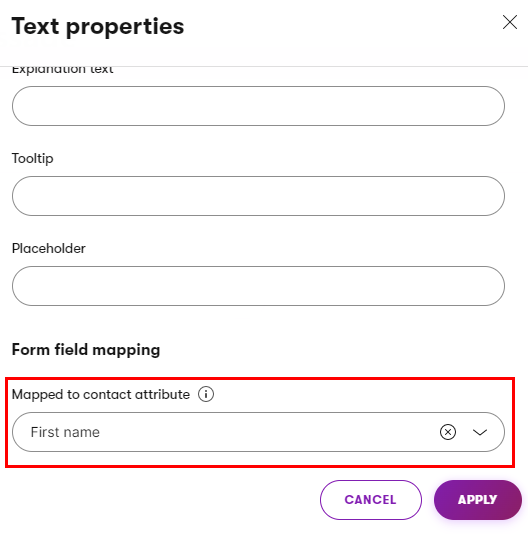
For example, if the form has a field where users enter their email address, you can choose this field for the Email contact attribute. When a user submits the form, the system automatically saves the field’s value as the email address of the contact representing the given user.
Contact mapping and featured fields
Certain featured fields are preconfigured to map to the corresponding contact attribute (e.g., First name, Last name, Email). The mapping can be changed. You can view a modify the field’s configuration using the properties dialog.
Contact segmentation
You can use forms to segment your contacts. For example, you can build a contact group for visitors who have submitted the Contact Us form.

Move and reorder fields
To change the order of existing fields or move them between different zones in the form layout:
- Select a field in the form.
- Drag the field by the handle () or the header that appears when you select a field.
Delete fields
To delete fields from the form:
Removing fields from forms with existing submissions
Removing a field from forms with existing submissions also deletes all data the field gathered over its lifetime.
- Select the field you wish to remove.
- Select the delete () icon in the upper right.
- Confirm the removal via the popup dialog.
Set the submit button text
Every form contains a button that allows users to submit the entered data. The submit button is positioned at the bottom of the form and cannot be moved.
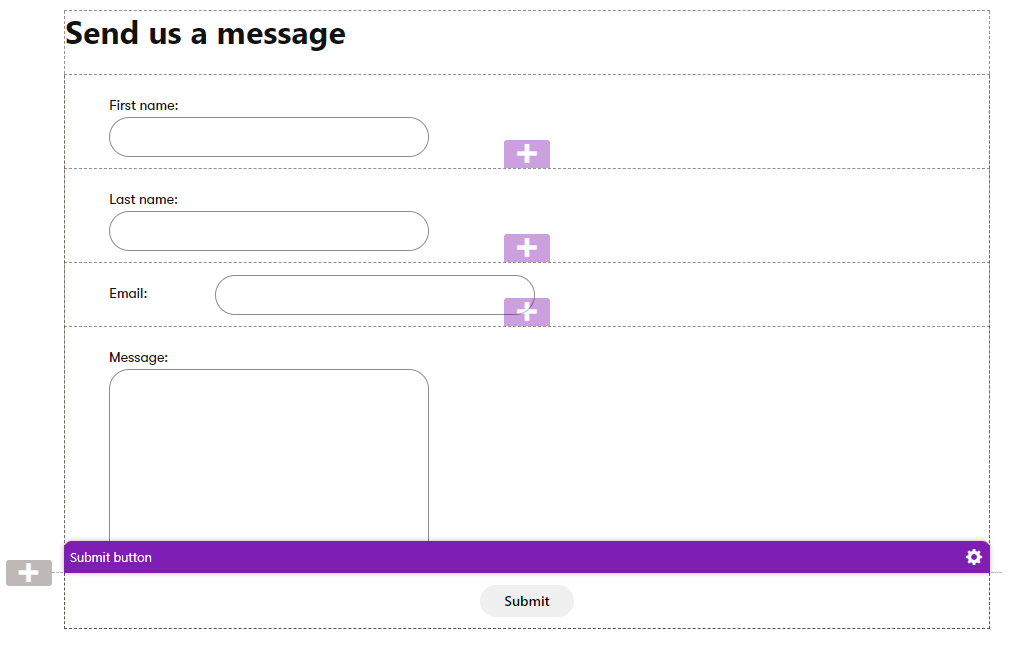
The Form Builder allows editors to change the text of the submit button’s label:
- Hover over the submit button at the bottom of the form.
- Open the button’s properties dialog by selecting configure ().
- Enter the desired text into the Submit button text property.
- Select Apply to save the change.
Configure form properties and behavior
After you create a form or when editing an existing form, you can define the following properties by selecting General in the options panel on the right:
Property | Description |
Form name | Used in the administration and when adding forms to pages via the Forms widget. New forms have an automatically generated name based on the current date and time, for example: Form (2022-12-02_12:00) |
Code name | An identifier of the form. Used internally by the system and by developers. Changes of the form code name will break existing forms placed onto pages via the Form widget. You need to reselect the form in these widgets after the change. |
Table name | The database table storing the collected submissions. Used by developers. |
Class name | A globally unique identifier of the form. Used by developers. The class name is updated automatically whenever the form’s code name is changed. Such changes break any existing code files generated for the form. Developers need to update or regenerate the code. |
Overwrite existing contact information with submitted data | If selected, form submissions by known contacts update already collected contact information. If disabled, only empty contact attributes are filled. |
Select Save to confirm any changes.
Actions after form submission
There are several possible actions that can occur after a user submits a form on the live site – Display text, Redirect to page, Redirect to URL. The action is configured when placing individual forms onto a website channel page.
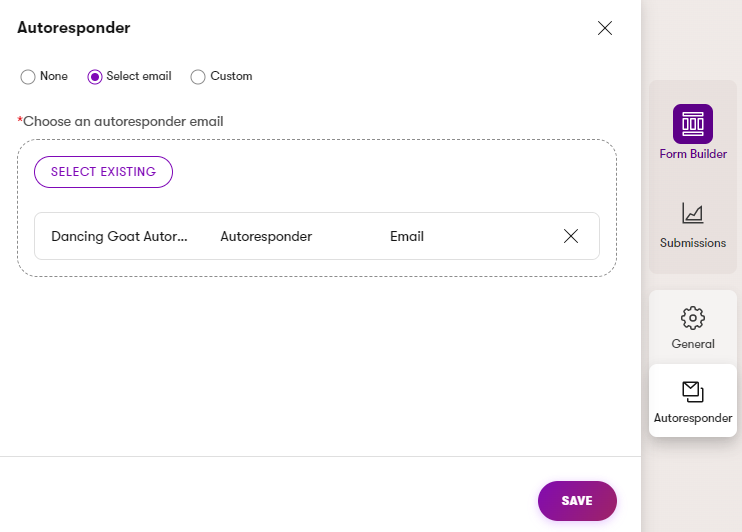
Additionally, you can enable the autoresponder, which automatically sends an email message to every user who submits the form. When editing a form in the Forms application, select Autoresponder in the options panel on the right.
- Select email – sends an email prepared in an email channel application in the Xperience administration. This option is recommended for most scenarios. See Emails for more information.
- Custom – for scenarios that require advanced or dynamic autoresponder content. Sends a custom autoresponder email prepared by developers, with any required content, including values that the user entered into the form. Note that the system does not track statistics for custom form autoresponder emails.
Email field requirement
To send autoresponder emails, the form must contain a field that allows users to submit their email address. The autoresponder can only be enabled if a form field is mapped to the Email contact attribute in the Form Builder.
Select Save to confirm any changes.