
Artificial intelligence features
Preview feature
AI features are currently in preview mode. Expect the features to be updated and modified in upcoming versions, including breaking changes.
Feel free to try out the AI features, for example using the sample Dancing Goat project template or other demo sites. Share your feedback with the Kentico Product team.
Generative artificial intelligence can increase the productivity of content editors, marketers and copywriters by providing content drafts and suggestions. Xperience by Kentico provides an integration with Azure OpenAI Service, using the Chat GPT (GPT-3.5) language model.
The integration provides AI features that allow users to:
Privacy and data protection
All data processed by the AI features is commercially protected.
Neither Kentico nor the underlying language model retain the prompts or responses that are generated when using the AI features. The data is discarded after each interaction with the AI features, so it can’t be used as part of a training set for the underlying language model.
Get access to the AI features
The AI features are not available by default for self-managed Xperience by Kentico instances. If you are interested, contact your sales representative to obtain a license that provides access to AI features.
AI settings
You can adjust the AI features by configuring the following settings:
- Open the Settings application in Xperience.
- Select the AI category and configure the settings:
- Excluded content types – allows you to simplify the selection of content sources when generating content for email fields. Items of the specified content types (for reusable content) will not be offered. For example, we recommend excluding content types that only store image content without text.
- Tone of voice guidelines – describe your organization’s tone of voice guidelines (professional, simple, humorous, etc.). The AI will use this tone when generating content. If not specified, the AI uses a neutral tone.
- Select Save.
The AI feature settings apply globally for all content types and fields across the system.
Add AI features to your content types
AI features need to be enabled for individual fields of your content types:
- Open the Content types application in Xperience.
- Select a content type.AI features are currently not supported in reusable field schemas.
- On the Fields tab, select which fields will have AI features. You can enable AI features for fields:
- With the Text or Long text data type.
- Using the Rich text editor, Text area, or Text input form component.
- Expand a field and scroll down to the AI features section.
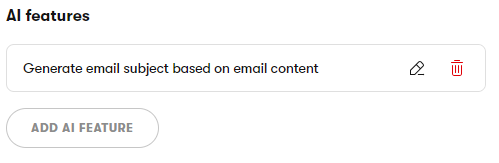
- Select Add AI feature and choose an AI feature:
Generate email content – generates email content based on reusable content items stored in the Content hub, external content specified by web URLs, or a custom description. You can globally configure which content types are available as content sources.
For fields using the Rich text editor form component, the Generate email content feature also automatically enables rich text editor refinements.Generate email subject based on email content – generates email subject suggestions based on the content of other fields. Use for the EmailSubject system field of email content types.
- Select Continue.
- Choose which fields of the content type will serve as the content source. Supported field data types are Text, Long text or Content items. The same data types are supported when loading content from the fields of linked content items. The maximum length of the total source content is 10 000 characters (if exceeded, a warning is displayed to the user and content over the limit is truncated).
- Select Save.
Rich text editor refinements – supported for text fields using the Rich text editor form component. Allows editors to select text and send it to the AI for refinement (make text shorter, improve writing and grammar, etc.).
- Save the field editor.
The selected AI feature is now enabled for the given field. Only one AI feature can be enabled for a single field.
Repeat the process for all fields and content types where you wish to enable the AI features. You can adjust the AI features by configuring settings and then start using rich text editor refinements or generating email content.
Use AI features outside of content types
AI features are not restricted to content types in the Content types application. You can use the same process to enable AI features in other field editors, for example for the fields of a custom object type in the Modules application.
However, keep in mind that the Generate email content and Generate email subject based on email content features optimize the AI prompts to generate email content. Results may be inaccurate if you attempt to generate other types of content.
Rich text editor refinements
When editing Rich text fields that have the Rich text editor refinements or Generate email content AI feature enabled, you can send selected pieces of text to the AI for refinement.
Select a block of text in the editor.
Select the Refine text with AI button, which appears next to the highlighted text.
Choose one of the refinement options (make text shorter, improve spelling and grammar, etc.).
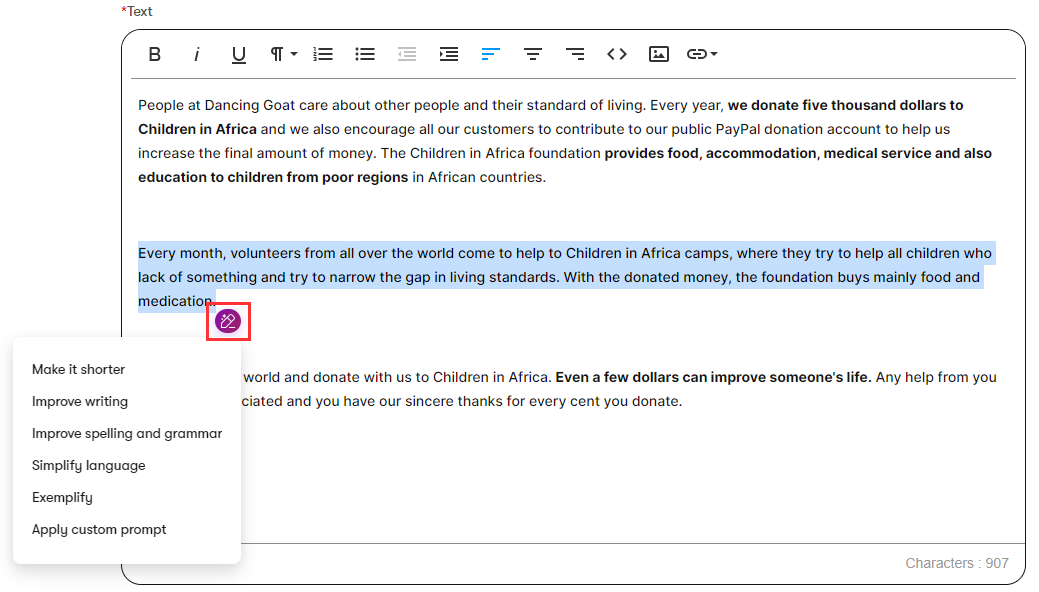
The AI displays a modified version of the selected text based on the chosen refinement option. You can apply further refinements by selecting the buttons below the list. The refinements always apply only to the latest output generated by the AI. You can also describe adjustments yourself by typing into the prompt at the bottom of the AI panel.
Once you are happy with the result, select and copy the text back into the editor. Remember to Save the content.
Generate email content
When creating emails in Xperience, marketers can use AI features to generate content suggestions for email subjects and content fields.
Once AI features are configured for your email content types, you can start generating content.
- Open an email channel application in Xperience.
- Create an email or select an existing one, and open the Content tab.
- Select the AI button next to an email field.
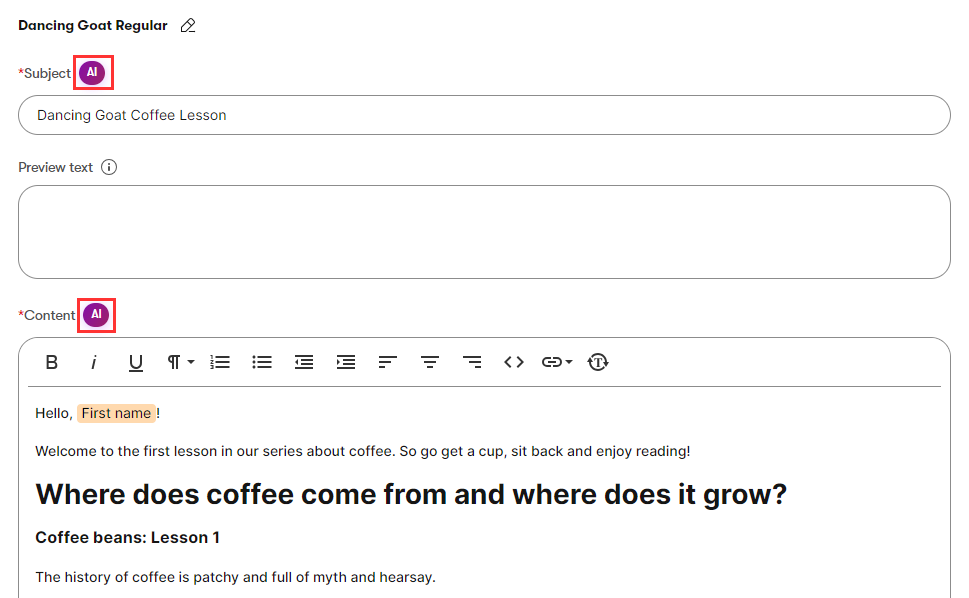
- Continue according to the type of the email field:
Generated content language
The AI generates content in the language that is currently selected in the given application, for example the Content language assigned to an email channel. If content items are not available in the given language when loading source content from the Content hub, the system uses fallbacks based on the configured language settings.
When using the Generate email content AI feature without a language context (for example in the UI of a custom module), content is generated in the system’s Default language.
Email subject fields
The AI generates a list of email subject suggestions based on the content of the fields selected when adding the AI feature.
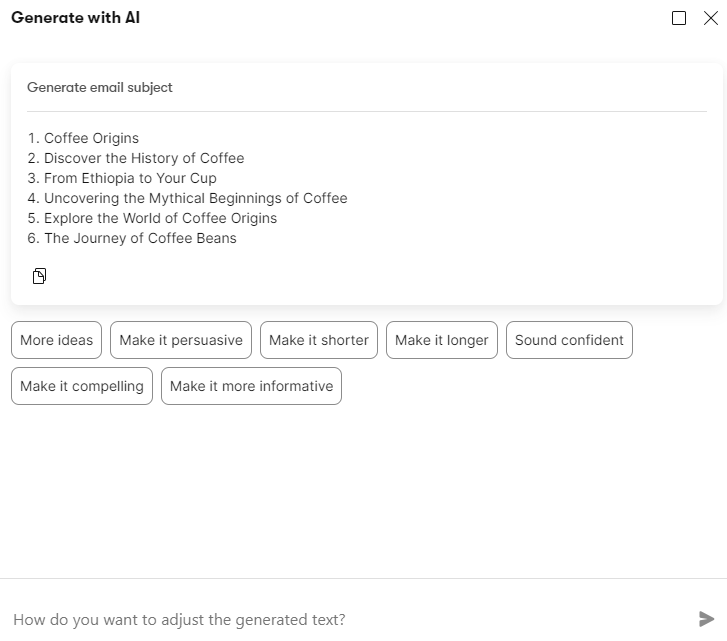
If the initial suggestions are not helpful, you can generate further suggestions by selecting the “quick refinement” buttons below the list. The refinements always apply only to the latest output generated by the AI. You can also describe adjustments yourself by typing into the prompt at the bottom of the AI panel.
Once you find a suitable suggestion for your email subject, you can select and copy the given line, close the AI panel, and paste the text into the email’s Subject field. Remember to Save the email.
Email content fields
In the Generate with AI panel, you first need to select content sources:
- Content hub – content is generated from the text fields of the selected content items (stored in the Content hub), as well as any linked content items. The maximum length of the total source content is 10 000 characters (if exceeded, a warning is displayed and content over the limit is truncated). The system loads the latest edited content (Draft or custom workflow steps) of the specified content items, even if they are not published yet.
- Web URLs – content is generated from external sources found under the specified URLs. Add each URL on a new line.
- Custom description – write your own description of the content you want the AI to generate. To get the best results, specify the maximum length of the generated text, describe the target audience, and what the reader should do after reading the content (call to action).
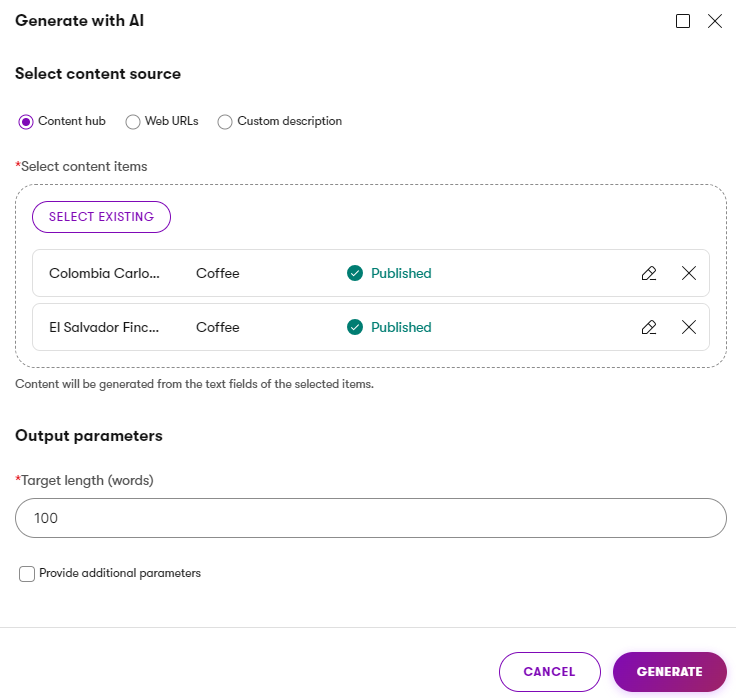
For optimal results when using the Content hub and Web URLs content sources, set the Target length (words) according to your requirements, select Provide additional parameters, and fill in all available options.
Once your content sources and parameters are specified, select Generate, and wait for the AI to produce the results.
You can further refine the generated text using the buttons below the text area. The refinements always apply only to the latest output generated by the AI. You can also describe adjustments yourself by typing into the prompt at the bottom of the AI panel.
Once you are happy with the generated text, select Copy () to add the content into the email field. Remember to Save the email.
For Rich text editor fields, you can also adjust the resulting text at any time using rich text editor refinements.