
Sections for Page Builder
Sections are components that define the layout of widget zones within editable areas. You can define any number of different sections and allow content editors to choose them in the Pages application.
The system provides a built-in Default section containing a single widget zone. If you wish to use more advanced layouts in Page Builder, you need to develop and register your own sections.
Develop sections
On a basic level, Page Builder sections are pieces of HTML output code containing widget zones. You can develop two types of sections:
- Basic sections – define their layout in a single partial view.
- Sections based on a view component – define their logic in an ASP.NET Core view component . Recommended for more complex sections that require non-trivial interactions with the application’s business layer.
In both cases you can develop sections with properties, which allow content editors to adjust the section appearance or behavior directly in the administration interface. For sections with configurable properties, you need to create an additional model class that represents the section properties. For information about this more advanced scenario, see Section properties.
Areas
Sections are designed to be used in the global scope and their code files must be placed in the application root of your Core project (not in an Area). Creating sections in Areas may lead to unexpected behavior.
Example of section development
To see a scenario with full code samples which will guide you through the process of developing a simple section, visit Example - Develop a section with a configurable property.
Basic sections
Use the following process to develop a section:
- Create a partial view with code that defines the required layout.
- Use the
WidgetZoneAsyncextension method (or the method’s<widget-zone />Tag Helper alternative ) to identify locations where widgets can be placed. Every section must contain at least one widget zone – sections without widget zones are not supported. - We recommend storing section views in the ~/Components/Sections/<SectionName> folder, and using a view name that matches the identifier assigned to the section upon its registration prefixed with the underscore (‘_’) character.
- Alternatively, you can use any required view location or name, and then specify it when registering the section.
- Use the
- Register the section into the system. See Register sections.
With this approach, the section’s view is automatically displayed using logic provided by the Xperience API.
The values of any properties defined for the section can be accessed by using the ComponentViewModel<TPropertyModel> class as the model.
You can also use the Page property of ComponentViewModel to access the ID, language, content type and channel information of the page where the section is displayed.
@using Kentico.Web.Mvc
@using Kentico.PageBuilder.Web.Mvc

@model ComponentViewModel<CustomSectionProperties>

@{
    int customNumber = Model.Properties.Number;

    int webPageId = Model.Page.WebPageItemID;
    int languageId = Model.Page.LanguageID
    string languageName = Model.Page.LanguageName;
    int contentTypeId = Model.Page.ContentTypeID;
    string contentTypeName = Model.Page.ContentTypeName;
    int channelId = Model.Page.WebsiteChannelID;
    string channelName = Model.Page.WebsiteChannelName;
}

<div>
    @await Html.Kentico().WidgetZoneAsync()
</div>
Sections based on a view component
The basic implementation of a section consists of only a partial view (and possibly a properties class). You may need additional logic, for example if you need to:
- react to the configuration of the section’s properties
- perform interactions based on the page where the section is rendered
- execute general business logic not suitable for views (e.g., database operations)
For this purpose, you can develop sections based on ASP.NET Core view components. Such sections consist of a view component class and the corresponding partial view it renders.
Implementing a section based on a view component follows this general process:
Create a view component class for the section.
- We recommend storing section view components in the ~/Components/Sections/<SectionName> folder together with other files required by the section.
Implement the component’s Invoke or InvokeAsync method (the synchronous and asynchronous approaches are both supported, this choice depends solely on your requirements).
The system invokes the view component when the section is inserted via Page Builder. During the invocation, the system passes the section’s properties (the
ComponentViewModelclass) into the component’s Invoke method. For this reason, the method’s signature needs to declare theComponentViewModelparameter. For sections with custom properties, you need to specify the properties class as the generic parameter.// The signature of a view component's InvokeAsync method for sections without custom properties public async Task<IViewComponentResult> InvokeAsync(ComponentViewModel sectionProperties) // The signature of a view component's InvokeAsync method for sections with custom properties public async Task<IViewComponentResult> InvokeAsync(ComponentViewModel<TSectionPropertiesClass> sectionProperties)
To the return statement of the component’s
Invokemethod, add the full relative path to the component’s partial view. For example:return View("~/Components/Sections/MySection/_MySection.cshtml", model);Create any required view model classes used to pass data from the section view component to the partial view.
- We recommend storing section models in the ~/Components/Sections/<SectionName> folder together with other files required by the section.
Prepare a partial view that defines the layout of the section.
- Use the
WidgetZoneAsyncextension method (or the method’s<widget-zone />Tag Helper alternative) to mark locations within the layout where widgets can be placed. Every section must contain at least one widget zone – sections without widget zones are not supported. - We recommend storing section views in the ~/Components/Sections/<SectionName> folder together with other files required by the section.
- Use the
Register the section into the system. See Register sections.
When the section is inserted using Page Builder, the system invokes the corresponding view component and renders its partial view. Using this approach, you can decouple business and view-layer code, maintaining separation of concerns.
Access the data of the current page
If you need to access fields of the page where the section is currently rendered, use the Page property of the ComponentViewModel class (from the component’s Invoke method). The property exposes further properties containing the ID, language, content type and channel information of the page. You can use this data to retrieve the page and access its content fields.
// Retrieves the language of the page on which the section is currently rendered
string language = widgetProperties.Page.LanguageName;
Handle POST actions
If your section needs to communicate with the server using POST actions, create a custom controller class containing the required action methods and logic. We recommend storing the class in the ~/Components/Sections/<SectionName> folder together with other files required by the section.
Endpoint security
Consider whether the endpoints you design should only be accessible from the admin UI (edit mode of the Pages application). See Secure custom endpoints for more information.
Fields of the page the section is rendered on are by default not accessible in controller actions that handle POST requests. Such requests do not contain sufficient information to identify the page from which they originate. To access page data in POST actions, you need to include information about the current page into the data submitted by the corresponding form in the section’s output – call the Html.Kentico().PageData extension method (or the method’s Tag Helper alternative) within the given form tag in your section view.
@using Kentico.Web.Mvc
@using Kentico.PageBuilder.Web.Mvc

<form asp-controller="SectionPostActionsController" asp-action="HandlePost" id="form">

    ...

    @Html.Kentico().PageData()

    <input type="submit" value="Submit" />
</form>
The method renders a hidden form field that persists information about the current page. The page data can be retrieved via the IWebPageDataContextRetriever service in the corresponding controller action.
Obtain an instance of the IWebPageDataContextRetriever service (using dependency injection) and call its Retrieve method. The returned object’s WebPage property contains basic information about the current page, which you can use to retrieve the page object.
// An instance of IWebPageDataContextRetriever (e.g., obtained via dependency injection)
private readonly IWebPageDataContextRetriever retriever;

// Access the current page data
var page = retriever.Retrieve().WebPage;

// Access the properties of the page
int webPageId = page.WebPageItemID;
int languageId = page.LanguageID
string languageName = page.LanguageName;
int contentTypeId = page.ContentTypeID;
string contentTypeName = page.ContentTypeName;
int channelId = page.WebsiteChannelID;
string channelName = page.WebsiteChannelName;
Register sections
For sections to become available in the Page Builder interface, they need to be registered into the system. Register sections using the RegisterSection assembly attribute (available in the Kentico.PageBuilder.Web.Mvc namespace).
To register basic sections (without a view component class), we recommend adding the assembly attributes to a dedicated code file. For example, you can create a file named ComponentRegister.cs in your project’s ~/Components folder and use it to register your Page Builder components. For basic sections, specify the following attribute parameters:
Identifier– the unique identifier of the section. We recommend using a unique prefix in your section identifiers to prevent conflicts when deploying sections to other projects, for example matching your company’s name.Name– the name used to identify the section when displayed in the administration interface.(Optional)
PropertiesType– only required for sections with properties. Specifies theSystem.Typeof the section’s property model class.CustomViewName– specifies the name and location of the view that defines the section’s output. If not set, the system searches for a corresponding _<Identifier>.cshtml view in the ~/Views/Shared/Sections folder (any period characters ‘.’ in the identifier are replaced by underscores ‘_’).Basic section registration example[assembly: RegisterSection("CompanyName.DefaultSection", "Default section", typeof(CustomSectionProperties), "~/Components/Sections/_MySection.cshtml")]
For sections based on a view component, you can add the assembly attribute directly into the view component code file. In this case, specify the following attribute parameters:
Identifier– the unique identifier of the section. We recommend using a unique prefix in your section identifiers to prevent conflicts when deploying sections to other projects, for example matching your company’s name.ViewComponentType– theSystem.Typeof the section’s view component class.Name– the name used to identify the section when displayed in the administration interface.View component section registration example[assembly: RegisterSection("CompanyName.DefaultSection", typeof(DefaultSectionViewComponent), "Default section")]
When registering any type of section, you can also set the following optional attribute properties:
Description– the description of the section displayed as a tooltip.IconClass– the font icon class displayed when viewing the sections in the section list.
[assembly: RegisterSection("CompanyName.DefaultSection", typeof(DefaultSectionViewComponent), "Default section", Description = "A default section with one widget zone.", IconClass="icon-box")]
Assign a default section
Editable areas in Page Builder have a default section, which is automatically added when the area is empty. This includes new areas where content editors have not yet placed any other section, and scenarios where an editor removes the last section from an area.
By default, the system’s built-in Default section is used for this purpose. For most websites, we recommend replacing the default section with your own to ensure that the Page Builder output code exactly matches the requirements of your website’s styling and design.
To specify a global default section, extend the code that registers the Page Builder feature in your project:
Set the
DefaultSectionIdentifierproperty ofPageBuilderOptionsto theidentifierof the appropriate section.To disable the system’s built-in Default section, also set the
RegisterDefaultSectionproperty tofalse.Warning: If your site already has existing pages that use Page Builder, replace all occurrences of the Default section in page content before you disable it. Otherwise, accessing the pages will result in an error.
Pass the
PageBuilderOptionsobject as the parameter of theUsePageBuildermethod.builder.Services.AddKentico(features => { features.UsePageBuilder(new PageBuilderOptions { DefaultSectionIdentifier = "CompanyName.DefaultSection", // Disables the system's built-in 'Default' section RegisterDefaultSection = false, ContentTypeNames = new[] { LandingPage.CONTENT_TYPE_NAME } }); ... });
Empty editable areas now use the new default section. The change does NOT modify the sections within existing Page Builder content.
You can also override the global default section for individual editable areas:
- Prepare an
EditableAreaOptionsobject. - Set the object’s
DefaultSectionIdentifierproperty to match theidentifierof the section which you want to use as default. - Assign the object as a parameter of
EditableAreaAsyncextension method (or the method’s Tag Helper alternative) in your views.
<div>
    @{
        var optionsDefaultSection = new EditableAreaOptions
        {
            DefaultSectionIdentifier = "LearningKit.Sections.Col5050"
        };
    }
    @await Html.Kentico().EditableAreaAsync("areaWithSection", optionsDefaultSection)
</div>
Limit widgets allowed in zones
You can define widget restrictions for individual zones defined within sections. To limit which widgets can be added to a specific zone:
- Edit the partial view of the section where the widget zone is defined.
- Create a list of strings containing the identifiers of widgets you want to allow in the zone. See Widgets for Page Builder to learn more about widget identifiers. For identifiers of the default system widgets, check the system widget reference.
- Assign the list of identifiers to the
allowedWidgetsnamed parameter of the widget zone extension method.
In the widgets parameter, you list widgets that you want to allow in the zone, and all others are automatically excluded. When the allowed widgets parameter is not specified, all registered widgets can be added to the zone.
The widget limiting feature is intended as a way to set guidelines for content editors, not as a security measure. When you limit a zone, existing instances of widgets placed in the zone are not validated or removed.
Editable area restrictions
Widget zone restrictions are combined with any widget restrictions set for the Page Builder editable area containing the section. Both sets of restrictions apply to create the final list of allowed widgets for the zone.
<div>
    @{
        var widgetsAllowlist = new[] { Kentico.Content.Web.Mvc.SystemComponentIdentifiers.FORM_WIDGET_IDENTIFIER,
                                       "LearningKit.Widgets.NumberWidget",
                                       "LearningKit.Widgets.SomeOtherWidget" };
    }
    @await Html.Kentico().WidgetZoneAsync(allowedWidgets: widgetsAllowlist)
</div>
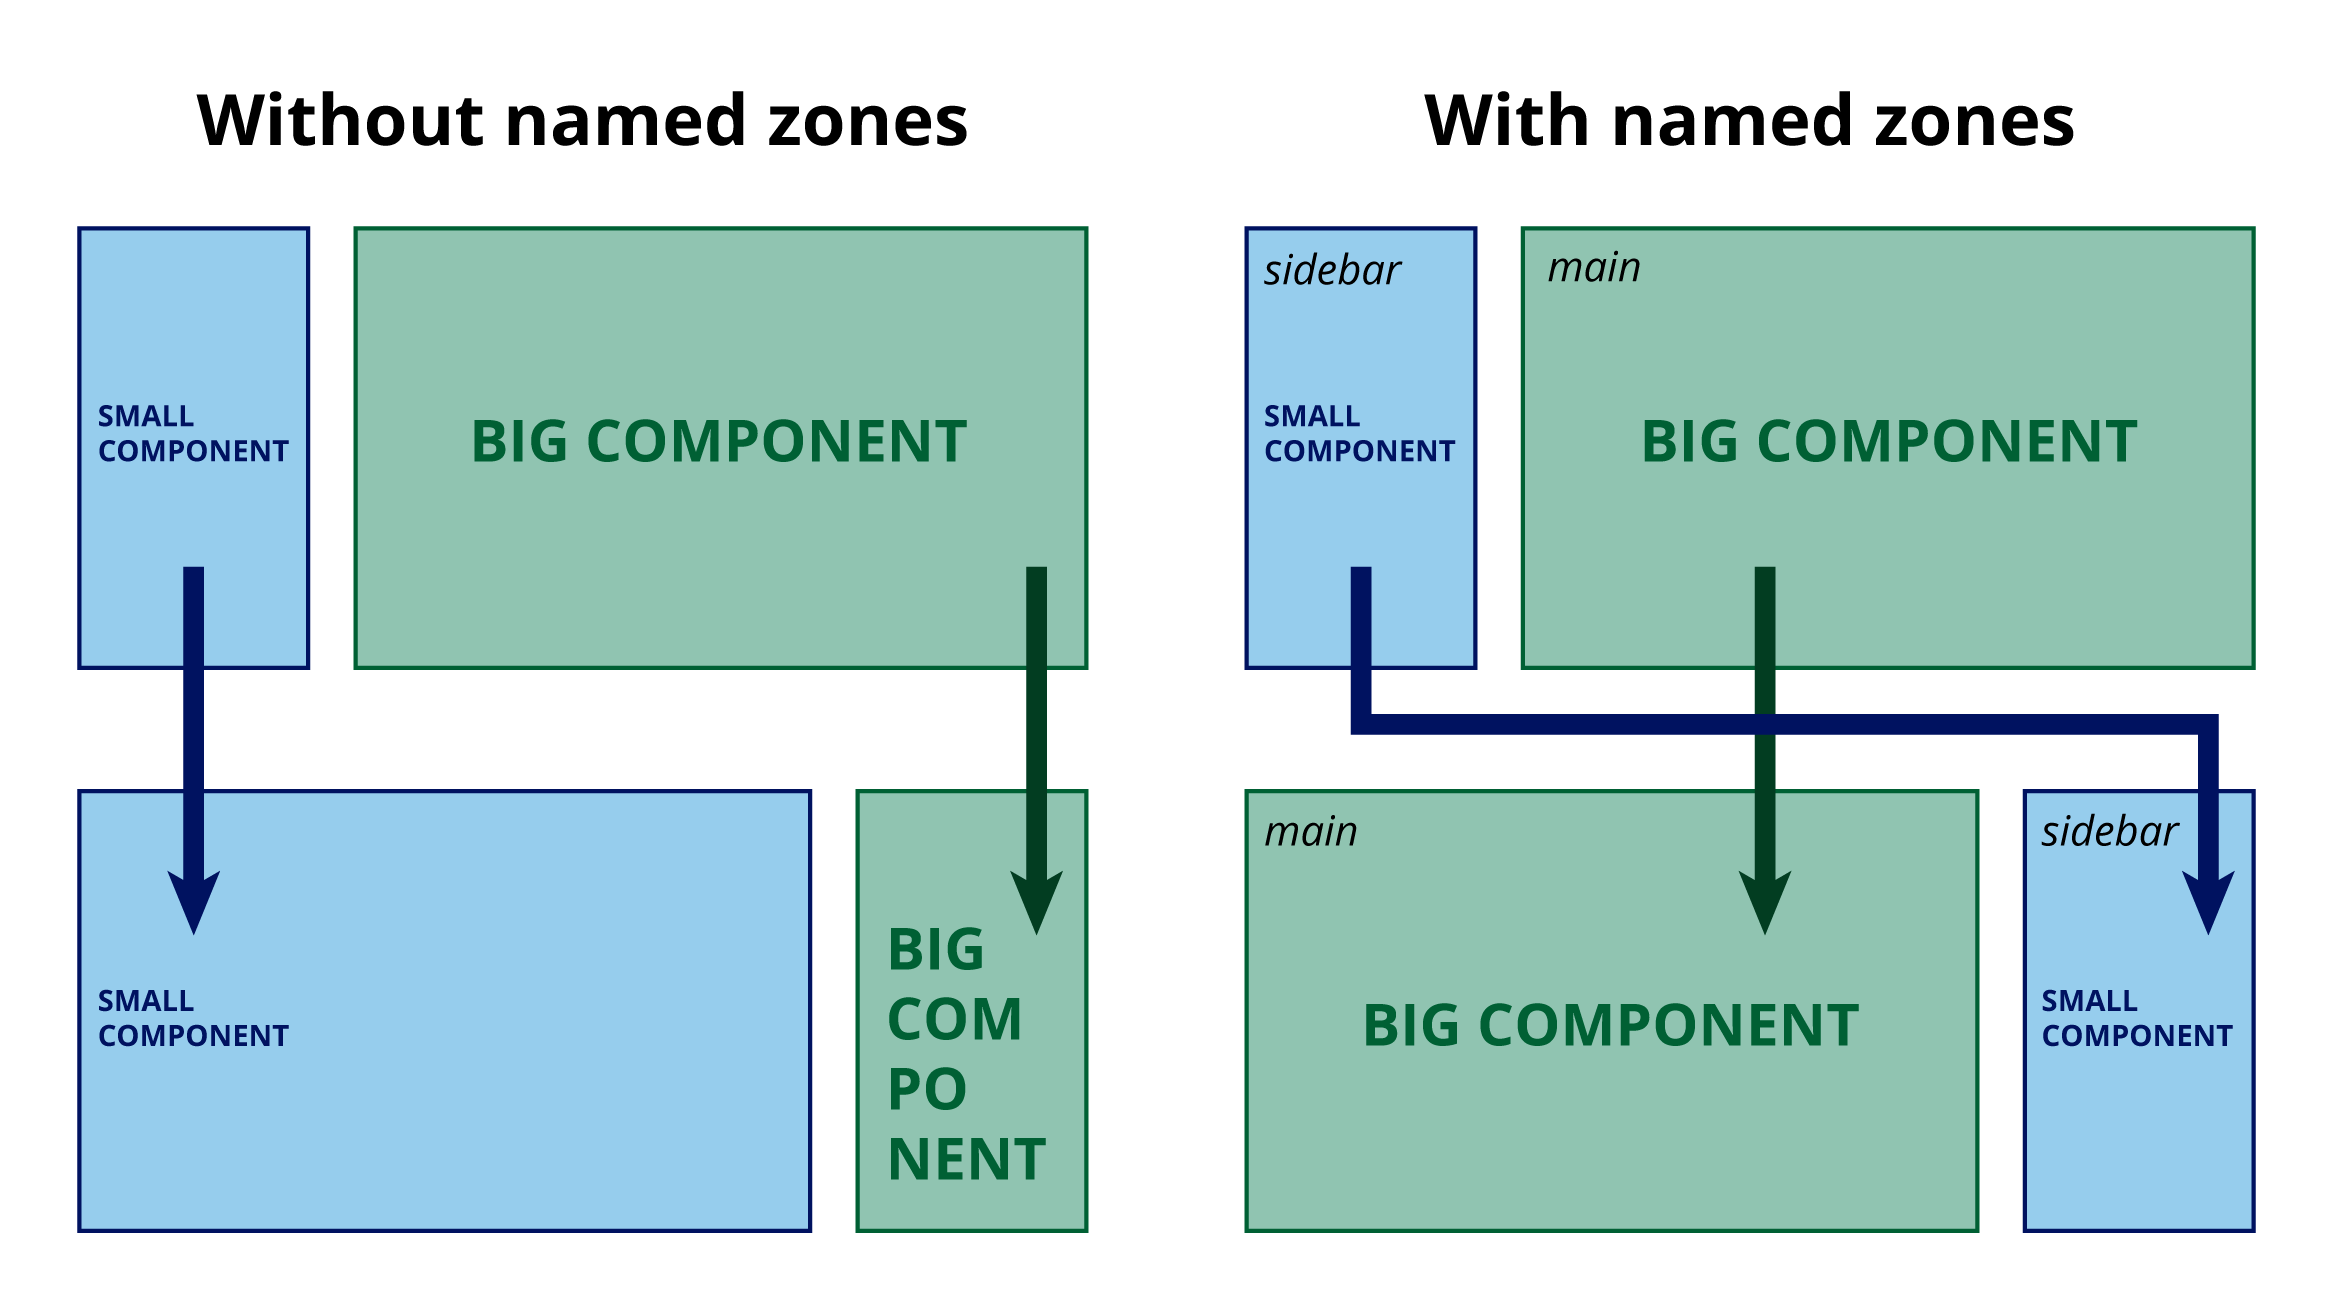
Ensure correct transfer of widgets between section types
When a user changes the section type in the Page Builder interface, widgets are moved to the new section’s widget zones automatically based on the order in which the zones are specified in the section code. This may require additional work from content editors to get the desired page layout.
To ensure that widgets are moved to correct zones when the section type is changed:
- Add an identifier to each zone, which creates so-called named widget zones.
- Use the same identifier for corresponding zones within all of your widget sections.
When a section type is changed, the system moves widgets to matching named zones.
<div>
    @await Html.Kentico().WidgetZoneAsync("main")
</div>
Add scripts and styles for sections
To add JavaScript and CSS styles required by your sections, we recommend placing script and stylesheet files into sub-folders under:
- ~/wwwroot/PageBuilder/Public/Sections/<SectionName> – scripts and styles intended for the live site.
- ~/wwwroot/PageBuilder/Admin/Sections/<SectionName> – scripts and styles intended for the administration interface (when working with the section in the Page Builder editing interface).
You can use sub-folders that match the identifiers of individual sections, or a Shared sub-folder for assets used by multiple sections. Note that this recommendation only applies when using the default configuration of the bundling support provided by Xperience and may be different for your project. See Bundle static assets of builder components.
CSS notes- Only use the specified directories to add basic styles that are required for the section to render correctly. Any site-specific styles that finalize the live site design of the section should be handled separately within the given site’s main stylesheet. - To avoid potential conflicts between styles from other third-party components, we recommend adding a unique prefix to your CSS classes and identifiers (for example #CompanyName-mid-column), or employ similar measures to ensure their uniqueness.
Initialize section scripts
If you need to initialize scripts (for example call a function on page load or register an event listener), you can add script tags directly into the view code of your Page Builder sections. However, you need to keep the following in mind:
Do not rely on the order of execution of multiple script tags within one section. The order of their execution may be different in the Page Builder interface than on the live site.
If you declare variables within section script tags, the variables are defined in the global namespace. To prevent conflicts on pages containing multiple instances of the same section, wrap the scripts into a self-executing anonymous function.
If you use assets stored in the ~/Content/Sections folder within the section views, the related bundles are added at the end of the HTML document’s
bodytag. Such assets are not available in the section code during the page load process. A solution is to run the initialization script during the DOMContentLoaded event. However, sections in the Page Builder interface may be added dynamically after the page is loaded. In this case, theDOMContentLoadedevent has already occurred and will not fire again. For example, the following script demonstrates how to reliably call a custom function on page load:@using Kentico.PageBuilder.Web.Mvc @using Kentico.Web.Mvc <div> @await Html.Kentico().WidgetZoneAsync() </div> <script type="text/javascript"> (function () { if (document.readyState === "loading") { // Calls the function during the 'DOMContentLoaded' event, after the HTML document has been completely loaded document.addEventListener("DOMContentLoaded", function () { customFunction(); }); } else { // Calls the function directly in cases where the section is rendered dynamically after 'DOMContentLoaded' customFunction(); } })(); </script>
Apart from initialization code, avoid linking or executing scripts directly within section views. This could lead to duplicated scripts on pages that contain multiple instances of the same section.