
UI pages with forms
The admin UI provides the following ways to create UI pages that contain forms to submit data to the back end:
- Object type edit pages – directly edit objects types managed by the system. Display forms suitable for editing the specified object based on its UI form definition. See Object type edit pages for details.
- Model-based edit pages – use a custom model class with metadata to define forms that can submit any data to the back end. Covered on this page.
Create model-based edit pages
Pages based on model classes must derive from the ModelEditPage<TModel> base class. Substitute the TModel generic with a model class that describes the form to render.
- First, prepare the model class that describes the form and its behavior using
- Editing components
- UI form component validation rules
- UI form component visibility conditionsas required. For example:
Example form model classusing Kentico.Xperience.Admin.Base.FormAnnotations; // Describes a form used to send an email specified by the 'Subject' and 'Body' fields to 'Recipients' public class EmailModel { [EmailValidationRule(AllowMultipleAddresses = true)] [TextInputComponent(Label = "To", Order = 1, Tooltip = "Email receiver(s). Supports multiple addresses separated by semicolons.")] public string Recipients { get; set; } [TextInputComponent(Label = "Subject", Order = 2)] public string Subject { get; set; } [TextAreaComponent(Label = "Body", Order = 3)] [VisibleIfNotEmpty(nameof(Subject))] public string Body { get; set; } } - Implement the page class:
- Create a new class that inherits from
ModelEditPage<TModel>. - Substitute the generic parameter with the form model class created in the previous step.When implementing the page, you need to override the
Modelabstract property and initialize it with an instance of the form model class. The system uses the class to prepare form components according to the model’s attribute annotations. You can also use this step to initialize the form fields with a default value if required.
Example edit page based on a model classusing Kentico.Xperience.Admin.Base; public class EmailForm : ModelEditPage<EmailModel> { private EmailModel model; // Mandatory constructor providing instances of required services to the base class // Can be used to initialize additional dependencies via dependency injection public EmailForm(IFormItemCollectionProvider formItemCollectionProvider, IFormDataBinder formDataBinder) : base(formItemCollectionProvider, formDataBinder) { } protected override EmailModel Model { get { if (model is null) { model = new EmailModel() { // Initializes the 'Recipients' field to a default value Recipients = "administrator@admin.com" }; } return model; } } } - Create a new class that inherits from
- The two classes created so far form the core of the UI page. The last thing to implement is the logic handling submitted form data. For this purpose, override and implement the
ProcessFormDatamethod. The method behaves as a standard command handler method that receives the following parameters from the client:- model – the data submitted from the client.
- formItems – a collection of form components comprising the client form.
Handle submitted data on the back endprotected override async Task<ICommandResponse> ProcessFormData(EmailModel model, ICollection<IFormItem> formItems) { // Custom logic that processes the submited data // e.g., sends an email using IEmailClient var result = await emailClient.SendEmail(new EmailMessage { From = "admin@site.com", Recipients = model.Recipients, Subject = model.Subject, Body = model.Body }); // Initializes a client response var response = ResponseFrom(new FormSubmissionResult(result.Success ? FormSubmissionStatus.ValidationSuccess : FormSubmissionStatus.ValidationFailure) { // Returns the submitted field values to the client (repopulates the form) Items = await formItems.OnlyVisible().GetClientProperties(), }); if (result.Success) { response.AddSuccessMessage($"Email sent to {model.Recipients}."); } else { response.AddErrorMessage(string.Format("Email sending failed.")); } return response; }
You can use the method to manipulate the submitted data as required.
The page’s back-end definition is now ready. Register it in the system to make it available in the admin UI.
Register model-based edit pages
Pages based on model classes must use the Kentico.Xperience.Admin.Base.TemplateNames.EDIT client template. The template is necessary for specific form features, such as visibility condition evaluation.
Otherwise, these pages follow the same registration pattern as other UI pages. See Register UI pages for more information.
Raise a confirmation prompt on submit
If ConfirmationConfiguration is provided within ConfigurePage, users are prompted to confirm their action when saving changes.
public override async Task ConfigurePage()
{
    ...

    PageConfiguration.SubmitConfiguration.ConfirmationConfiguration = new ConfirmationConfiguration()
    {
        Title = "Dialog caption",
        Detail = "Dialog text",
        Button = "Button label",
        // Optionally renders a form within the dialog
        FormModel = typeof(ConfirmationDialogModel)
    };
}
Additionally, the dialog can also display an arbitrary form. Typically you would want to offer a multiple-choice selector that allows you to further control how the back end processes the submitted data.
The form must be defined within a dedicated model class and annotated with Editing components. Validation rules are also supported.
using Kentico.Xperience.Admin.Base;
using Kentico.Xperience.Admin.Base.FormAnnotations;

public class ConfirmationDialogFormModel
{
    [RequiredValidationRule]
    [RadioGroupComponent(Inline = false, Order = 1,
         Options = $"submit;Submit\r\nsubmitandlog;Submit and log\r\n")]
    public string ChooseOne { get; set; } = "option1";
}
To access the data on form submit, use GetValidatedConfirmationModel<T> within ProcessFormData (Lifecycle of model-based edit pages).
protected override async Task<ICommandResponse> ProcessFormData(EmailModel model, ICollection<IFormItem> formItems)
{
    // The system binds the form from the confirmation dialog to the model <T>
    var confirmationDialogFormData = GetValidatedConfirmationModel<ConfirmationDialogFormModel>();

    // Decide the evaluation flow based on the submitted data
    if (string.Equals(confirmationDialogFormData.ChooseOne, "submitandlog", StringComparison.OrdinalIgnoreCase))
    {
        // Logs the submitted data
        // eventLogService is an instance of IEventLogService injected using dependency injection
        eventLogService.LogInformation("Model submit", "SUBMIT", $"Submitted data {confirmationDialogFormData}");
    }

    return ResponseFrom(new FormSubmissionResult(FormSubmissionStatus.ValidationSuccess))
                                     .AddInfoMessage($"Selected {confirmationDialogFormData.ChooseOne}");
}
Lifecycle of model-based edit pages
This section details the lifecycle of model-based edit pages and their available customization points. You can use this information to customize the pages’ behavior at specific stages of their lifecycle. See the following diagram (red borders indicate steps where you can customize the behavior).
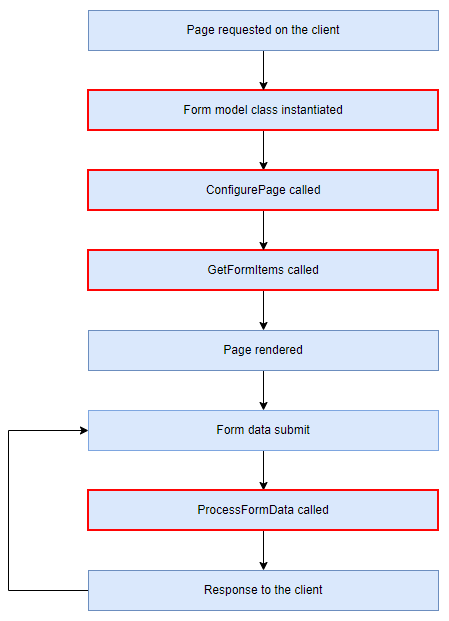
Model class initialization
This is the first step of the page’s initialization process. At this point, the model class that defines the rendered form is instantiated. You can use this step to initialize the form with default values. For example:
protected override EmailModel Model
{
    get
    {
        if (model is null)
        {
            model = new EmailModel()
            {
                // Initializes the 'Recipients' field to a default value
                Recipients = "administrator@admin.com"
            };
        }
        return model;
    }
}
If you need to grab data from other objects, you can use parameterized URLs to get the object’s identifier, retrieve it, and use its properties to populate the form.
Page configuration
This step allows you to configure the client template (TemplateNames.EDIT) used to render the page. Model-based edit pages allow the same configuration as object edit pages. Among others, you can set the page’s
- heading,
- callouts,
- confirmation dialogs,
- and submit button text.
See the object edit page PageConfiguration reference for details.
Form component configuration
At this point, you can modify the collection of form components instantiated from the metadata of the provided form model class. The system provides the GetFormItems method for this purpose. For example, you can:
Disable specific components.
  protected override async Task<ICollection<IFormItem>> GetFormItems()
  {
      var items = await base.GetFormItems();

      var component = items.OfType<TextInputComponent>()
                           .Single(i => String.Equals(i.Name, nameof(FormModel.FirstName), StringComparison.OrdinalIgnoreCase));

      component.Properties.Disabled = true;

      return items;
  }
Post-configure form component properties using data not available from the model class, such as information from stored options configurations.
  protected override async Task<ICollection<IFormItem>> GetFormItems()
  {
      var items = await base.GetFormItems();

      items.OfType<PasswordComponent>().ToList().ForEach(i =>
      {
          // 'adminIdentityOptions' is an instance of the 'AdminIdentityOptions' options class injected via constructor DI
          // Maps the password policy used by the admin UI to the component
          i.Properties.RequiredLength = adminIdentityOptions.Value.PasswordOptions.RequiredLength;
          i.Properties.RequireDigit = adminIdentityOptions.Value.PasswordOptions.RequireDigit;
      });

      return items;
  }
Otherwise dynamically configure the form components in ways that the attribute notation doesn’t allow.
Data processing
How the back end should respond to data submitted from the client is handled in the ProcessFormData method.
General customization
One general adjustment that applies throughout the page’s lifecycle is overriding and customizing the IsEditedObjectValid method. By default, the method checks if the form model class is initialized (not null). If you need to enforce stricter requirements on the model, this method is the place to implement them.