
Xperience Portal
This page discusses Xperience Portal administration (available at https://xperience-portal.com). Learn how to:- Access your Xperience Portal project - Provide access to the project for your team members - Set up the resources needed before deploying to the SaaS environment
Use the Dashboard application to see the information about your project, including the region where your application is deployed (service region), project tier, project expiration date, and project GUID.
Access Xperience Portal projects
To access Xperience Portal, you need to receive an invitation to a specific Xperience Portal project. Kentico sends the invitation to join the project for the first project user, and you can send further invitations from the Xperience Portal, see Invite a new user to a project.
Access your Xperience Portal project:
- Select the link in the email invitation.
- Accept the Terms of Service.
- Set a password. You will use the email and password to access all projects you were invited to.
- Set up the Multi-Factor Authentication (MFA) in Xperience Portal:
- Use One-Time Passwords (OTP) with your preferred authenticator application.
- After you set up the authenticator, a recovery code is displayed. Copy this code and store it somewhere safe, as it can be used to access the portal in case you lose the device used as the second factor.
You now have access to your Xperience Portal project.
Contact Kentico support if you have issues with accessing your Xperience Portal project.
Users
Access to Xperience Portal is restricted to accounts associated with unique email addresses using Role-based access control (RBAC). RBAC defines user roles and privileges, see Reference - Xperience Portal user roles.
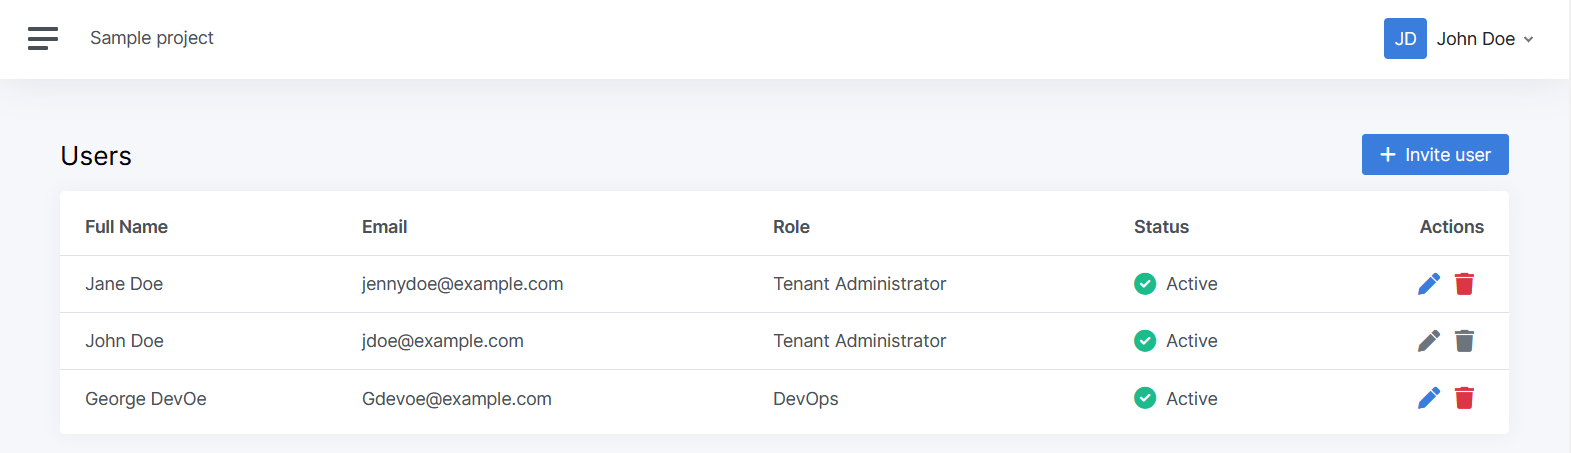
Log in as a user with the Tenant Administrator role to access the Usersapplication where you can:
Invite a new user to a project
- Open the Users application.
- Select Invite user.
- Enter the email address of the user you want to invite.
- Assign a role to the user and select Invite. See Reference - Xperience portal user roles to decide which role to assign to the existing user.
- Refer the invited user to Access Xperience Portal for the first time.
The user will receive an email with an access link to join a project in Xperience Portal. If the email address is not associated with an Xperience Portal account, the user will receive an invitation to create an Xperience Portal account.
Change a role of an existing user
- In the Users Application, select the Edit () icon of a user whose role you want to change.
- Select the role from the Role drop-down menu. See Reference - Xperience portal user roles to decide which role to assign to the existing user.
- Select Save.
Remove a user from the project
- In the Users application, select the Remove () icon of a user you want to remove from the project.
- Confirm by selecting Remove.
The user is removed from the project, and the Personal access token associated with the account are revoked. The user does not lose access to other projects after removal from a specific project.
Hash string salt for the Xperience Portal project
Set your .NET project hash string salt to the hash string salt available in the Project info section of the Xperience Portal project Dashboard.
Wait until the project infrastructure is created for the Hash string salt to be displayed in your Xperience Portal project Dashboard.
Personal access tokens
Personal access tokens are used to authenticate API requests to Xperience Portal, for example, when you upload the deployment package to Xperience Portal.
Use the Personal access tokens applicationto Create, Edit, or Revoke tokens.
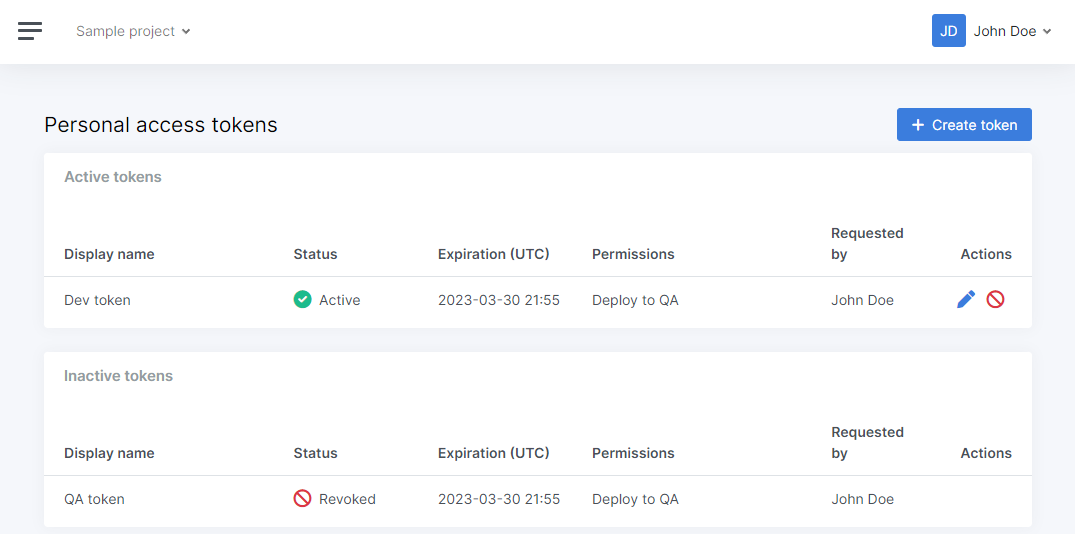
Create a new Personal access token (PAT)
In the Personal access tokens application, select Create token.
Enter the required data into the form:
Display name – is used to identify the token in the listing of tokens.
Expiration date – defines a period during which the token is valid. By default, a token is valid for one year.
Permissions – select permissions to associate with the currently created token.
At least one permission has to be associated with a token.
Create the token.
Store the created token in a safe location before you proceed. After you close the dialog, the token string cannot be displayed again.
Lost personal access token strings cannot be recovered. You will need to revoke the lost token and create a new one.