
Website channel management
Website channels encapsulate websites managed by Xperience. Each channel is an independent entity with its own domain name configuration and content management.
Channels store content in pages and linked content items. See the content modeling guide to learn more about the recommended ways to store and display content in Xperience.
Create website channels
To create a new website channel:
- Open the Channel management application in the Xperience administration.
- Select New channel.
- Fill in:
- Channel name – the name of the channel displayed in the administration. Also sets the name of the channel application where users manage the website’s pages and edit content.
- (Optional) Identifiers – specify the code name if you wish to use a code name different than the pre-filled value.
- Note: Channel code names must be unique across all channels (of any type).
- Channel type – select Website
- Website domain – the domain name on which the website will be accessible. See Channel domains in self-managed environments to learn about the expected format and limitations when setting website domains.
- Primary language – a language configured in the Languages application. In multilingual content, the primary language is not displayed in URLs, as opposed to other languages. For example: If the primary language is set to English, and content is also in French, the URLs are in the format:
~/pagefor English~/fr-fr/pagefor French
- Save the changes.
The website channel is now ready. After you add a channel, the system automatically creates a new application matching the channel’s name in the Channels category of the administration’s application list. This is the application where users can create and edit the channel’s pages.
For applications deployed in the SaaS environment, you also need to add the channel in Xperience Portal. See Website channels in the SaaS environment.
Configure website channels
If you need to configure an existing channel, open the channel again via the Channel management application and edit the values on the General and Channel settings tabs.
Changing the Primary language affects the live URLs of the website’s pages in the given languages, and breaks page links added in the Rich text editor.
Channel domains in self-managed environments
For applications deployed to the SaaS environment, see Website channels in the SaaS environment.
Each website channel must have a unique domain assigned. The domain determines where the live website is accessible. The system also uses the domain when
- displaying previews of live content,
- resolving hyperlinks in text,
- performing license checks,
and in many other cases.
Domain name format
Use the following format for the domain name:
- include the port number if the application is running under a different port than 80
- do not include the URL scheme (protocol) – both http and https are included automatically
- include the path in the URL if your site is running under a specific path, for example, mysite.com/path
Incorrect domain name:
- https://mysite.com
Correct domain names:
- mysite.com
- partners.mysite.com
- mysite.com:8080
- mysite.com/path
Configure a domain name in the Xperience administration
Use a domain name conforming to the domain name format.
To run Xperience in your local development environment, for example on the localhost domain, set Website domain to
localhost.You can configure the system to use a different set of domains according to the project environment. See Domain aliases and environment-specific domains.
For self-managed Xperience deployments, a valid license key is required for every domain name, including domain aliases. See Licensing self-managed Xperience deployments.
Open the Channel management application in the Xperience administration.
Select the website channel.
Switch to the General tab.
Edit the Website domain field.
Select Save.
The domain name is now registered in the Xperience administration.
Domain aliases and environment-specific domains
Domain aliases are alternative domain names that point to the same website. You can add any number of domain aliases to the main domain name.
Channel domain aliases can be configured programmatically using the WebsiteChannelDomainOptions options class and ASP.NET Core configuration providers.
For example, when configured via appsettings.json:
{
  "WebsiteChannelDomains": {
    "DomainOverrides": {
      "DancingGoatPages": {
        "Domains": [ "dancinggoat.com", "dancingllama.com" ]
      }
    }
  },
  ...
}
Where DancingGoatPages is the code name of the website channel to configure.
The system uses the first domain specified in the Domains array as the main domain (dancinggoat.com in the example above). This configuration takes priority over the channel options set via the General tab in the Xperience user interface. The domain gets used, for example, when resolving relative links (in rich text content, email body). All additional domains are treated as domain aliases – they can be used to access the website, but are not reflected in URLs. You need to have a valid license key – available free of charge – for every domain alias used by your project.
using CMS.Websites;

var builder = WebApplication.CreateBuilder(args);

// Apply the configuration from appsettings.json
builder.Services.Configure<WebsiteChannelDomainOptions>(builder.Configuration.GetSection("WebsiteChannelDomains"));
For channels not configured via application settings, the values specified via the administration interface are used.
You can also make use of the options pattern to set different domains per environment by introducing corresponding appsettings.environment.json files. The following example sets the primary domain to localhost when the project is run under the Development environment.
{
  "WebsiteChannelDomains": {
    "DomainOverrides": {
      "DancingGoatPages": {
        "Domains": [ "localhost", "localdev.com" ]
      }
    }
  }
}
Website channels in the SaaS environment
For applications deployed in the SaaS environment, you need to add your channels in Xperience Portal:
- Open the Channels and Domains → Channels application in Xperience Portal.
- Select Add channel.
- Set the channel properties:
- Display name – enter a name for the channel that will be displayed in Xperience Portal.
- Code name – copy the exact code name of the website channel from the Channel management application in the Xperience administration.
- Channel type – Website
- Select Add channel.
After you add a channel, the system automatically starts configuring channel domain settings for the deployed applications. This process may take up to several minutes. You do not need to (and cannot) configure the channel’s domain in the Xperience administration.
Once the domain configuration is complete, the content of the website channel becomes available under an automatically generated Default domain. For production environments, you need to add suitable custom domains for the channel.
Manage channel domains in Xperience Portal
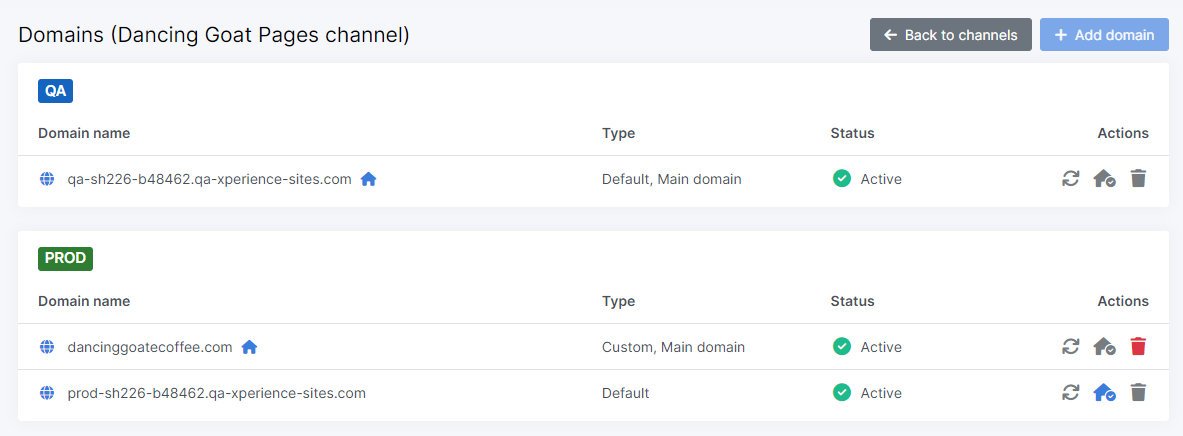
Website channels in Xperience Portal use the following types of domain names:
Default – a default domain is generated for every website channel and environment. Default domains cannot be removed or altered.
Custom – a custom domain added for the PROD environment.
The number of available custom domains depends on the project tier. Tiers up to Level 3 allow 1 custom domain by default, and additional domains can be purchased by contacting your sales representative.
Main domain – the primary domain set for the website channel, for example used in links to the site’s pages. Each channel can only have one main domain, typically a custom domain name suitable for the production environment.
To set a custom domain for the PROD environment of a website channel:
Choose a domain name conforming to the following rules:
- Your site cannot run under a specific path, for example: mysite.com/path
- Do not include a port numberor URL scheme in the domain name.
- Any subdomains must be added as a separate domain, for example: www.mysite.com
Open the Channels and Domains → Channels application in Xperience Portal with a Tenant administrator or DevOps Engineer role.
Select the Domains () action for the given website channel.
Select Add domain.
Enter the chosen Domain name and select Next.
Xperience Portal displays DNS settings. Apply these settings with your DNS registrar.
After the settings are successfully registered with your DNS registrar, select the checkbox confirming the DNS configuration and select Create. This triggers a DNS validation process.
Allow a few minutes for the DNS validation to finish.
- If the DNS validation fails, double-check your DNS settings, wait a few minutes, and select Validate ()to restart the validation. See Revalidate custom domain DNS settings.
Use the action to set your custom domain as the website channel’s main domain.
The system automatically configures the new domain settings for the deployed production application. This process may take up to several minutes. You do not need to (and cannot) configure the channel’s domain in the Xperience administration.
License keys for domain names of SaaS environment deployments are handled automatically, except for the localhost domain. See License keys for SaaS local development.
Your application is now available under the configured domain name.
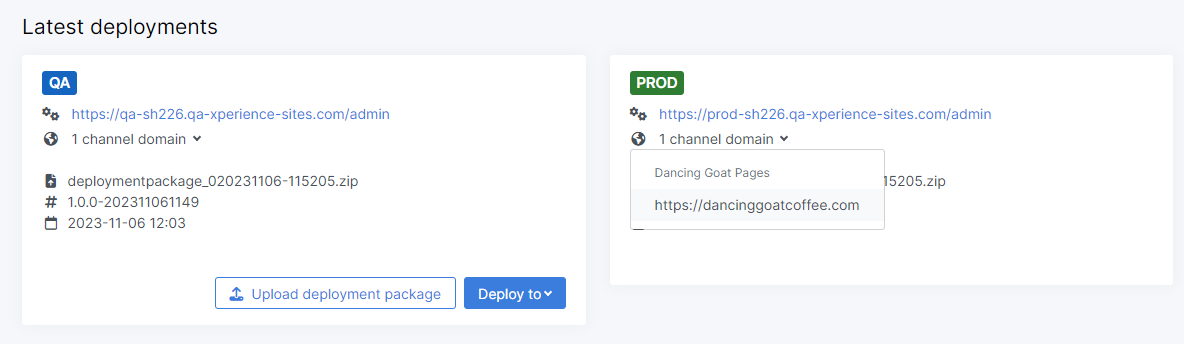
You can see the main domain configured for each environment and website channel in the Deployments application in Xperience Portal.
Domain status
You can check the status of a channel’s domains in the Channels and Domains → Channels application in Xperience Portal. Select the Domains () action for a specific channel.
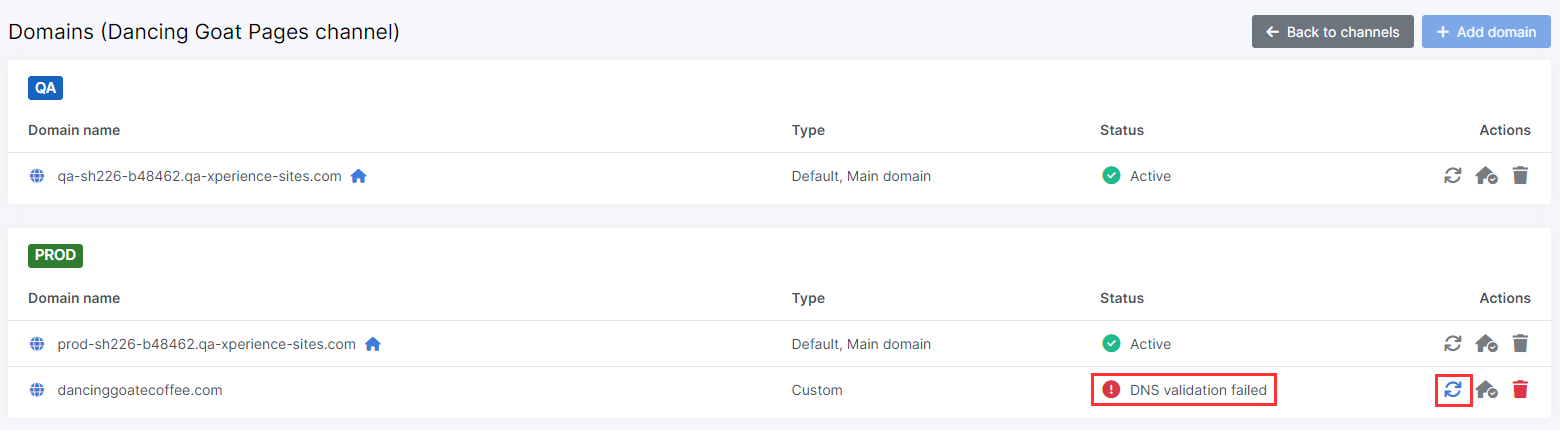
- Active – The domain is active and working.
- DNS validation failed – The DNS records are configured incorrectly, or the configuration has not yet been propagated through the DNS servers. See Revalidate custom domain DNS settings.
- Error – A system configuration issue with the domain. Contact Kentico support.
- Transient error – There was a temporary error while creating, validating, or deleting the domain. To recover from this status, use the Revalidate () action to resubmit the domain.
- Creating – The domain is being created.
- Deleting – The domain is being deleted.
Revalidate custom domain DNS settings
If you add a custom domain for a channel and its DNS validation fails, you need to revalidate the DNS settings in Xperience Portal.
- Open the Channels and Domains → Channels application in Xperience Portal with a Tenant administrator or DevOps Engineer role.
- Select the Domains () action for the related channel.
- Select Revalidate ()to restart the domain validation for a domain.
- Xperience Portal displays DNS settings. Apply these settings with your DNS registrar.
- After the settings are successfully registered with your DNS registrar, select the checkbox confirming the DNS configuration and select Validate. This triggers a DNS validation process.
- Allow a few minutes for the DNS validation to finish.
- Check the domain status.
Your custom domains are now revalidated. If the issues persist, contact Kentico support.