Example - Offices management application
This page contains step-by-step instructions showing how to implement a custom application for the Xperience administration, which allows management of manage offices. When working with the application, users:
- Create new office objects
- Assign users registered in the system as workers
- Create listings of open positions for individual offices
Developers can then display the modeled data on the website, for example when building the site’s company overview or hiring sections.
The implementation makes use of custom object types to define required database entities and the admin UI customization framework to build an editing interface for administration users. For this reason, you should already be familiar with these concepts (though relevant links are provided throughout the text).
This page is separated into multiple sections, each building upon the functionality implemented previously:
- Prepare a class library for administration-related customizations
- Define the custom Office object type and build a basic editing interface
- Add the option to define open positions for individual offices via a child object type
- Link users registered in the system to individual offices via a binding object type
Prepare a class library for administration-related customizations
We recommend storing all administration interface-related customizations in a dedicated class library project. This approach brings benefits such as separability for specific types of deployments.
Create a new class library project and reference it from your application.
- The example on this page uses a fictitious Acme company to ensure the uniqueness of various object identifiers and namespace declarations.
- For example, name the class library: Acme.Web.Admin
- Add the Kentico.Xperience.Admin package to the project.
Enable class discovery for the assembly via the
AssemblyDiscoverableattribute.AssemblyAttributes.csusing CMS; [assembly:AssemblyDiscoverable]
Define the Office object type
Create a new module to host the Office object type
- Open the Modules application.
- Select New module and fill in:
- Module name: Acme
- Identifiers → Code name: AcmeModule
- Save the changes.
Create and model the Office object type
- Open the Modules application and select the Acme module from the listing.
- Switch to the Classes tab and select New class.
- Enter the following values:
- Class name: Office
- Code name
- Namespace: Acme
- Name: Office
- Select Save.
The system creates the data class and its corresponding database table: Acme_Office
Continue by modeling the database entity:
- Switch to the Database columns tab of the Office class (available after the class is created).
- Using the field editor, add the following fields:
- Field name: OfficeType
- Data type: Integer number
- Required: No (unselected)
- Default value: 0
- Field name: OfficeDisplayName
- Data type: Text
- Required: Yes (checked)
- Save your changes after each field.
Generate code files for the Office object type
Shut down the application.
Run the following command from the root directory of your project. When prompted for confirmation, press
Y:dotnet run --no-build -- --kxp-codegen --type "Classes" --include "Acme.*"Move the generated code files for classes with the
Acmenamespace from the Classes\Acme\Office directory under your project’s root to the custom class library. Alternatively, you can use the--locationparameter to set a custom path that targets the class library. Make sure the classes do not remain under your main web project, otherwise you will encounter errors when working with the office object types.Relaunch the site using
dotnet run.
With the code files created, the last step required to prepare the object type is to define the create and edit UI forms that enable basic manipulation of office objects via custom admin UI pages.
Define the create UI form
- Open the Modules application, edit the Acme module and select the Office class.
- Switch to the UI forms tab and select New UI form.
- Enter the following values:
- UI form name: Office create
- Identifiers → Code name: create
- Select Save.
With the UI form created, define its fields:
- Switch to the Fields tab.
- Add the following fields using the field editor:
- Database column: OfficeDisplayName
- Field caption: Office name
- Form component: Text input
- Watermark: Office name
- Database column: OfficeType
- Field caption: Office type
- Form component: Number input
- Save your changes after each field.
Define the edit UI form
- Open the Modules application, edit the Acme module and select the Office class.
- Switch to the UI forms tab and select New UI form.
- Enter the following values:
- UI form name: Office edit
- Identifiers → Code name: edit
- Select Save.
With the UI form created, define its fields:
- Switch to the Fields tab.
- Add the following fields using the field editor:
- Database column: OfficeDisplayName
- Field caption: Office name
- Form component: Text input
- Watermark: Office name
- Database column: OfficeType
- Field caption: Office type
- Form component: Number input
- Save your changes after each field.
This concludes the basic configuration of the Office object type. The next step details how to build a simple application for the administration interface where users can create and edit Office objects.
Build a basic editing interface for the Office object type
This section covers the implementation of the Office management application for the admin UI.
Application page
The application page serves as an entry point to the application. It contains the application registration and also registers a custom category under which the application is displayed in the administration.
- Create a new folder structure in the custom class library: UIPages/OfficeManagement
- The UIPages folder groups all custom UI page implementations
- The OfficeManagement folder groups all implementations that belong to the OfficeManagement application
- Under the OfficeManagement folder, create a new class OfficeManagementApplication.cs and copy the following code:
using Kentico.Xperience.Admin.Base;

using Acme.Web.Admin.UIPages.OfficeManagement;

// Registers a new category for custom admin UI applications
[assembly: UICategory(
    codeName: OfficeManagementApplication.CUSTOM_CATEGORY,
    name: "Custom applications",
    icon: Icons.CustomElement,
    order: 400)]

// Registers a new application under the 'Custom applications' category
[assembly: UIApplication(
    identifier: OfficeManagementApplication.IDENTIFIER,
    type: typeof(OfficeManagementApplication),
    slug: "officeManagment",
    name: "Office management",
    category: OfficeManagementApplication.CUSTOM_CATEGORY,
    icon: Icons.Apple,
    templateName: TemplateNames.SECTION_LAYOUT)]

namespace Acme.Web.Admin.UIPages.OfficeManagement
{
    // 'ApplicationPage' base class ensures automatic redirection to the first child page of 'OfficeManagementApplication'
    // The ApplicationPage itself is never actually accessed and only serves as an entry point
    public class OfficeManagementApplication : ApplicationPage
    {
        // Unique identifier of the application
        public const string IDENTIFIER = "Acme.Web.Application.OfficeManagement";

        public const string CUSTOM_CATEGORY = "acme.web.admin.category";
    }
}
Office listing
The listing page displays all existing offices. The page is based on the listing UI page template provided by the API. To add the listing page:
- Under the OfficeManagement folder, create a new class OfficeListing.cs and copy the following code:
using System.Threading.Tasks;

using Kentico.Xperience.Admin.Base;

using AcmeModule;
using Acme.Web.Admin.UIPages.OfficeManagement;

// Registers the page into the system under 'OfficeManagementApplication'
[assembly: UIPage(
    parentType: typeof(OfficeManagementApplication),
    slug: "list",
    uiPageType: typeof(OfficeListing),
    name: "Offices",
    templateName: TemplateNames.LISTING,
    order: UIPageOrder.First)]

namespace Acme.Web.Admin.UIPages.OfficeManagement
{
    public class OfficeListing : ListingPage
    {
        // Sets the object type to list
        // The code generated for the Office object type atomatically contains the referenced property
        protected override string ObjectType => OfficeInfo.OBJECT_TYPE;

        // Configures the listing page
        public override Task ConfigurePage()
        {
            PageConfiguration.HeaderActions.AddLink<OfficeCreate>("New office");

            PageConfiguration.ColumnConfigurations.AddColumn(nameof(OfficeInfo.OfficeDisplayName), "Office name");

            // Generates URLs with appropriate object identifiers
            PageConfiguration.AddEditRowAction<OfficeEdit>();

            return base.ConfigurePage();
        }
    }
}
Create page
The create page enables users to create new office objects. The page is based on the create UI page template provided by the API. To add the create page:
- Under the OfficeManagement folder, create a new class OfficeCreate.cs and copy the following code:
using Kentico.Xperience.Admin.Base;
using Kentico.Xperience.Admin.Base.Forms;

using AcmeModule;
using Acme.Web.Admin.UIPages.OfficeManagement;

// Registers the page into the system under 'OfficeListing'
[assembly: UIPage(
    parentType: typeof(OfficeListing),
    slug: "create",
    uiPageType: typeof(OfficeCreate),
    name: "OfficeCreate",
    templateName: TemplateNames.EDIT,
    order: 200)]

namespace Acme.Web.Admin.UIPages.OfficeManagement
{
    public class OfficeCreate : CreatePage<OfficeInfo, OfficeEditSection>
    {
        public OfficeCreate(IFormComponentMapper mapper, IFormDataBinder binder, IPageUrlGenerator generator)
            : base(mapper, binder, generator)
        {
        }
    }
}
Edit page
The create page enables users to create new office objects. The page is based on the edit UI page template provided by the API. To add the create page:
Create a new folder under OfficeManagement called OfficeEdit.
Under the OfficeEdit folder, create a new class OfficeEditSection.cs and copy the following code:
Office edit sectionusing Kentico.Xperience.Admin.Base; using AcmeModule; using Acme.Web.Admin.UIPages.OfficeManagement; [assembly: UIPage( parentType: typeof(OfficeListing), slug: PageParameterConstants.PARAMETERIZED_SLUG, uiPageType: typeof(OfficeEditSection), name: "Edit section for office objects", templateName: TemplateNames.SECTION_LAYOUT, order: 300)] namespace Acme.Web.Admin.UIPages.OfficeManagement { // Provides a URL slug with the identifier of the selected office object public class OfficeEditSection : EditSectionPage<OfficeInfo> { } }Under the OfficeEdit folder, create a new class OfficeEdit.cs and copy the following code:
Office edit pageusing Kentico.Xperience.Admin.Base; using Kentico.Xperience.Admin.Base.Forms; using AcmeModule; using Acme.Web.Admin.UIPages.OfficeManagement; // Registers the page under the 'edit section' of the office object // Ensures the identifier of an office object in the URL [assembly: UIPage( parentType: typeof(OfficeEditSection), slug: "edit", uiPageType: typeof(OfficeEdit), name: "Edit an office", templateName: TemplateNames.EDIT, order: UIPageOrder.First)] namespace Acme.Web.Admin.UIPages.OfficeManagement { public class OfficeEdit : InfoEditPage<OfficeInfo> { public OfficeEdit(IFormComponentMapper formComponentMapper, IFormDataBinder formDataBinder) : base(formComponentMapper, formDataBinder) { } // Consumes the identifier provided by the parent page // Identifies the Office instance to edit [PageParameter(typeof(IntPageModelBinder))] public override int ObjectId { get; set; } } }
Final page hierarchy
The following diagram shows the final UI page hierarchy of the Office management application:
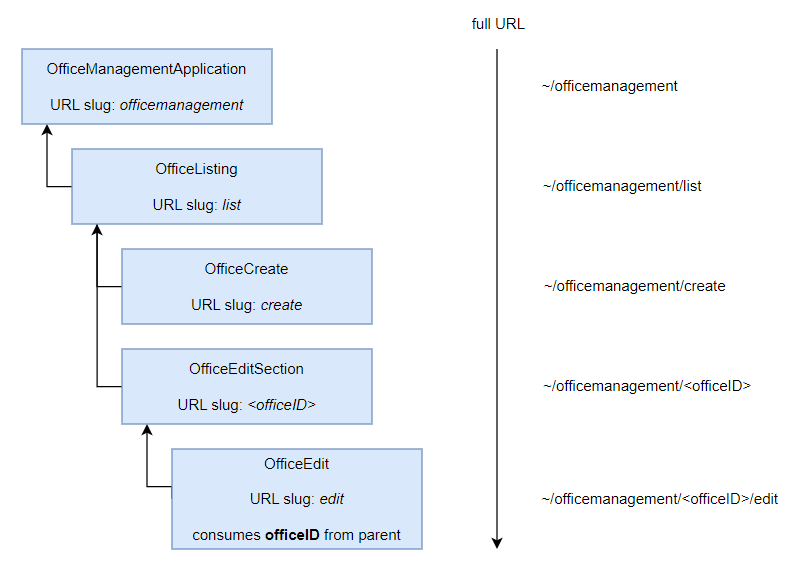
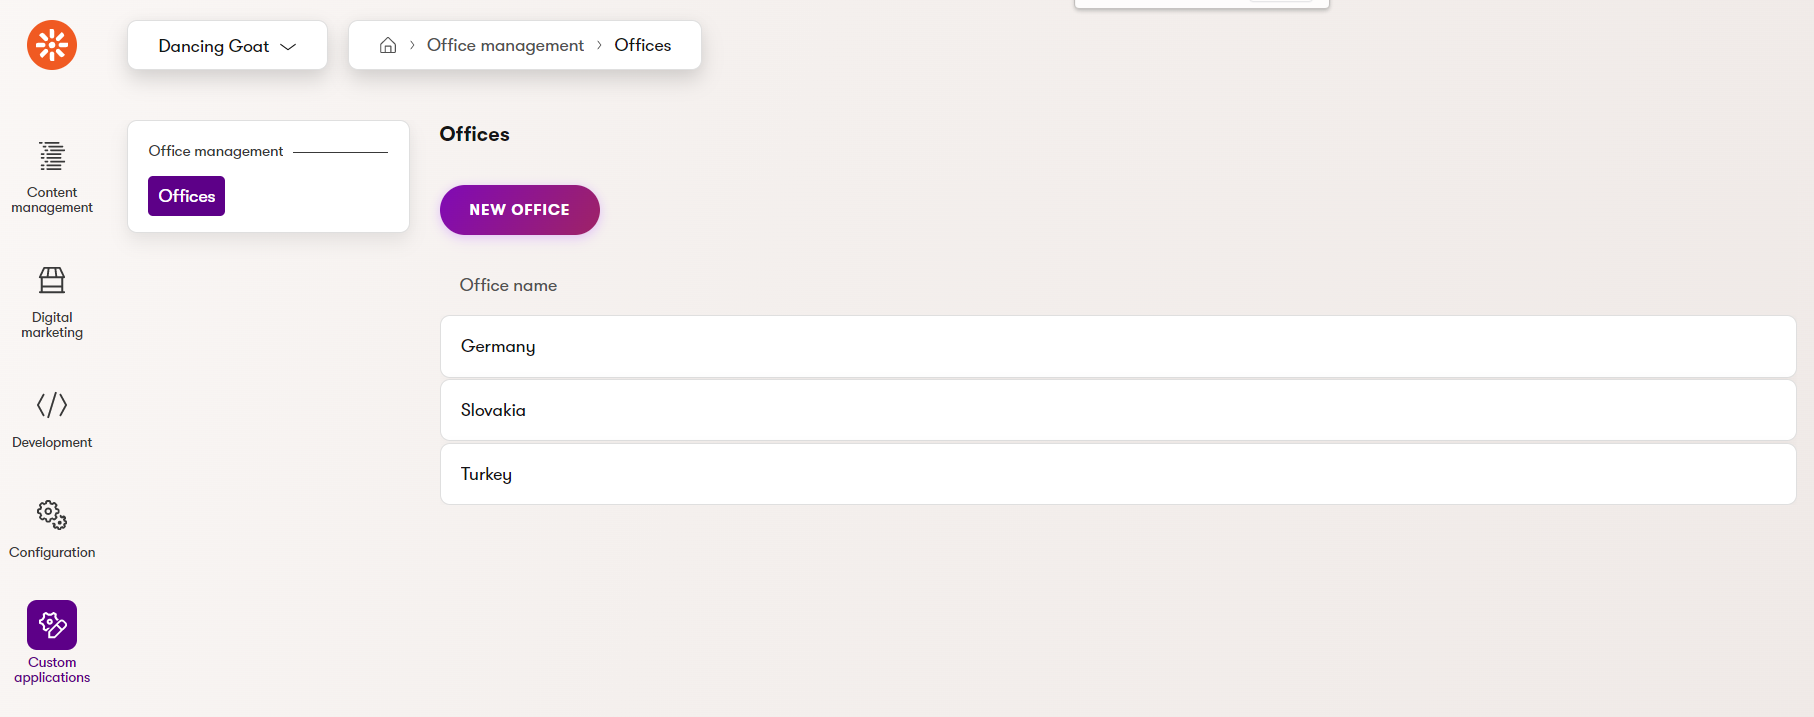
The application, when accessed and populated with sample data, displays the following:
Add a child class tracking open job positions
Prerequisites
This example extends the Office management application created in the following sections:
In this section, we extend the Office management application with the ability to create and list job openings available for specific offices. Similar to Office objects, job openings are represented by a custom OfficeJob object type that has a parent-child relationship with a specific office.
Create the OfficeJob object type
- Edit the Acme module in the Modules application.
- Switch the Classes tab and select New class.
- Fill in the following values:
- Class name: Office job opening
- Code name
- Namespace: Acme
- Name: OfficeJob
- Save the changes.
The system creates the data class and its corresponding database table: Acme_OfficeJob
Continue by modeling the database entity:
- Switch to the Database columns tab of the OfficeJob class (available after the class is created).
- Using the field editor, add the following fields:
- Field 1:
- Field name: OfficeJobDisplayName
- Data type: Text
- Required: Yes (checked)
- Field 2:
- Field name: OfficeJobOpeningCount
- Data type: Integer number
- Required: Yes (checked)
- Field 3:
- Field name: OfficeJobParentID
- Data type: Integer number
- Required: Yes (checked)
- Field 1:
- Save your changes after each field.
Generate code files for the Office job object type
Shut down the application.
Run the following command from the root directory of your project. When prompted for confirmation, press
Y:dotnet run --no-build -- --kxp-codegen --type "Classes" --include "Acme.OfficeJob"Move the code files generated for the OfficeJob object type from the Classes\Acme\Office directory under your project’s root to the custom class library. Alternatively, you can use the
--locationparameter to set a custom path that targets the class library housing the Office management application. Make sure the classes do not remain under your main web project, otherwise you will encounter errors when working with the office job object types.
Set the OfficeJob object type as a child of the Office object type
Edit OfficeJobInfo.generated.cs.
Navigate to the
TYPEINFOfield in the class’s code.Set the parent-related parameters of the
ObjectTypeInfoconstructor (the last two parameters):parentIdColumn:
"OfficeJobParentID"parentObjectType:
OfficeInfo.OBJECT_TYPEOfficeJobInfo object type info constructorpublic static ObjectTypeInfo TYPEINFO = new ObjectTypeInfo( providerType: typeof(OfficeJobInfoProvider), objectType: OBJECT_TYPE, objectClassName: "Acme.OfficeJob", idColumn: "OfficeJobID", timeStampColumn: null, guidColumn: null, codeNameColumn: null, displayNameColumn: "OfficeJobDisplayName", binaryColumn: null, parentIDColumn: "OfficeJobParentID", parentObjectType: OfficeInfo.OBJECT_TYPE) { TouchCacheDependencies = true, };
Save the change and Rebuild the solution.
Relaunch the site using
dotnet run.
The OfficeJob object type is now registered as a child of the Office object type.
Define the UI forms for the OfficeJob object type
New job opening
- Open the Modules application, edit the Acme module and select the OfficeJob class.
- Switch to the UI forms tab and select New UI form.
- Enter the following values:
- UI form name: New job opening
- Identifiers → Code name: opening
- Select Save.
With the UI form created, define its fields:
- Switch to the Fields tab.
- Add the following fields using the field editor:
- Field 1:
- Database column: New field without database column
- Field name: OfficeSelect
- Data type: Text
- Field caption: For office
- Form component: Dropdown selector
- Field 2:
- Database column: OfficeJobDisplayName
- Field caption: Job title
- Form component: Text input
- Field 3:
- Database column: OfficeJobOpeningCount
- Field caption: Number of openings
- Form component: Number input
- Field 1:
- Save your changes after each field.
Office job edit
- Open the Modules application, edit the Acme module and select the Office job opening class.
- Switch to the UI forms tab and select New UI form.
- Enter the following values:
- UI form name: Office job edit
- Identifiers → Code name: edit
- Select Save.
With the UI form created, define its fields:
- Switch to the Fields tab.
- Add the following fields using the field editor:
- Field 1:
- Database column: OfficeJobDisplayName
- Field caption: Job title
- Form component: Text input
- Field 2:
- Database column: OfficeJobOpeningCount
- Field caption: Number of openings
- Form component: Number input
- Field 3:
- Database column: New field without database column
- Field name: OfficeDisplayName
- Data type: Text
- Field caption: For office
- Form component: Text input
- Field 1:
- Save your changes after each field.
Build an editing interface for open positions
The editing interface for the job listing consists of a listing of all open positions and a corresponding editing interface that allows users to create and edit postions.
Open position listing
Create a new folder under UIPages\OfficeManagement called OpenPositions.
Under the OpenPositions folder, create a new class OpenPositionListing.cs and copy the following code:
Listing of open positions - OpenPositionListing.csusing System.Threading.Tasks; using Kentico.Xperience.Admin.Base; using AcmeModule; using Acme.Web.Admin.UIPages.OfficeManagement; [assembly: UIPage( parentType: typeof(OfficeManagementApplication), slug: "openpositions", uiPageType: typeof(OpenPositionListing), name: "Open positions", templateName: TemplateNames.LISTING, order: 300)] namespace Acme.Web.Admin.UIPages.OfficeManagement { public class OpenPositionListing : ListingPage { protected override string ObjectType => OfficeJobInfo.OBJECT_TYPE; public override Task ConfigurePage() { PageConfiguration.HeaderActions.AddLink<OpenPositionCreate>("New open position"); PageConfiguration.ColumnConfigurations.AddColumn(nameof(OfficeJobInfo.OfficeJobDisplayName), "Position") .AddColumn(nameof(OfficeJobInfo.OfficeJobOpeningCount), "Number of slots") .AddColumn(nameof(OfficeInfo.OfficeDisplayName), "Office"); PageConfiguration.TableActions.AddDeleteAction(nameof(Delete)); PageConfiguration.QueryModifiers .AddModifier(query => query .Source(source => source.Join<OfficeInfo>(nameof(OfficeJobInfo.OfficeJobParentID), nameof(OfficeInfo.OfficeID))) ); PageConfiguration.AddEditRowAction<OpenPositionEdit>(); return base.ConfigurePage(); } [PageCommand] public override Task<ICommandResponse<RowActionResult>> Delete(int id) => base.Delete(id); } }
Open position create page
The create page enables users to create new job opening objects. The page is based on the edit UI page template provided by the API. To add the create page:
Under the OpenPositions folder, create a new class OpenPositionCreate.cs and copy the following code:
Create a new open position - OpenPositionCreate.csusing System; using System.Collections.Generic; using System.Linq; using System.Threading; using System.Threading.Tasks; using Kentico.Xperience.Admin.Base; using Kentico.Xperience.Admin.Base.Forms; using Kentico.Xperience.Admin.Base.FormAnnotations; using AcmeModule; using Acme.Web.Admin.UIPages.OfficeManagement; // Registers the page into the system under 'OpenPositionListing' [assembly: UIPage( parentType: typeof(OpenPositionListing), slug: "create", uiPageType: typeof(OpenPositionCreate), name: "Open position create", templateName: TemplateNames.EDIT, order: UIPageOrder.First)] namespace Acme.Web.Admin.UIPages.OfficeManagement { public class OpenPositionCreate : CreatePage<OfficeJobInfo, OpenPositionEdit> { private readonly IOfficeInfoProvider officeInfoProvider; public OpenPositionCreate(IFormComponentMapper formComponentMapper, IFormDataBinder formDataBinder, IPageUrlGenerator pageUrlGenerator, IOfficeInfoProvider officeInfoProvider) : base(formComponentMapper, formDataBinder, pageUrlGenerator) { this.officeInfoProvider = officeInfoProvider; } public override Task ConfigurePage() { // Assigns the 'New job opening' UI form to the page PageConfiguration.UIFormName = "opening"; return base.ConfigurePage(); } // Populates the 'OfficeSelect' UI form field of the 'New job opening' UI form with existing offices protected override async Task<ICollection<IFormItem>> GetFormItems() { var items = await base.GetFormItems(); var officeSelector = items.OfType<IFormComponent>() .FirstOrDefault(i => i.Name == "OfficeSelect") as DropDownComponent; officeSelector.Properties.DataProviderType = typeof(OfficesDropdownOptionsProvider); return items; } protected override Task FinalizeInfoObject(OfficeJobInfo infoObject, IFormFieldValueProvider fieldValueProvider, CancellationToken cancellationToken) { base.FinalizeInfoObject(infoObject, fieldValueProvider, cancellationToken); fieldValueProvider.TryGet<string>("OfficeSelect", out var value); infoObject.OfficeJobParentID = Int32.Parse(value); return Task.CompletedTask; } protected override Task<ICommandResponse> GetSubmitSuccessResponse(OfficeJobInfo savedInfoObject, ICollection<IFormItem> items) { string navigationUrl = pageUrlGenerator.GenerateUrl<OpenPositionListing>(); return Task.FromResult((ICommandResponse)NavigateTo(navigationUrl) .AddSuccessMessage("Position created.")); } } // Provides dropdown options for the UI form selector public class OfficesDropdownOptionsProvider : IDropDownOptionsProvider { private readonly IOfficeInfoProvider officeInfoProvider; public OfficesDropdownOptionsProvider(IOfficeInfoProvider officeInfoProvider) { this.officeInfoProvider = officeInfoProvider; } public async Task<IEnumerable<DropDownOptionItem>> GetOptionItems() { return (await officeInfoProvider.Get().GetEnumerableTypedResultAsync()) .OrderBy(x => x.OfficeDisplayName) .Select(x => new DropDownOptionItem() { Value = x.OfficeID.ToString(), Text = x.OfficeDisplayName } ); } } }
Open positions edit page
The edit page enables users to edit job opening objects. To add the edit page:
Create a new folder under OpenPositions called OpenPositionsEdit.
Under the OpenPositionsEdit folder, create a new class OpenPositionEditSection.cs and copy the following code:
Office edit sectionusing Kentico.Xperience.Admin.Base; using AcmeModule; using Acme.Web.Admin.UIPages.OfficeManagement; [assembly: UIPage( parentType: typeof(OpenPositionListing), slug: PageParameterConstants.PARAMETERIZED_SLUG, uiPageType: typeof(OpenPositionEditSection), name: "Open position edit section", templateName: TemplateNames.SECTION_LAYOUT, order: 600)] namespace Acme.Web.Admin.UIPages.OfficeManagement { public class OpenPositionEditSection : EditSectionPage<OfficeJobInfo> { } }Under the OpenPositionsEdit folder, create a new class OpenPositionEdit.cs and copy the following code:
Office edit pageusing System.Threading.Tasks; using System.Collections.Generic; using System.Linq; using Kentico.Xperience.Admin.Base; using Kentico.Xperience.Admin.Base.Forms; using AcmeModule; using Acme.Web.Admin.UIPages.OfficeManagement; [assembly: UIPage( parentType: typeof(OpenPositionEditSection), slug: "edit", uiPageType: typeof(OpenPositionEdit), name: "Edit position", templateName: TemplateNames.EDIT, order: UIPageOrder.First)] namespace Acme.Web.Admin.UIPages.OfficeManagement { public class OpenPositionEdit : InfoEditPage<OfficeJobInfo> { private readonly IOfficeInfoProvider officeInfoProvider; public OpenPositionEdit(IFormComponentMapper formComponentMapper, IFormDataBinder formDataBinder, IOfficeInfoProvider officeInfoProvider) : base(formComponentMapper, formDataBinder) { this.officeInfoProvider = officeInfoProvider; } [PageParameter(typeof(IntPageModelBinder), typeof(OpenPositionEditSection))] public override int ObjectId { get; set; } protected override async Task<ICollection<IFormItem>> GetFormItems() { var items = await base.GetFormItems(); await SetOfficeName(items); return items; } private async Task SetOfficeName(ICollection<IFormItem> items) { var officeNameField = items.OfType<IFormComponent>() .FirstOrDefault(i => i.Name == "OfficeDisplayName") as TextInputComponent; var infoObject = await GetInfoObject(); var officeName = officeInfoProvider.Get() .WhereEquals(nameof(OfficeInfo.OfficeID), infoObject.OfficeJobParentID) .First().OfficeDisplayName; officeNameField.SetValue(officeName); } } }
This completes the editing interface for the OfficeJob object type.
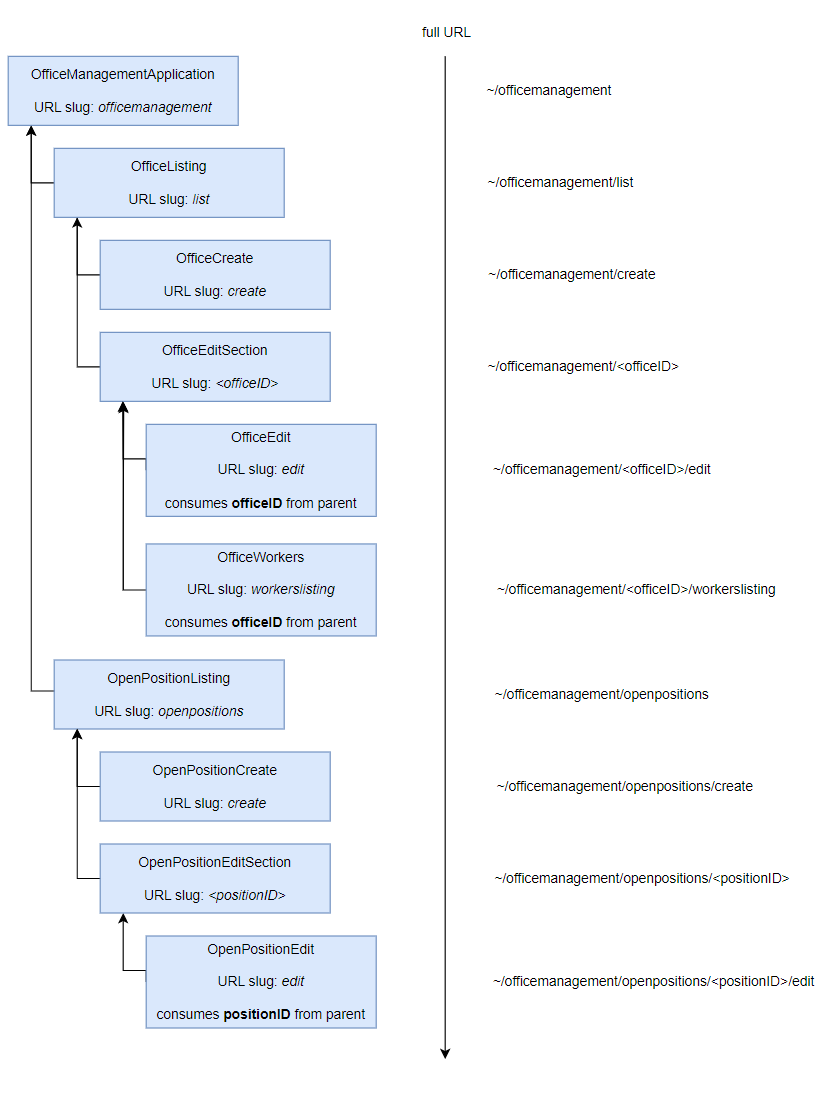
Final page hierarchy of the Office management application
The following diagram shows the final UI page hierarchy of the Office management application:
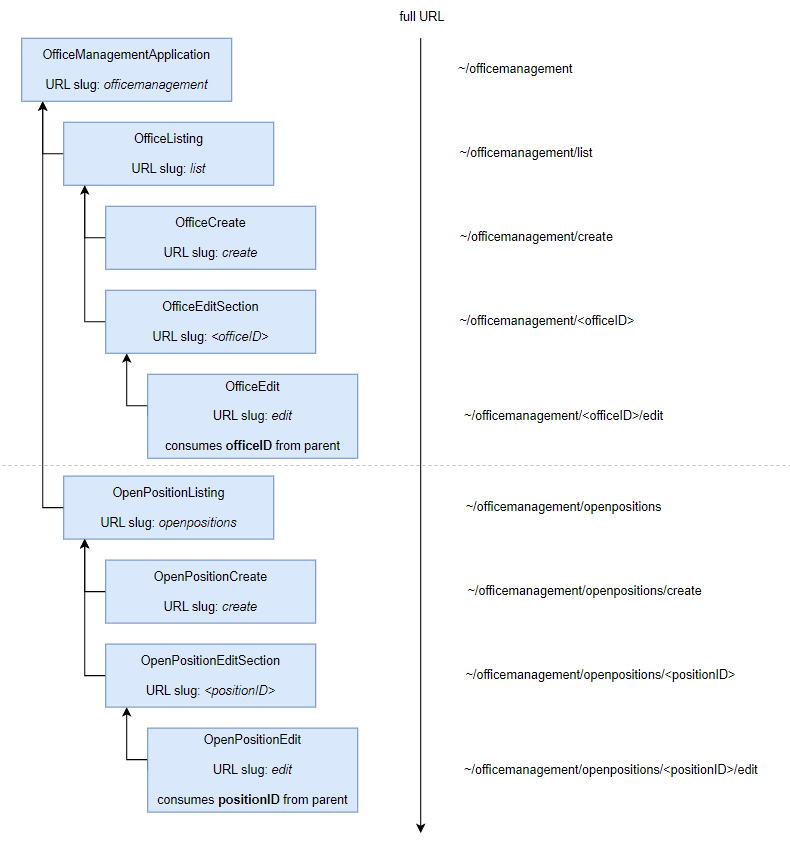
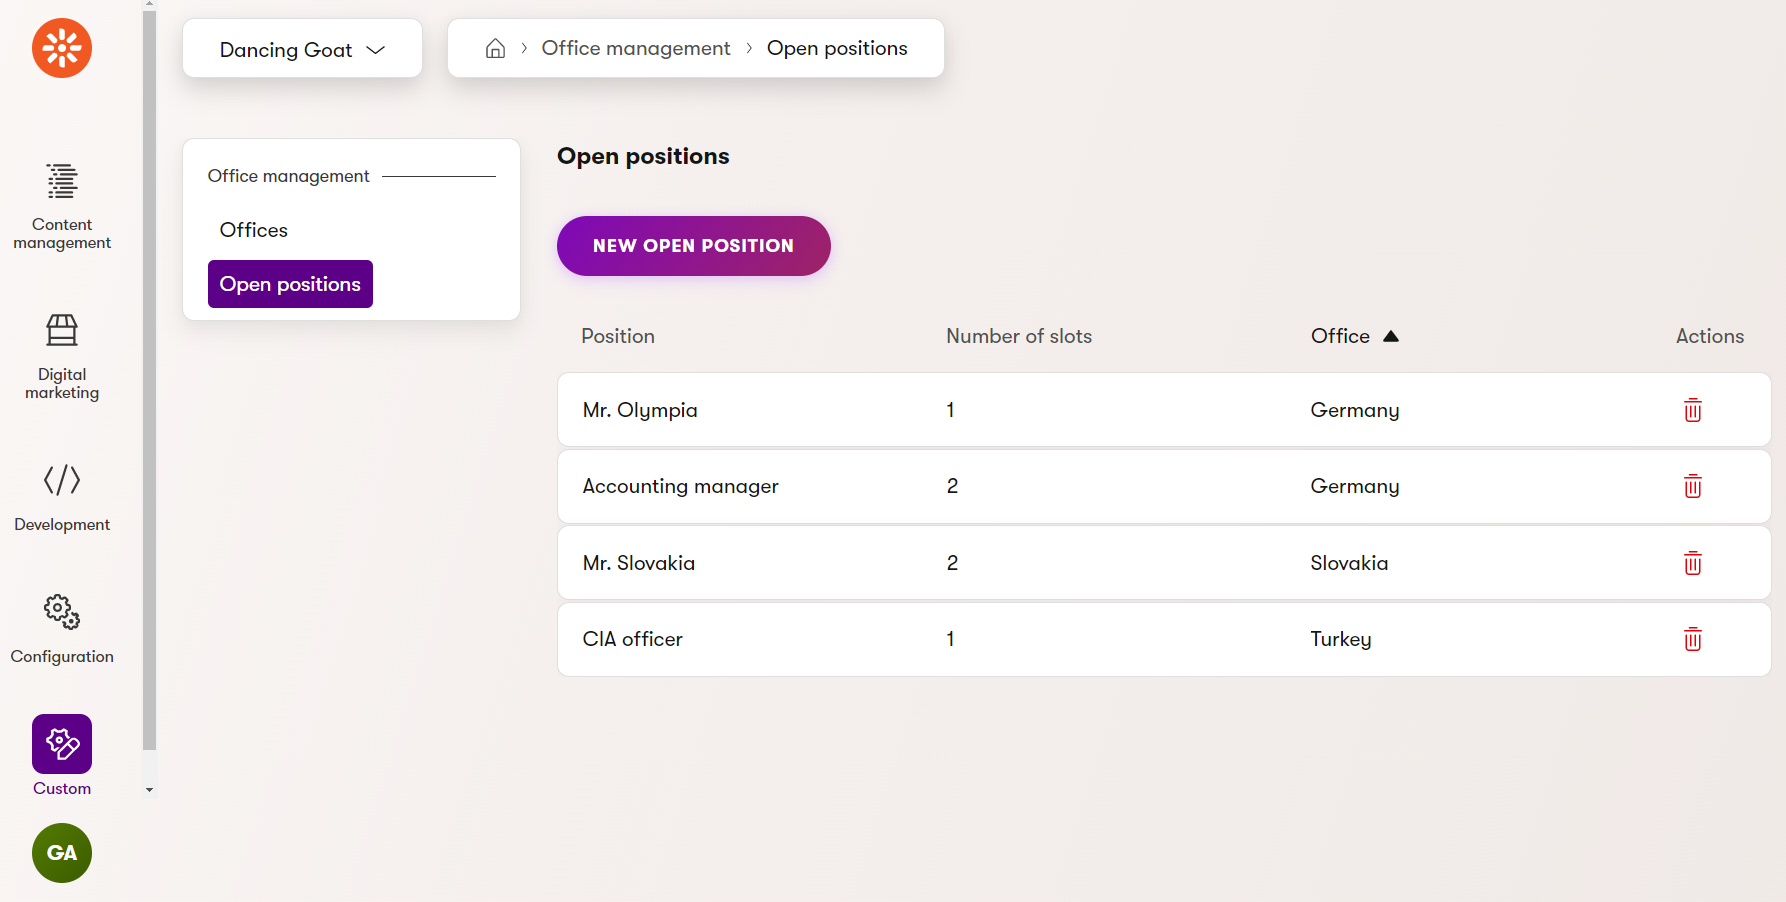
The application, when accessed on the Open positions page and populated with sample data, displays the following:
Assign users from the system to offices via a binding object type
Prerequisites
This example extends the Office management application created in the following sections:
The following example demonstrates how to create a binding class, including an editing interface. The sample binding class allows the creation of relationships between offices and users. Each relationship indicates that a user is an employee of a given office.
Create and model the binding object type
- Edit the Acme module in the Modules application.
- Switch the Classes tab and select New class.
- Fill in the following values:
- Class name: Office user binding
- Identifiers → Code name
- Namespace: Acme
- Name: OfficeUser
- Save the changes.
The system creates the data class and its corresponding database table: Acme_OfficeUser
Continue by modeling the database entity:
- Switch to the Database columns tab of the Office user binding class (available after the class is created).
- Using the field editor, add the following fields:
- Field 1:
- Field name: OfficeID
- Data type: Integer number
- Required: yes (checked)
- Reference to: ObjectType.acme_office
- Reference type: Binding
- Field 2:
- Field name: AssignedUserID
- Data type: Integer number
- Required: yes (checked)
- Reference to: User
- Reference type: Binding
- Field 1:
- Save your changes after each field.
Generate code files for the Office-user object type
Generate the code required for the binding class’s API (including the type information):
Shut down the application.
Run the following command from the root directory of your project. When prompted for confirmation, press
Y:dotnet run --no-build -- --kxp-codegen --type "Classes" --include "Acme.OfficeUser"Move the code files generated for the OfficeUser object type from the Classes\Acme\Office directory under your project’s root to the custom class library. Alternatively, you can use the
--locationparameter to set a custom path that targets the class library housing the Office management application. Make sure the classes do not remain under your main web project, otherwise you will encounter errors when working with office-user binding object type.
Set the OfficeUser object type as a binding
Edit OfficeUserInfo.generated.cs.
Navigate to the
TYPEINFOfield in the class’s code.Add the
IsBindingproperty to the initializer of the newObjectTypeInfoobject and set the value totrue:public static ObjectTypeInfo TYPEINFO = new ObjectTypeInfo( providerType: typeof(OfficeUserInfoProvider), objectType: OBJECT_TYPE, objectClassName: "Acme.OfficeUser", idColumn: "OfficeUserID", timeStampColumn: null, guidColumn: null, codeNameColumn: null, displayNameColumn: null, binaryColumn: null, parentIDColumn: "OfficeID", parentObjectType: "acme.office") { IsBinding = true, TouchCacheDependencies = true, DependsOn = new List<ObjectDependency>() { new ObjectDependency("AssignedUserID", "cms.user", ObjectDependencyEnum.Binding), }, };Save the change and Rebuild the solution.
Relaunch the site using
dotnet run.
The OfficeUser object type is now configured as a binding between the Office and User object types.
Add foreign key constraints for the database table
The system does not provide automatic management of foreign keys on the database level. You need to manually set the added foreign key columns as foreign keys in the corresponding database tables. This is not required to ensure the correct functionality of foreign key columns. However, it is recommended to leverage the performance and data consistency advantages of foreign key constraints.
In this example, create foreign keys for the OfficeID and UserID columns in the Acme_OfficeUser table. Add relationships with the corresponding columns in the Acme_Office and CMS_User tables respectively. You can either use SQL Server Management Studio or execute an SQL script. See Create Foreign Key Relationships for more information.
Build a user interface for the office-user binding
The following code samples show how to create a new page in the Office management application that allows users to assign workers to offices.
Create a new folder under OfficeEdit called OfficeRelationships.
Under the OfficeRelationships folder, create a new class OfficeWorkers.cs and copy the following code:
OfficeWorkers.csusing CMS.Membership; using Kentico.Xperience.Admin.Base; using AcmeModule; using Acme.Web.Admin.UIPages.OfficeManagement; // Registers the page under the 'edit section' of the office object // Ensures the identifier of an office object in the URL [assembly: UIPage( parentType: typeof(OfficeEditSection), slug: "workerslisting", uiPageType: typeof(OfficeWorkers), name: "Assigned workers", templateName: TemplateNames.BINDING, order: 200)] namespace Acme.Web.Admin.UIPages.OfficeManagement { // Lists all users assigned to the curently edited office and allows users to be added or removed public class OfficeWorkers : InfoBindingPage<OfficeUserInfo, UserInfo> { // Configures the ID of the edited binding object [PageParameter(typeof(IntPageModelBinder))] public override int EditedObjectId { get; set; } // Returns the name of the property that is used as the source in the binding object type protected override string SourceBindingColumn => nameof(OfficeUserInfo.OfficeID); // Returns the name of the property that is used as the target in the binding object type protected override string TargetBindingColumn => nameof(OfficeUserInfo.AssignedUserID); // Configures the listing of workers assigned to the office public override async Task ConfigurePage() { // Configures captions of pages and buttons PageConfiguration.ExistingBindingsListing.Caption = "Users assigned as workers"; PageConfiguration.BindingSidePanelListing.Caption = "Add users as workers"; PageConfiguration.AddBindingButtonText = "Add workers"; PageConfiguration.SaveBindingsButtonText = "Confirm"; // Adds a callout with information on top of the page PageConfiguration.ExistingBindingsListing.Callouts.Add( new CalloutConfiguration { Type = CalloutType.QuickTip, ContentAsHtml = true, Headline = "This is a binding page", Content = "Removing items from this page will not delete any users from the database." } ); // Configures columns displayed in the listing of existing bindings PageConfiguration.ExistingBindingsListing.ColumnConfigurations .AddColumn(nameof(UserInfo.UserName), "User name", searchable: true, defaultSortDirection: SortTypeEnum.Asc); PageConfiguration.ExistingBindingsListing.QueryModifiers.AddModifier((objectQuery) => { // Add a query modifier if necessary return objectQuery; }); // Configures columns displayed in the listing of available object PageConfiguration.BindingSidePanelListing.ColumnConfigurations .AddColumn(nameof(UserInfo.UserName), "User name", searchable: true, defaultSortDirection: SortTypeEnum.Asc); PageConfiguration.BindingSidePanelListing.QueryModifiers.AddModifier((objectQuery) => { // Add a query modifier if necessary return objectQuery; }); await base.ConfigurePage(); } } }
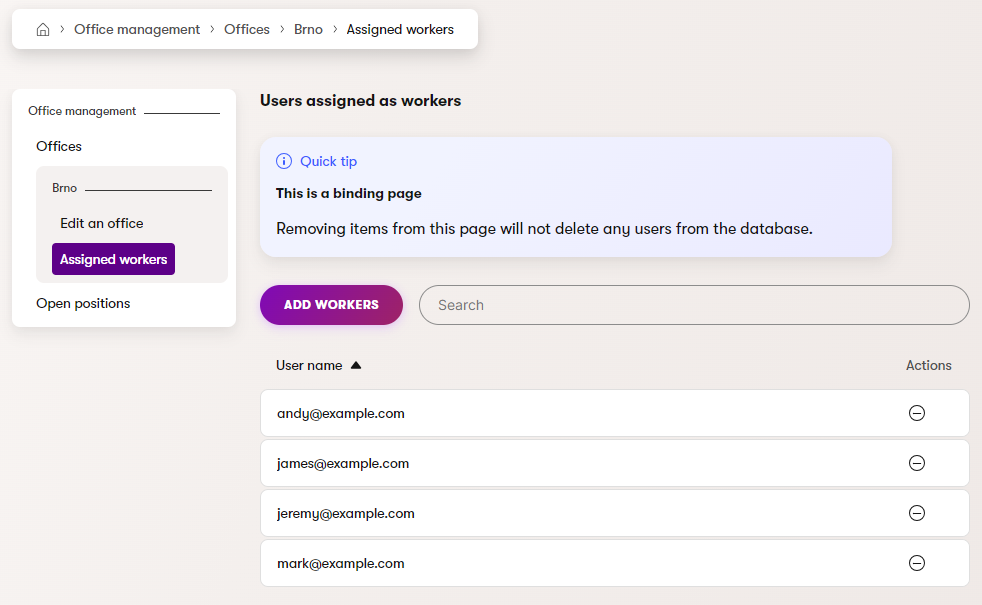
Final page hierarchy of the Office management application
The following diagram shows the final UI page hierarchy of the Office management application:
The application, when accessed on the Assigned workers page and populated with sample data, displays the following: