
Hide builder content from visitors who have not consented to tracking
The activity tracking documentation explains that Xperience logs the Form submit activity automatically, even for users who have not consented to tracking. As the page notes, this means you need to ensure that usage of personal data collected through such activities falls under legitimate interest purposes.
To avoid potential legal complications, you may want to display certain forms only to users who have consented to tracking.
This guide covers the process of creating a page builder section which hides its contents from users who have not given consent for tracking. The code you develop will add an alternate version of the existing Form column section included in the quickstart guides repository.
The code in this guide relies on the value of the CMSCookieLevel cookie, and assumes this has been properly mapped to consent in your application.
You can find an example of this in the data protection series of quickstart guides.
Activity tracking series - prerequisites
This guide is part of a series on Activity tracking, and uses the Xperience by Kentico quickstart guides repository.
If you want to follow along, you can start here.
Activity tracking functionality ties in with consents, which are covered in detail in the Data protection series.
Edit the view model
This form section needs to execute complex logic and change its behavior accordingly, so you should base it on a view component.
A view component will allow you to pass your own model to the section, rather than relying on the ComponentViewModel<TPropertyModel> object Xperience provides for basic sections.
You need to create this view model before you can use it in the view component.
- Navigate to TrainingGuides.Web/Features/Shared/Sections/FormColumn/FormColumnSectionViewModel.cs.
- Add a boolean field to represent whether the form section should render its content.
The SectionAnchor property corresponds to a property of the same name from the existing FormColumnSectionProperties class. It lets editors specify the value of an id attribute added to the HTML <section> tag that wraps the contents of the FormColumnSection.
namespace TrainingGuides.Web.Features.Shared.Sections.FormColumn;

public class FormColumnSectionViewModel
{
    public bool ShowContents { get; set; }
    public string SectionAnchor { get; set; }
}
Alter the view
You must account for the new ShowContents property of the FormColumnSectionViewModel in the view, used to conditionally display its contents.
Navigate to TrainingGuides.Web/Features/Shared/Sections/FormColumn/FormColumnSection.cshtml.
Add a conditional that only shows the view’s contents if the
ShowContentsproperty of the model istrue, or if the page is in preview or page builder mode.Checking for preview mode ensures that the section contents will be visible in Page builder regardless of an editor’s cookie level.
@using TrainingGuides.Web.Features.Shared.Sections.FormColumn
@model FormColumnSectionViewModel

@if(Model.ShowContents || Context.Kentico().Preview().Enabled)
{
    var sectionAnchor = !string.IsNullOrWhiteSpace(Model.SectionAnchor) ? $"id={Model.SectionAnchor}" : "";

    <section class="c-section form" @sectionAnchor>
        <div class="container">
            <div class="row justify-content-center">
                <div class="col-lg-8">
                    <widget-zone />
                </div>
            </div>
        </div>
    </section>
}
Create a new view component and tweak the existing one
The first guide in this series explained how you can use the value of the CMSCookieLevel cookie to determine whether the current visitor is trackable, and showed you how to create a method called CurrentContactCanBeTracked to determine whether or not Xperience should track the current user.
Use this method in a new view component to create a view model and pass it along to the view.
Add a new view component called FormColumnSectionConsentViewComponent.cs to the TrainingGuides.Web/Features/Shared/Sections/FormColumn folder.
Inject an
ICookieConsentServiceinstance.Set the
Invokemethod to take aComponentViewModel<FormColumnSectionProperties>object as a parameter.Xperience will supply this object automatically. You can use it to access properties configured by editors from the
Invokemethod.Use
sectionProperties.Properties.SectionAnchorandCurrentContactCanBeTrackedto populate the properties of a newFormColumnSectionConsentViewModel, and pass it along to the view.Create a new constant to hold the identifier and use it to register the view component as a page builder section.
FormColumnSectionConsentViewComponentusing Kentico.PageBuilder.Web.Mvc; using Microsoft.AspNetCore.Mvc; using TrainingGuides.Web.Features.Shared.Sections.FormColumn; using TrainingGuides.Web.Features.DataProtection.Services; [assembly: RegisterSection( identifier: FormColumnSectionConsentViewComponent.IDENTIFIER, viewComponentType: typeof(FormColumnSectionConsentViewComponent), name: "Form column: Consent-based", propertiesType: typeof(FormColumnSectionProperties), Description = "Form column section that hides its contents if the visitor has not consented to tracking.", IconClass = "icon-square")] namespace TrainingGuides.Web.Features.Shared.Sections.FormColumn; public class FormColumnSectionConsentViewComponent : ViewComponent { public const string IDENTIFIER = "TrainingGuides.FormColumnSectionConsent"; private readonly ICookieConsentService cookieConsentService; public FormColumnSectionConsentViewComponent(ICookieConsentService cookieConsentService) { this.cookieConsentService = cookieConsentService; } public IViewComponentResult Invoke(ComponentViewModel<FormColumnSectionProperties> sectionProperties) { //If the CMSCookieLevel is set to All (1000) or higher, and Data Protection is set up, it means the visitor has the appropriate consent level for tracking. bool showContents = cookieConsentService.CurrentContactCanBeTracked(); var model = new FormColumnSectionViewModel() { SectionAnchor = sectionProperties.Properties.SectionAnchor, ShowContents = showContents }; return View("~/Features/Shared/Sections/FormColumn/FormColumnSection.cshtml", model); } }Adjust the existing FormColumnSectionViewComponent.cs file to account for the new
ShowContentsproperty of the view model.... public IViewComponentResult Invoke(ComponentViewModel<FormColumnSectionProperties> sectionProperties) { var model = new FormColumnSectionViewModel() { SectionAnchor = sectionProperties.Properties.SectionAnchor, ShowContents = true }; return View("~/Features/Shared/Sections/FormColumn/FormColumnSection.cshtml", model); } ...
Add an identifier
Now, in case the identifier of the new consent-based component needs to be accessed externally, add it to the component identifiers file.
Add a new constant to the Sections class in TrainingGuides.Web/ComponentIdentifiers.cs that references the constant from the view component.
...
public static class ComponentIdentifiers
{
    public static class Sections
    {
        ...
        public const string FORM_COLUMN_CONSENT = FormColumnSectionViewComponent.IDENTIFIER;
        ...
    }
    ...
}
What’s next
You have implemented a layout and logic that displays or hides content on the website depending on a visitor tracking consent. In order to see it in action, you need to use it on a page.
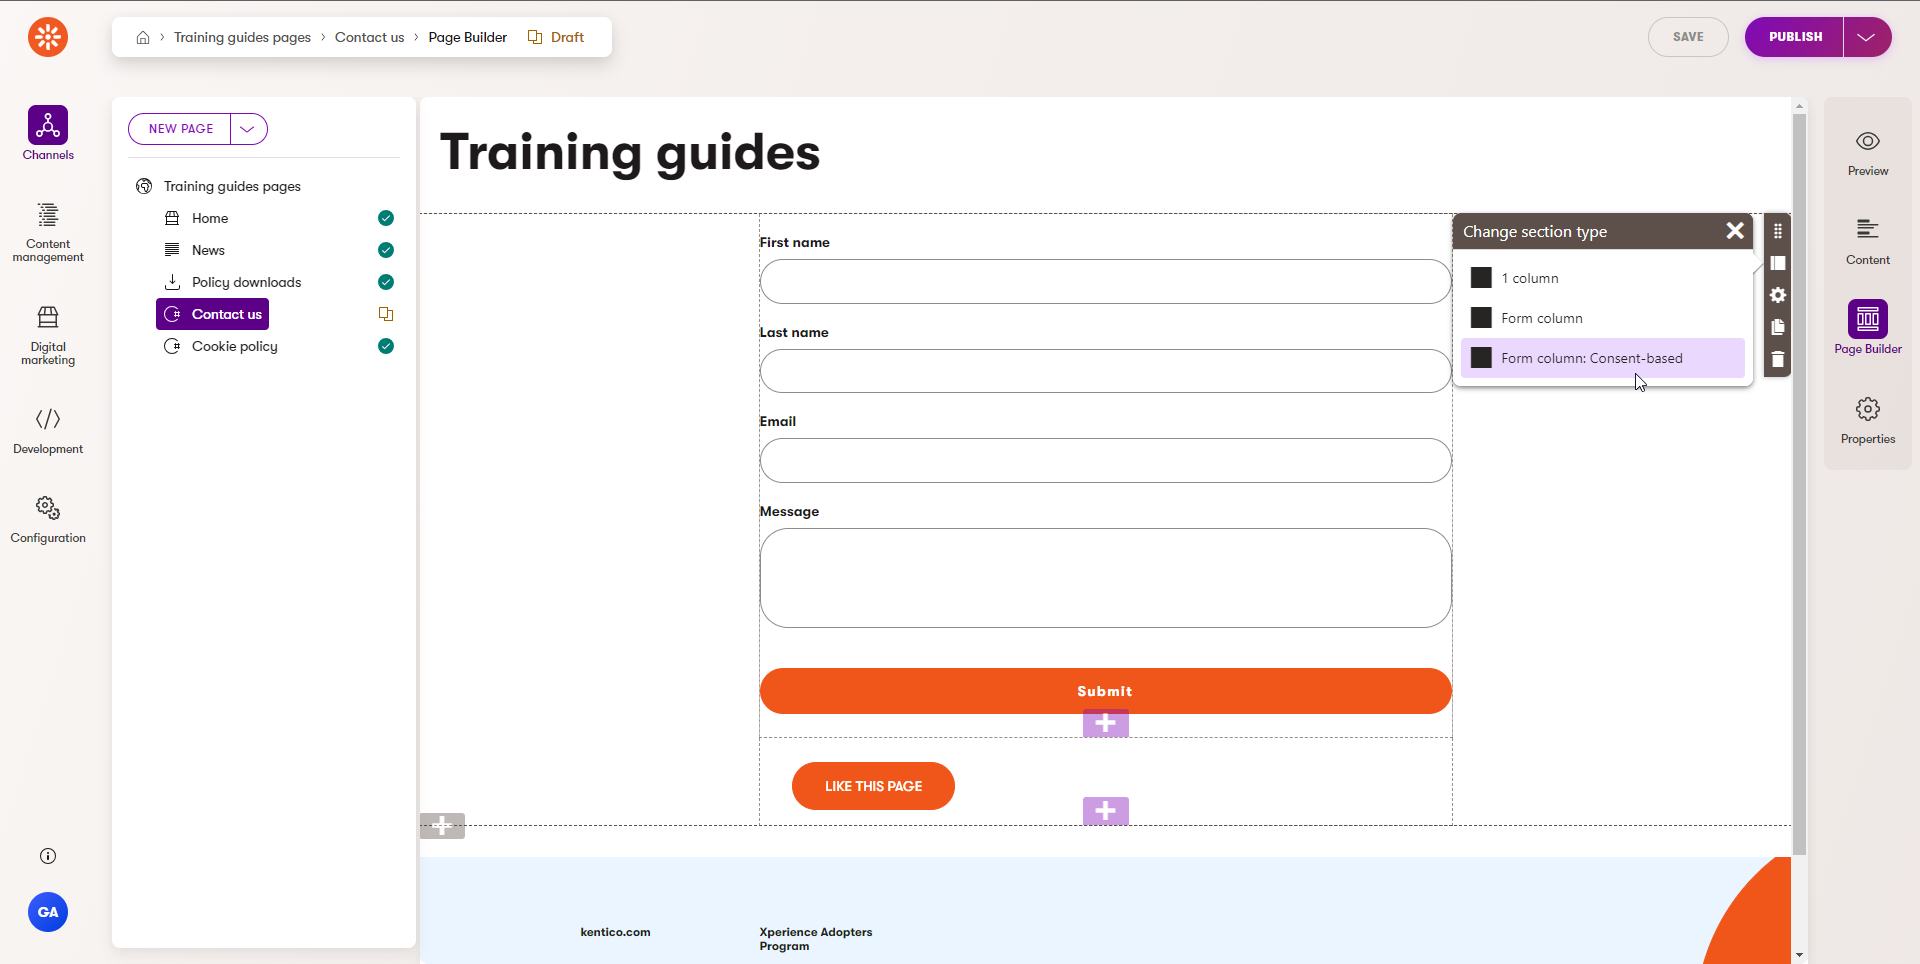
Run your project locally, login to the administration interface, and navigate to the Training guides pages channel.
Click Edit → Create new version to edit the Contact-us page.
Set page builder to use the Form column: Consent-based section, then Save and Publish the web page.
Now pretend that you are a visitor and navigate to your website in a browser’s incognito window. Visit the Cookie policy page, set the cookie level to essential and then visit your Contact us page. The section should not display.
Go back to the Cookie policy page, change your consent to Marketing and revisit Contact us page. If you’ve implemented the functionality properly, you’ll see the form displayed on the page.
Your site now includes a section with a powerful custom logic. Your website editors can use the new section to hide forms on the website from specific visitors. But they are not limited to just forms. They can hide any custom widgets which might lead to, for example, a GDPR compliance breach if displayed for all the visitors.