
Implement cross-site activities
Today, digitally mature businesses often have multiple web sites contributing to their online presence. For example, they may have separate websites for different branches of the company, microsites that tie in with viral marketing campaigns, or specially designated brochure sites for upcoming events.
Developers often craft these sites on diverse platforms, not all of which have the same kind of activity tracking functionality as Xperience by Kentico.
In these cases, Xperience’s Cross-site tracking feature enables the activity of visitors on these external sites to be tracked. It appears in the Activities tab of the Contact management application, alongside contact activities logged directly on the Xperience by Kentico site.
This guide shows you how to use Xperience by Kentico to track contact activities on a separate, external site.
Host your sites securely
As a prerequisite to this guide, you must find a way to securely host the external site files provided in the \src\TrainingGuides - External Site folder of the quickstart guides repository.
Note that for cross-site tracking to work, both your Xperience site and the external site that you want to use cross-site tracking on must be hosted under HTTPS with trusted SSL certificates.
Using self-signed certificates for local testing will not work.
The site must also have unique domain names or subdomains, with no application path or port numbers. You can find more information about the prerequisites in the documentation.
This guide’s example uses a static HTML page for demonstration purposes. You will likely need to do things slightly differently in the framework you are using in order to get your project to output HTML like this example.
Activity tracking series - prerequisites
This guide is part of a series on Activity tracking, and uses the Xperience by Kentico quickstart guides repository.
If you want to follow along, you can start here.
Activity tracking functionality ties in with consents, which are covered in detail in the Data protection series.
Enable cross-site tracking with dynamic consent
The Data protection quickstart guides detail how to create a dynamic mapping between granular cookie levels and consents. If you are referencing this guide without having gone through the data protection series, you can follow the example in the documentation for enabling cross-site tracking in the Program.cs file.
If you have completed the Data protection quickstart guides, follow this example to dynamically use whatever consent is mapped to the Marketing cookie level.
This guide uses the Marketing cookie consent for the sake of example, but you should review which consent is most applicable to cross-site tracking with your legal team and ensure that its wording accurately explains all of its uses. You may even consider making an additional mapping specifically for cross-site tracking.
Create a folder in the TrainingGuides.Web project with the following path: ~/Features/Shared/Helpers/Startup, and define a file within called StartupHelper.cs.
Add a method to this class that retrieves the current
CookieLevelConsentMappingconfigured for the applicationDo not use dependency injection or dependency resolution, as this code will run at startup, before the
ServiceProviderand its collection exist.StartupHelper.csusing CMS.DataEngine; using TrainingGuides.Admin; namespace TrainingGuides.Web.Features.Shared.Helpers.Startup; public class StartupHelper { /// <summary> /// Retrieves the codename of the currently mapped Marketing consent, returning an empty string if it is not found /// </summary> /// <remarks> /// Used in Program.cs to prevent <see cref="DataClassNotFoundException"/> when running CI restore for the first time. /// </remarks> /// <returns></returns> public static async Task<string> GetMarketingConsentCodeName() { string consentCodeName; try { //Do not resolve ICookieLevelConsentMappingInfoProvider or ICookieConsentService-- //This code runs on startup before the app is built, so no ServiceProvider exists. var consentQuery = await CookieLevelConsentMappingInfo.Provider.Get() .GetEnumerableTypedResultAsync(); var consent = consentQuery.FirstOrDefault(); consentCodeName = consent?.MarketingConsentCodeName?.FirstOrDefault(); } catch (DataClassNotFoundException) { consentCodeName = string.Empty; } return consentCodeName ?? string.Empty; } }Open the Program.cs file, and go to the features delegate passed to the
AddKenticomethod, adding the async keyword.Call the
UseCrossSiteTrackingextension, and use the newStartupHelperclass to determine theConsentNameproperty of theCrossSiteTrackingConsentOptionsobject.Set the
WebSiteChannelNameto the codename of the only web channel present in the repository, and theAgreeCookieLevelto theAllCMSCookieLevel.
...
// Enable desired Kentico Xperience features
builder.Services.AddKentico(async features =>
{
    ...
    features.UseCrossSiteTracking(
        new CrossSiteTrackingOptions
        {
            ConsentSettings = new[] {
                new CrossSiteTrackingConsentOptions
                {
                    WebsiteChannelName = "TrainingGuidesPages",
                    ConsentName = await StartupHelper.GetMarketingConsentCodeName(),
                    AgreeCookieLevel = CookieLevel.All.Level
                }
            },
        });
    ...
});
...
Register the site for cross-site tracking
Now the external site needs to be registered in the Xperience administration application.
Log in to the Xperience by Kentico administration interface and follow the steps outlined in the documentation to enable tracking for the external site.
Do not copy the tracking snippet into the site’s HTML yet. You need to modify the snippet slightly first, and this guide will cover the process in a later step.
Add a controller to indicate the right consent
Looking at the Cross-site tracking documentation, you might have noticed that the consent example has a hard-coded consent codename.
The consent functionality from the data protection series of quickstart guides dynamically maps consents to different cookie tracking levels, so you must account for this, and retrieve the correct consent from the external site.
This section applies if you have gone through the Data protection series of quickstart guides, or have otherwise created a custom consent mapping.
Create a controller to provide the codename of the relevant consent to the external site.
- Add a new empty controller named ConsentCodnameController.cs to the ~/Features/DataProtection/Controllers folder of the TrainingGuides.Web project.
- Create an asynchronous controller action called
MarketingConsent. - Decorate the action with an attribute to specify the ~/consent/marketing route for the controller, and designate it as an HTTP GET endpoint.
- Inject an ICookieConsentService instance, and use it to get the current cookie level mapping, returning the codename of the marketing consent as JSON.
using TrainingGuides.Admin;
using Microsoft.AspNetCore.Mvc;
using TrainingGuides.Web.Features.DataProtection.Services;

namespace trainingGuides.Web.Features.DataProtection.Controllers;

public class ConsentCodnameController : Controller
{
    private readonly ICookieConsentService cookieConsentService;

    public ConsentCodnameController(ICookieConsentService cookieConsentService)
    {
        this.cookieConsentService = cookieConsentService;
    }

    //Provides the name of the consent mapped to the Marketing cookie level for cross-site tracking.
    [HttpGet("consent/marketing")]
    public async Task<IActionResult> MarketingConsent()
    {
        CookieLevelConsentMappingInfo mapping = await cookieConsentService.GetCurrentMapping();
        string marketingConsent = mapping.MarketingConsentCodeName.FirstOrDefault();
        return Json(marketingConsent);
    }
}
This controller action will allow the external site to fetch the codename of the marketing consent.
Set a CORS policy
When the tracking snippet is added to the external site, it will add a link to a script from the Xperience site, meaning you will need to set up a CORS (cross-origin resource sharing) policy that allows the external site to use resources from your Xperience project.
This is enabled during application startup in .NET, so it can be enabled in the Program.csfile.
Open Program.csin the TrainingGuides.Web project and add a variable to store the name of your policy.
Program.cs... string trainingGuidesAllowSpecificOrigins = "_trainingGuidesAllowSpecificOrigins"; ...After the builder is created, use the
AddCorsextension to add CORS to the service collection.Add a policy, assigning the name defined earlier, and use the
WithOriginsextension to allow sharing with the domain where you hosted your external site.Use the
WithHeadersandAllowCredentialsextensions to allow requests with credentials and thecontent-typeheader.Program.cs... var builder = WebApplication.CreateBuilder(args); ... builder.Services.AddCors(options => { options.AddPolicy(name: trainingGuidesAllowSpecificOrigins, policy => { policy .WithOrigins("https://The-URL-of-your-external-site.com") .WithHeaders("content-type") .AllowAnyMethod() .AllowCredentials(); }); }); ...After the application is built, but before it is run, call the
UseCorsextension, passing the name of the policy you set up.Program.cs... app.UseCors(trainingGuidesAllowSpecificOrigins); ...
Now resource requests from the external domain to the Xperience application will not be blocked.
Add scripts to the page
With a CORS policy in place that allows your external site to use scripts from Xperience, there are no more blocking factors, and you can add the necessary scripts to the external site.
Looking over the index.html page found in the /src/TrainingGuides - External Site folder of the quickstart guides repository, you may notice the buttons and label match the basic example for consent management found in the documentation. Much of the JavaScript in this section will also mirror functionality from this example, with some key changes to fit this guide’s scenario.
Add the Xperience tracking snippet
Log in to the administration interface of Xperience and open the record for your external site in the Cross-site tracking application.
Copy the script snippet and paste it into the header of the external site.
Remove the
kxt('pagevisit');line.This line, which logs a Page visit activity, will be added in later, after consent has been confirmed.
...
<script type="text/javascript">
    (function (w, d, s, e, n) {
        w.XperienceTrackerName = n;
        w[n] = w[n] || function () {
            (w[n].q = w[n].q || []).push(arguments);
        };
        var scriptElement = d.createElement(s);
        var scriptSection = d.getElementsByTagName(s)[0];
        scriptElement.async = 1;
        scriptElement.src = e.replace(/\/+$/, '') + '/Kentico.Resource/CrossSiteTracking/Logger.js';
        scriptSection.parentNode.insertBefore(scriptElement, scriptSection);
        w[n]('init', { mainSiteUrl: e, document: d, window: w });
    })(window, document, 'script', 'https://The-URL-of-your-Xperience-site.com', 'kxt');
</script>
...
This snippet adds a script reference to a JavaScript file in your Xperience instance which contains functions related to activities and consent.
Retrieve the consent codename from the controller
Xperience tracking scripts that rely on consent need to know the codename of the consent associated with tracking. You need to create a function that retrieves the codename from the controller action defined earlier in this guide. Create a javascript file with a function to retrieve this value to the existing script block.
- Add a new JavaScript file to the external site called activity.js.
- Create a function
getConsentCodeName, which fetches a response from the URL of yourMarketingConsentcontroller action, located at the /consent/marketing path of your Xperience site. - Convert the JSON data from the response to a string in your consuming code.
- Remove any extraneous quotation marks, and return the value.
...
//Fetches the codename of the marketing consent
function getConsentCodeName(){
    return fetch("https://The-URL-of-your-Xperience-site.com/")
        .then(response => response.json())
        .then(consentJson => JSON.stringify(consentJson).replace(/"+/g, ''));
}
...
Add handler functions for activities
The file also needs functions to log the activities that will be tracked on the page.
Add a function that agrees to a given consent for the current contact.
Use a similar approach to the example in the documentation, but accept a parameter to specify the consent codename.activity.js... // Click handler that creates a consent agreement for the current contact function trackingConsentAgree(consentName) { kxt('consentagree', { codeName: consentName, callback: () => { // Enables tracking for any subsequent logging scripts kxt('updateconsent', { allow_tracking: true, allow_datainput: true }); }, onerror: t => console.log(t) }); } ...With the same approach, add a function that revokes a given consent for the current contact.
activity.js... // Click handler that revokes the tracking consent agreement for the current contact function trackingConsentRevoke(consentName) { kxt('consentrevoke', { codeName: consentName, callback: () => { // Disables tracking for any subsequent logging scripts kxt('updateconsent', { allow_tracking: false, allow_datainput: false }); }, onerror: t => console.log(t) }); } ...Create a function that logs a link click activity, using the alt text of the link to populate the label.
The label should be unique in order to indicate which link on the external site was clicked in the Xperience admin interface. Keep this in mind when adding links to your external site.activity.js... //Click handler that logs a link click. function logLinkClick() { kxt('click', { label: this.getAttribute("alt"), onerror: t => console.log(t) }); } ...Define a function that logs the file download custom activity, similar to the example from the custom activities guide.
activity.js... //Click handler that logs a file download activity function logDownload() { kxt('customactivity', { type: 'filedownload', value: this.getAttribute('alt') + ', ' + window.location.pathname, title: 'File download', onerror: t => console.log(t) }); } ...
Set up the page on load
These functions allow you to set up click event handlers, and set up the page using the marketing consent.
Add a new function that handles the
DOMContentLoadedevent.Disable tracking by default, then call the
getConsentCodeNamefunction.When the promise is fulfilled, write the text of the marketing consent to the
lblConsentTextlabel.If the current contact has already agreed to the marketing consent, enable tracking.
The activity will only be logged if the consent is given, thanks to the previous step. Call the
kxtfunction to log a page visit.Register click handlers for the
btnConsentAgreeandbtnConsentRevokebuttons, assigning the corresponding functions and passing the marketing consent codename.Outside of the consuming code for the consent name promise, assign the
logDownloadfunction to the click event of any links with thedownloadattribute, and thelogLinkClickfunction to any other links.
//When the document loads
document.addEventListener('DOMContentLoaded', () => {
    // Disables all tracking by default
    kxt('consentdefault', {
        allow_tracking: false,
        allow_datainput: false,
        onerror: t => console.log(t)
    });

    getConsentCodeName()
        .then(consentName => {
            // Retrieves and displays the consent text
            kxt('consentdata', {
                codeName: consentName,
                languageName: 'en',
                callback: consentData => {
                    document.getElementById('lblConsentText').innerHTML = consentData.shortText;
                },
                onerror: t => console.log(t)
            });

            // Enables tracking if the current contact has agreed with the consent
            kxt('consentcontactstatus', {
                codeName: consentName,
                callback: consentStatus => {
                    if (consentStatus.isAgreed) {
                        kxt('updateconsent', {
                            allow_tracking: true,
                            allow_datainput: true
                        });
                    }
                },
                onerror: t => console.log(t)
            });

            // Logs a page visit activity (if tracking is enabled for the current contact)
            kxt('pagevisit', {
                onerror: t => console.log(t)
            });

            //Registers click event handlers for consent functions
            const consentAgreeButton = document.getElementById("btnConsentAgree");
            consentAgreeButton.addEventListener("click", () =>
                trackingConsentAgree(consentName)
            );

            const consentRevokeButton = document.getElementById("btnConsentRevoke");
            consentRevokeButton.addEventListener("click", () =>
                trackingConsentRevoke(consentName)
            );
        });

    const links = document.getElementsByTagName("a");
    //Registers click event handlers for download and standard links
    for (let i = 0; i < links.length; i++) {
        if (links[i].hasAttribute("download")) {
            links[i].addEventListener("click", logDownload);
        }
        else{
            links[i].addEventListener("click", logLinkClick);
        }
    }
});
Add the scripts to the page
The JavaScript code is fully implemented, and can be referenced from the HTML page.
Return to the index.html file of the external site
Beneath the Xperience snippet, add a script reference to the newly created file.
index.html<script src="./activity.js" ></script>
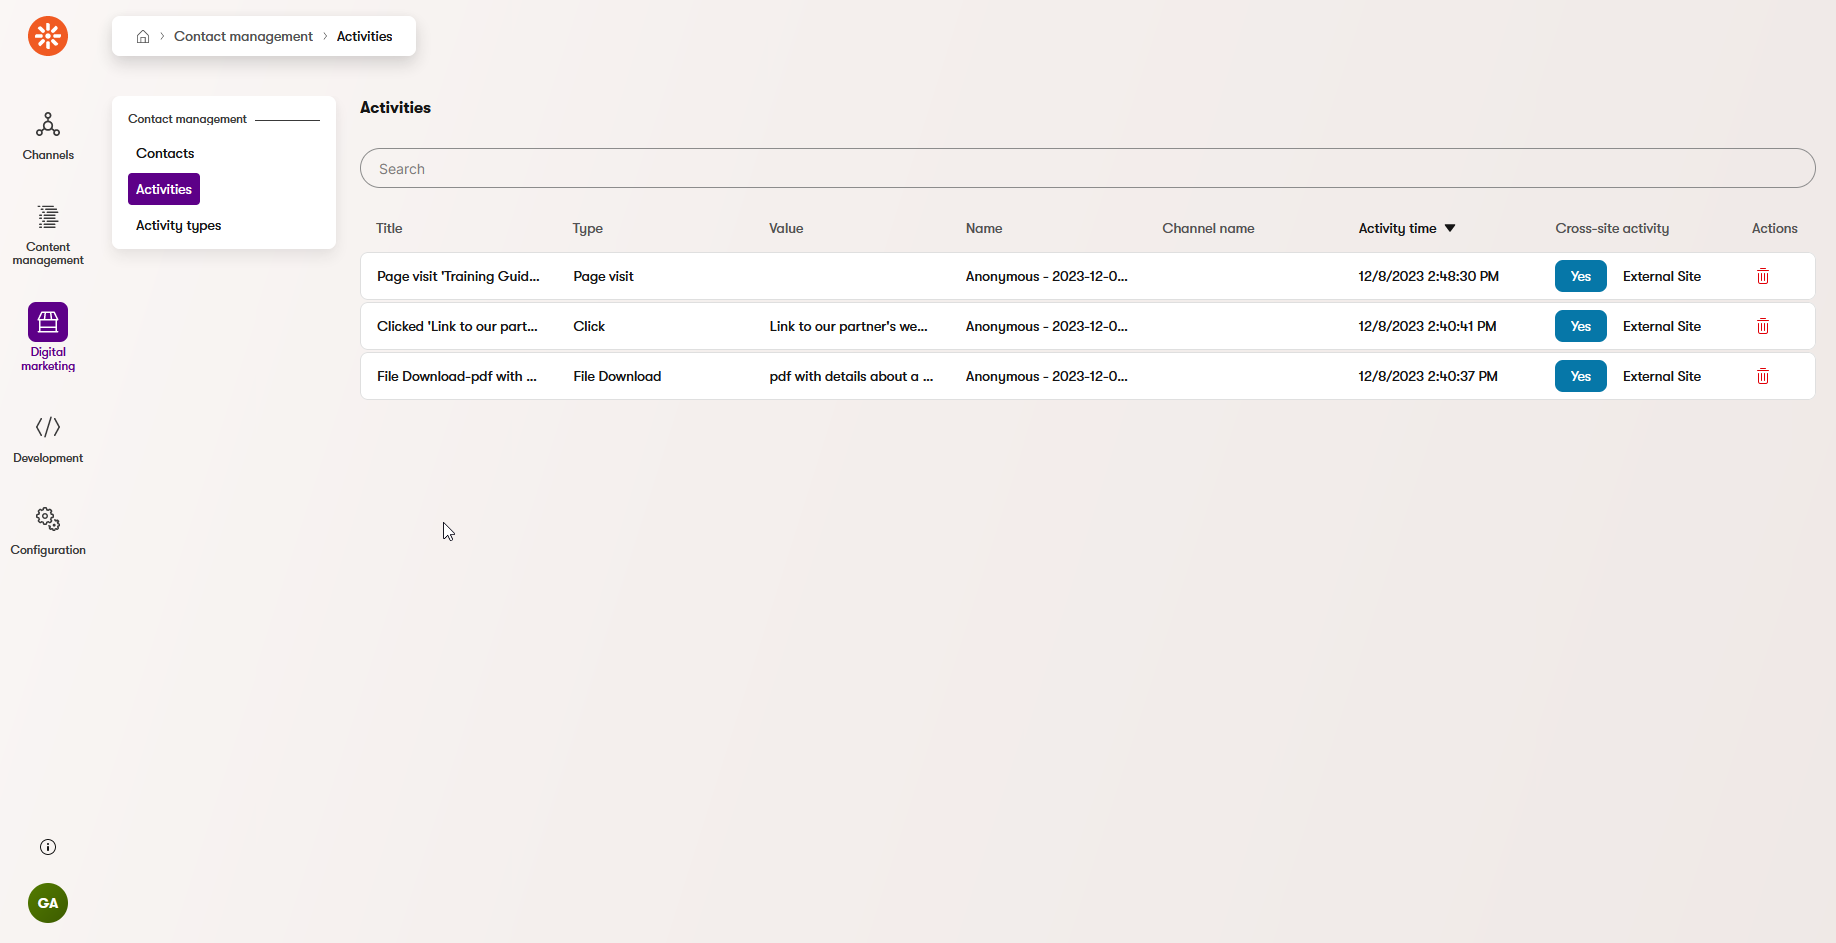
With this code in place, the external site will log page visit, file download, and link click activities on the index page, depending on the current contact’s consent. These activities can be viewed on the Activities tab of the Contact management application in the Xperience admin interface.
The following video demonstrates the functionality added in this guide.
After the visitor gives consent on the external site, Xperience tracks their page visit, download, and link click activity. Then, after consent is revoked, these activities are no longer tracked.
What’s next?
Now that the external site logs activities with your Xperience instance, you can experiment with improvements to this basic site. For example, you can log different activities, such as the Page like activity from the Custom activities guide, and hide the corresponding buttons depending on whether the current contact has or hasn’t consented to tracking.
You can also handle data input to map data to contacts, and handle error states as shown in the documentation example.