
Display page content
This page is part of a tutorial, which you should follow sequentially from beginning to end. Go to the first page: Xperience by Kentico overview.
In this step, you’ll:
- In this step, you’ll:
- Configure the Home page URL
- Disable the default domain root message
- Enable Page Builder
- Display the Home page
- Use Page Builder
- Display the Medical center page
In the previous step, we’ve created the basic layout and added styling for your website. In this step, you’ll finally get to see what the content stored in Xperience looks like on the live site. So let’s roll up our sleeves and write the required code.
The dynamic content of your website’s pages is created and maintained in the Xperience administration, and stored within the project’s database. When working with data on an MVC site, we need to write code that retrieves the data, prepare controllers that handle the appropriate URL routes, and create views with corresponding models that format the data into the desired output.
Configure the Home page URL
Currently, accessing the domain root of our website returns a default text message. This makes sense: both pages that we created are located at different URLs. One is available at ~/Home, the other at ~/MedicalCenter.
We want all users that access the domain root (~/) to see the Home page content. We can do that by configuring our MEDLAB Clinic Pages website channel:
- In the Xperience administration interface, open the Channel management application.
- Select the MEDLAB Clinic Pages channel.
- Open the Channel settings tab.
- Under Content tree-based routing, set the Home page to: /Home
- Select Save.
Both the domain root and ~/Home URL now display the Home page. The system rewrites the home page URL to the domain root for optimal SEO – we want the home page content to only be available under a single URL.
Disable the default domain root message
By default, the Boilerplate project template that is the base of your website returns a warning message when displaying the domain root. Since we’ll be creating the Home page in the next steps, it’s time to disable this warning message:
Before you edit the project’s code, shut down the application in the Kestrel web server. Press
Ctrl+Cin the command line prompt where the application is running.Edit the application’s Program.cs file.
Comment out or delete the endpoint handling for the “/” domain root:
 ...

 var app = builder.Build();
 app.InitKentico();

 app.UseStaticFiles();

 app.UseCookiePolicy();

 app.UseAuthentication();

 app.UseKentico();

 // app.UseAuthorization();

 app.Kentico().MapRoutes();

 /* Disables the default endpoint handling for "/"
 app.MapGet("/", () => "The MEDLABClinic site has not been configured yet.");
 */

 app.Run();
Save your changes.
The application is now ready to display your own website root (Home page) content.
Enable Page Builder
The Page Builder enables users to manage page content via an intuitive drag-and-drop interface. When using Page Builder, content editors work with widgets – configurable pieces of content represented by a partial view or a view component. To enable
Edit the application’s Program.cs file.
Uncomment the
features.UsePageBuilder()call withinbuilder.Services.AddKentico.Set the
PageBuilderOptionsparameter of theUsePageBuildermethod to choose which content types support Page Builder.In our case, we’ll enable Page Builder for the Home page. Use the generate Home class to get the content type’s code name.
Program.csusing Kentico.Content.Web.Mvc.Routing; using Kentico.PageBuilder.Web.Mvc; using Kentico.Web.Mvc; using MEDLAB; using Microsoft.AspNetCore.Builder; using Microsoft.Extensions.DependencyInjection; ... // Enable desired Kentico Xperience features builder.Services.AddKentico(features => { // Enables Page Builder for the Home content type using the generated Home class features.UsePageBuilder(new PageBuilderOptions { ContentTypeNames = new[] { Home.CONTENT_TYPE_NAME, } }); ...
Save the Program.cs file.
This enables Page Builder for the home page. In the next steps, we’ll add an editable area where editors can place widgets.
Display the Home page
We will use MVC architecture to display the home page, which requires a view model and controller class, as well as a Razor view.
Create the Home view model
First, we create a view model.
In Visual Studio, create a Models folder in the project’s root directory.
Inside the Models folder, create a new HomePageViewModel.cs class using Add → Class.
Create a property for each field of the Home content type.
 public string HomeHeader { get; init; }
 public string HomeTextHeading { get; init; }
 public string HomeText { get; init; }
 public string HomePageTitle { get; init; }
Add a constructor for the
HomePageViewModelclass, accepting aHomeobject as a parameter.public HomePageViewModel(Home home) { HomeHeader = home.HomeHeader; HomeTextHeading = home.HomeTextHeading; HomeText = home.HomeText; HomePageTitle = home.HomePageTitle; }Add the missing
usingstatement required to access theHomeclass generated for your content type (see Add missing using in Visual Studio).Save your changes.
The final code of your HomePageViewModel should look like this:
using MEDLAB;
namespace MEDLABClinic.Models
{
public class HomePageViewModel
{
public string HomeHeader { get; init; }
public string HomeTextHeading { get; init; }
public string HomeText { get; init; }
public string HomePageTitle { get; init; }
 public HomePageViewModel(Home home)
 {
     HomeHeader = home.HomeHeader;
     HomeTextHeading = home.HomeTextHeading;
     HomeText = home.HomeText;
     HomePageTitle = home.HomePageTitle;
 }
}
}
Create the Home controller
As part of the MVC architecture, we now need to create a controller for the Home page.
Create a Controllers folder in the project’s root directory.
Inside the folder, create a new HomeController.cs class using Add → Class.
Add the
RegisterWebPageRouteassembly attribute above the class and namespece. This registers the controller to handle routes targeting our Home content type.[assembly: RegisterWebPageRoute( contentTypeName: Home.CONTENT_TYPE_NAME, controllerType: typeof(HomeController), WebsiteChannelNames = new[] { "MEDLABClinicPages" })]With this registration, routing is hanndled automatically by the system.
To learn more about content tree-based routing, see Set up content tree-based routing.
To retrieve the content of the Home page, we need to access the
IContentQueryExecutorservice using constructor dependency injection. The class should now look like this:public class HomeController : Controller { // Service for executing content item queries private readonly IContentQueryExecutor executor; public HomeController(IContentQueryExecutor executor) { this.executor = executor; } }Next, we need an asynchronous
Index()method to retrieve the home page data, map the data to our view model, and pass it to the view.public async Task<IActionResult> Index() { var query = new ContentItemQueryBuilder() // Scopes the query to pages of the MEDLAB.Home content type .ForContentType(Home.CONTENT_TYPE_NAME, config => config // Retrieves the page with the /Home tree path under the MEDLABClinicPages website channel .ForWebsite("MEDLABClinicPages", PathMatch.Single("/Home"))); // Executes the query and stores the data in the generated 'Home' class Home page = (await executor.GetMappedWebPageResult<Home>(query)).FirstOrDefault(); // Passes the home page content to the view using HomePageViewModel return View("Views/ContentTypes/Home.cshtml", new HomePageViewModel(page)); }The code retrieves page (content item) data using the Xperience Content item query API. Content item query provides an abstraction layer over your SQL database and allows you to build and execute queries. You can adjust how the data is retrieved by calling additional methods.
See the documentation if you wish to learn more: Content item API
Add the missing
usingstatements (see Add missing using in Visual Studio).Save your changes.
The resulting controller code should look like this:
using Microsoft.AspNetCore.Mvc;
using System.Linq;
using System.Threading.Tasks;
using CMS.ContentEngine;
using CMS.Websites;
using Kentico.Content.Web.Mvc.Routing;
using MEDLAB;
using MEDLABClinic.Controllers;
using MEDLABClinic.Models;
 [assembly: RegisterWebPageRoute(
     contentTypeName: Home.CONTENT_TYPE_NAME,
     controllerType: typeof(HomeController),
     WebsiteChannelNames = new[] { "MEDLABClinicPages" })]
namespace MEDLABClinic.Controllers
{
public class HomeController : Controller
{
// Service for executing content item queries
private readonly IContentQueryExecutor executor;
public HomeController(IContentQueryExecutor executor)
{
this.executor = executor;
}
 public async Task<IActionResult> Index()
 {
     var query = new ContentItemQueryBuilder()
                         // Scopes the query to pages of the MEDLAB.Home content type
                         .ForContentType(Home.CONTENT_TYPE_NAME,
                         config => config
                             // Retrieves the page with the /Home tree path under the MEDLABClinicPages website channel
                             .ForWebsite("MEDLABClinicPages", PathMatch.Single("/Home")));

     // Executes the query and stores the data in the generated 'Home' class
     Home page = (await executor.GetMappedWebPageResult<Home>(query)).FirstOrDefault();

     // Passes the home page content to the view using HomePageViewModel
     return View("Views/ContentTypes/Home.cshtml", new HomePageViewModel(page));
 }
}
}
Create the Home view
Now we’ll create the view file referenced in the controller.
- Create a ContentTypes folder under ~/Views/.
- Add an empty razor view named Home.cshtml.
Now we need to provide the formatting and design for pages based on the Home content type.
Open the Home.cshtml view file.
Remove the initial code and comments in the view code.
Specify the following model class:
@model MEDLABClinic.Models.HomePageViewModelSet the
ViewBag.Titlevalue to theModel.HomePageTitleproperty:@{ ViewBag.Title = Model.HomePageTitle; }Add Xperience Tag Helpers to the page:
@addTagHelper *, Kentico.Content.Web.MvcCall the
<page-builder-styles />and<page-builder-scripts />tag helpers within the corresponding Razor sections (as defined in the site’s _Layout). The tag helpers render links to stylesheets and scripts required by the Page Builder functionality.@section styles { @* Includes CSS necessary for page builder functionality *@ <page-builder-styles /> } @section scripts { @* Includes scripts necessary for page builder functionality *@ <page-builder-scripts /> }From the index.html file in the tutorial resources, copy the HTML code of the two <section>elements in the body tag (styled with the teaser and content CSS classes) to the Home view.
In the teaser section, replace the text of the paragraph element with the
Model.HomeHeaderproperty.In the content section, replace the following values:
- The text of the heading element with the
Model.HomeTextHeadingproperty. - The text of the paragraph element with the
Model.HomeTextproperty.
- The text of the heading element with the
Call the
<editable-area />tag helper with thearea-identifier="editableArea"attribute at the end of thecontentsection’s first<div>element.Editable areas serve as containers for Page Builder widgets. Each editable area must be defined with a string identifier that is unique within the context of the given view (editableArea in this case).
<editable-area area-identifier="editableArea" />Save your changes.
The final code of your Home view should look like this:
@addTagHelper *, Kentico.Content.Web.Mvc
@model MEDLABClinic.Models.HomePageViewModel
 @{
     ViewBag.Title = Model.HomePageTitle;
 }
 @section styles
 {
     @* Includes CSS necessary for page builder functionality *@
     <page-builder-styles />
 }

 @section scripts
 {
     @* Includes scripts necessary for page builder functionality *@
     <page-builder-scripts />
 }
<section class="teaser">
<div class="col-sm-offset-3 col-sm-4">
<p>@Model.HomeHeader</p>
</div>
<div class="clearfix"></div>
</section>
<section class="content">
<div class="col-sm-offset-3 col-sm-5">
<h1>@Model.HomeTextHeading</h1>
<p>@Model.HomeText</p>
<editable-area area-identifier="editableArea" />
</div>
<div class="clearfix"></div>
</section>
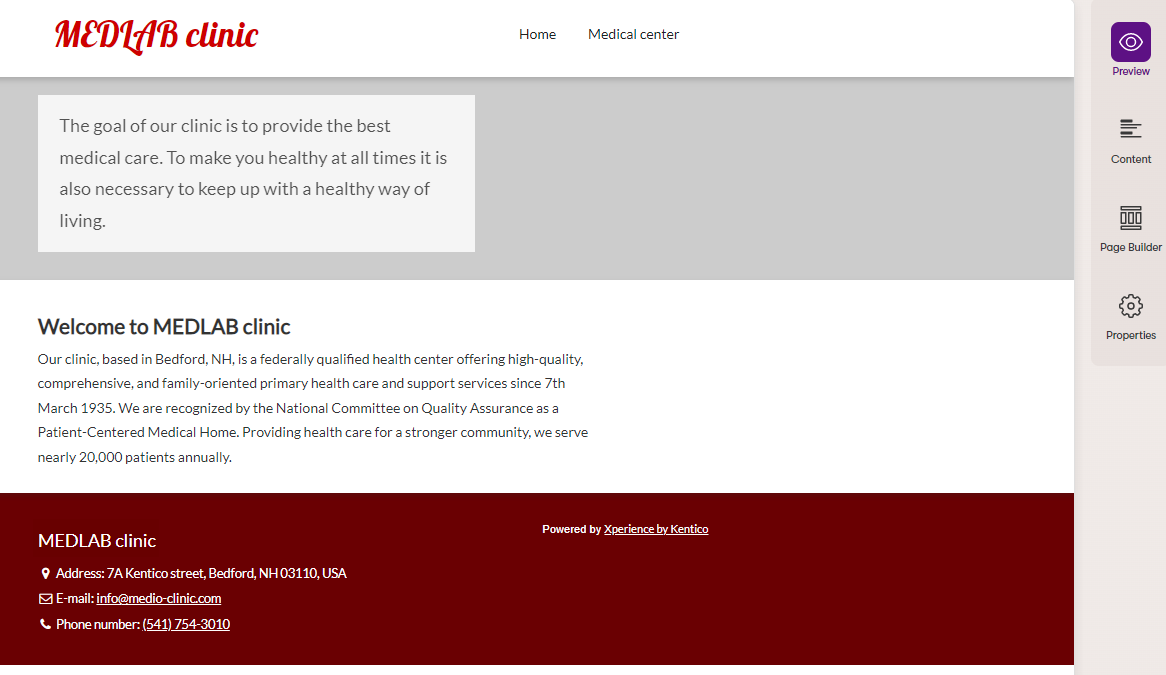
Preview the Home page
Let’s Rebuild your project and see how the page looks!
When we start the application again (dotnet run in the command line prompt), our configuration of the website channel ensures the request is redirected to ~/Home and displayed using the Home.cshtml view file.
You can also preview the page directly in the Xperience administration. Switch to the MEDLAB Clinic Pages website channel application and select the Preview mode.
Use Page Builder
The Home content type has Page Builder enabled, we’ve included Page Builder scripts and styles on the page, and also added the <editable-area /> tag helper to the page’s view. This means that Page Builder is active on the Home page, so let’s try it out.
- Open the Pages application in the Xperience administration.
- Select the Home page in the content tree.
- Switch to the Page Builder view mode.
- To edit the page, select Edit page → Create new version.
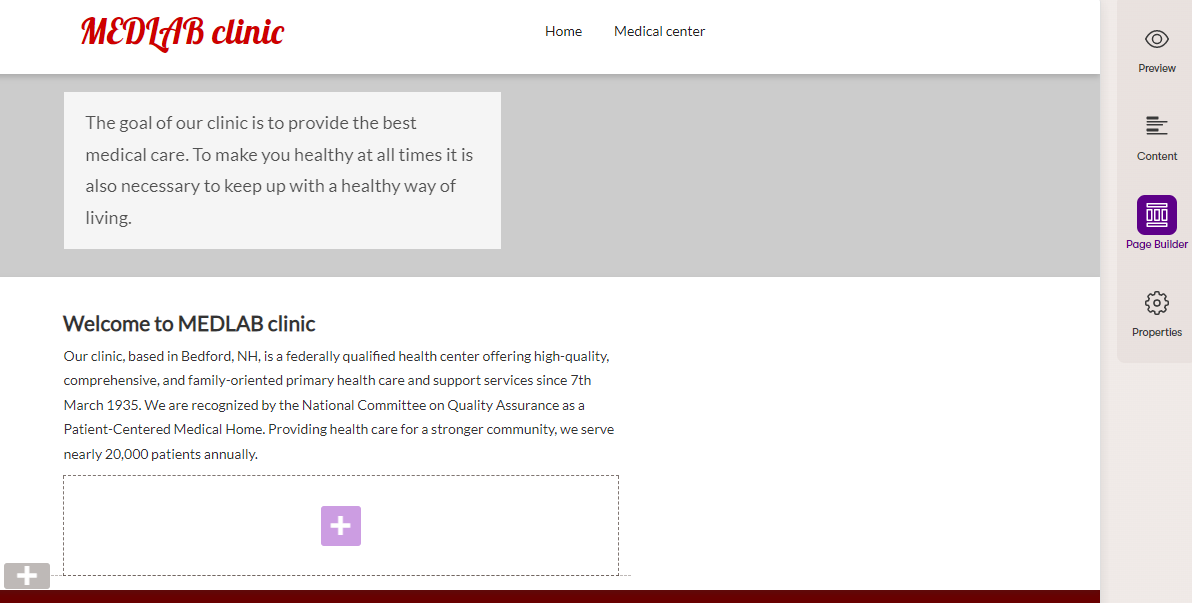
- Try adding a widget to the editable zone in Page Builder, for example Rich text.
- Save the changes and Publish the page.
The content added via the widget appears on the live site.
Display the Medical center page
Using a similar workflow as with the Home page, we will now display the Medical center page using MVC architecture.
Create the Medical center view model
To display the Medical center page, we first need to create a view model.
In Visual Studio, expand the Models folder in your project’s root directory.
Create a new MedicalCenterPageViewModel.cs class.
Add the following code into the class:
 using MEDLAB;

 namespace MEDLABClinic.Models
 {
     public class MedicalCenterPageViewModel
     {
         public string MedicalCenterHeader { get; init; }
         public string MedicalCenterText { get; init; }
         public string MedicalCenterPageTitle { get; init; }

         public MedicalCenterPageViewModel(MedicalCenter medicalCenter)
         {
             MedicalCenterHeader = medicalCenter.MedicalCenterHeader;
             MedicalCenterText = medicalCenter.MedicalCenterText;
             MedicalCenterPageTitle = medicalCenter.MedicalCenterPageTitle;
         }
     }
 }
Save your changes.
Create the Medical Center controller
We now need to create a controller for the Medical center page.
In the Controllers folder, create a new MedicalCenterController.cs class.
Add the
RegisterWebPageRouteassembly attribute above the controller class and namespece to register routing for the Medical center content type.[assembly: RegisterWebPageRoute( contentTypeName: MedicalCenter.CONTENT_TYPE_NAME, controllerType: typeof(MedicalCenterController), WebsiteChannelNames = new[] { "MEDLABClinicPages" })]Add following code to the class:
 using Microsoft.AspNetCore.Mvc;
 using System.Linq;
 using System.Threading.Tasks;

 using CMS.ContentEngine;
 using CMS.Websites;

 using Kentico.Content.Web.Mvc.Routing;

 using MEDLAB;
 using MEDLABClinic.Controllers;
 using MEDLABClinic.Models;

 [assembly: RegisterWebPageRoute(
     contentTypeName: MedicalCenter.CONTENT_TYPE_NAME,
     controllerType: typeof(MedicalCenterController),
     WebsiteChannelNames = new[] { "MEDLABClinicPages" })]

 namespace MEDLABClinic.Controllers
 {
     public class MedicalCenterController : Controller
     {
         // Service for executing content item queries
         private readonly IContentQueryExecutor executor;

         public MedicalCenterController(IContentQueryExecutor executor)
         {
             this.executor = executor;
         }

         public async Task<IActionResult> Index()
         {
             var query = new ContentItemQueryBuilder()
                                 // Scopes the query to pages of the MEDLAB.MedicalCenter content type
                                 .ForContentType(MedicalCenter.CONTENT_TYPE_NAME,
                                 config => config
                                     // Retrieves the /Medical_center page under the MEDLABClinicPages website channel
                                     .ForWebsite("MEDLABClinicPages", PathMatch.Single("/Medical_center")));

             // Executes the query and stores the data in the generated 'MedicalCenter' class
             MedicalCenter page = (await executor.GetMappedWebPageResult<MedicalCenter>(query)).FirstOrDefault();

             // Passes the medical center page content to the view using MedicalCenterPageViewModel
             return View("Views/ContentTypes/MedicalCenter.cshtml", new MedicalCenterPageViewModel(page));
         }
     }
 }
Save your changes.
Create the Medical center view
Now let’s create a view that uses MEDLABClinic.Models.MedicalCenterPageViewModel as its model class.
The Medical center content type contains a field that is managed by a rich text editor, which means you need to handle potential HTML elements in the content (for example text styling, hyperlinks, images, etc.).
To display the content of the rich text editor fields in Razor views, use the Html.Raw method. This disables HTML encoding for the submitted value.
Expand the Views/ContentTypes folder.
Add an empty razor view named MedicalCenter.cshtml.
Remove the initial code and comments in the view code.
Set the model class to
MEDLABClinic.Models.MedicalCenterPageViewModel.@model MEDLABClinic.Models.MedicalCenterPageViewModelSet the
ViewBag.Titlevalue to theModel.MedicalCenterPageTitleproperty:@{ ViewBag.Title = Model.MedicalCenterPageTitle; }From the medical-center.html file in the tutorial resources, copy the HTML code of the two
<section>elements in the body tag (styled with the teaser and content CSS classes) to the MedicalCenter view.In the
teasersection, replace the text of the paragraph tag with theModel.MedicalCenterHeaderproperty.In the
contentsection, replace both the heading and the paragraph with the following Razor call:@Html.Raw(Model.MedicalCenterText)Save your changes.
The final code of your MedicalCenter view should look like this:
@model MEDLABClinic.Models.MedicalCenterPageViewModel
 @{
     ViewBag.Title = Model.MedicalCenterPageTitle;
 }
<section class="teaser">
<div class="col-sm-offset-3 col-sm-4">
<p>@Model.MedicalCenterHeader</p>
</div>
<div class="clearfix"></div>
</section>
<section class="content">
<div class="col-sm-offset-3 col-sm-5">
@Html.Raw(Model.MedicalCenterText)
</div>
<div class="clearfix"></div>
</section>
Remember to Rebuild your project after saving the changes and start up the application again (dotnet run in the command line prompt).
Preview the Medical center page
You can preview your page in the MEDLAB Clinic Pages website channel application in the Xperience administration. Like with the Home page, content tree-based routing ensures that accessing ~/Medical-center renders the correct view for the page based on its content type.
We’ve now created the logic that retrieves and presents the content of the site’s pages. Let’s continue by building the website’s navigation in the last step of the tutorial!
Previous page: Create the site layout — Next page: Create the navigation menu
Completed pages: 7 of 9