
Configuration
Working with users
Working with roles
Data protection
📖 Users and roles used overview
👉 Update user information (admin)
👉 Update my name or username (user)
📝 Invite a new user (Data protection officer)
👉 Create a new role (Content editor)
📖 Data protection feature overview
👉 Find data Xperience collected about a contact
👉 Find contact’s consent agreements
📝 Send customer information about their data Xperience collected (right to access)
📝 Delete contact data (right to be forgotten)
📖 Users and roles overview
Users log in daily to your website’s administration interface and create new articles, personalize content for different audiences, build new online forms, or monitor the system’s performance.
Users in Xperience by Kentico work with the applications from the back end - they create content, define marketing activities, etc. A typical user, for example, adds website articles or creates personalized content variants.
Administrators create different roles to define user permissions and access to applications.
You can assign one role to more users. For example, you can have several users with a Content editor role that can add or edit articles and other website pages or update content across the website.
Administrators can also assign multiple roles to the same user. Permissions granted within each role are cumulative. For example, if a user has a Content editor role and a Digital marketer role, permissions from both roles apply.
Admins assign these roles to users, such as marketers, editors, and data protection officers.
Visitors who create their accounts in your application are called members. Unlike Users who can access the Xperience administration, members can access only the front-facing part of your application, such as a website. They can browse pages or access member-only sections of the website.
Find out more in the documentation ➡
📖 User permissions overview
Administrators create different roles to define user permissions and access to applications and operations within these applications, such as Update, Create, or Send email.
Permissions granted within each role are cumulative. For example, if a user has a Content editor role and a Digital marketer role, permissions from both roles apply.
Find out more in the documentation ➡
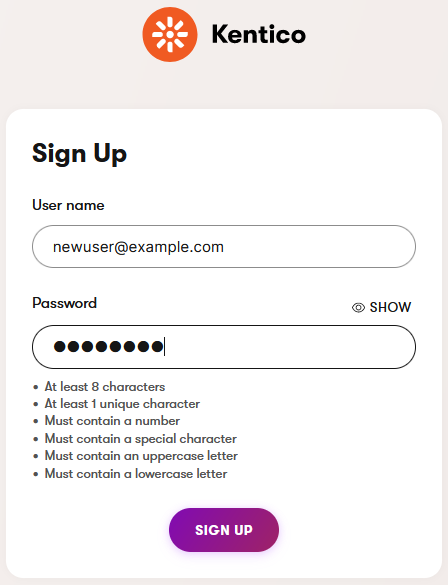
👉 Create a new user
You need to have sending of transactional emails configured. Otherwise, you cannot add a new user. Find out more about enabling transactional emails in the documentation.
- Go to the Users application.
- Select New user, fill in their information, and save the changes.
- When you create a new user, Xperience sends them a confirmation email.
- As an Administrator with appropriate permissions, you can change other users’ credentials. In the Users application, find and edit the user.
- Change the user’s general information and roles or enable or disable the user.
👉 Change a password
- On the application dashboard, open your personal Account (bottom-left button).
- Go to the Password tab and change your password.
- Save your changes.
👉 Create a new role (Content editor)
Let’s create a role with specific permissions for a user that works on his tasks.
Before you create a new role in Kentico, put together a list of activities users with this role should be able to perform. Consider the applications they need and the actions they must perform in each application.
Go to the Role management application.
Add a New role and fill in the following information:
- Display name: e.g., Content Editor,
- Code name: e.g., ContentEditor,
- Description: e.g., “A role with access to Pages and Content hub. Responsible for creating, managing, updating, and curating the website’s content.”.
Save to create the role.
On the left, switch to the Permissions tab.
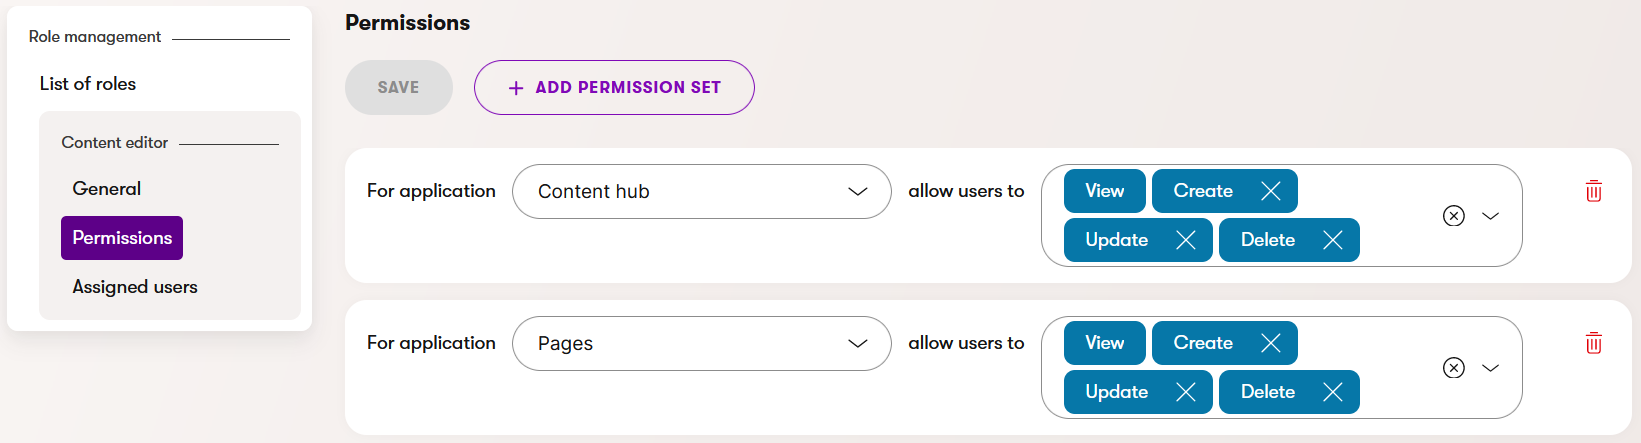
For each application that the user needs to work with, select Add permission set and choose the rights for the application. For example:
- Content hub: View, Create, Update, Delete,
- Pages: View, Create, Update, Delete.
Save your changes.
Go to the Assigned users tab and select the existing users you want to add to this role. If you need to add a new user, use the Users application.
Save the changes.
In this example, the Content Editor role should look like the following:
👉 Update user permissions
- Go to the Role management application.
- Select the role you want to change.
- Switch to the Permissions tab and update the permissions.
- In the drop-down list, select the application you want your user to have access to and choose which actions the user can perform.
- Save your changes.
Find out more in the documentation ➡
📝 Create a Data Protection Officer role
Let’s create a Data Protection Officer role your manager asked you to create to comply with the legislation. The Data Protection Officer oversights the personal data of company staff, customers, providers, or any other individuals (data subjects) in compliance with the applicable data protection rules.
Not a fan of the video format? Here’re the steps you need to take to create a Data protection officer role in Xperience by Kentico.
- Go to the Role management application.
- Add a New role and fill in the information:
- Display name: Data Protection Officer
- Code name: DataProtectionOfficer
- Description: e.g., "The Data Protection Officer oversight the personal data of company staff, customers, providers, or any other individuals (data subjects). The role is responsible for informing the data subjects about their data protection rights and handling requests for data erasure from them."
- Save to create the role.
- Go to the Permissions tab.
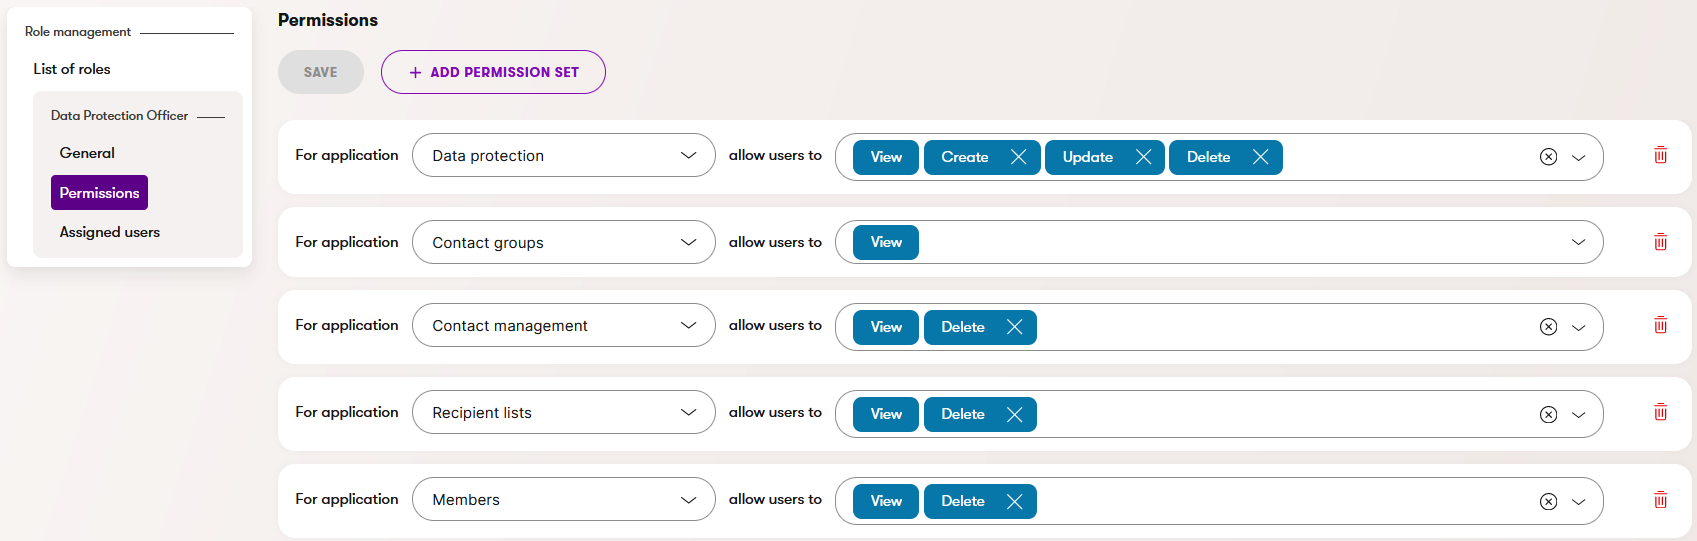
- Select Add permission set for each application:
- Data protection: View, Create, Update, Delete.
- Contact groups: View.
- Contact management: View, Update, Delete.
- Recipient list: View, Delete.
- Members: View, Update, Delete.
- Save the changes.
- Your Data Protection Officer role should look like the following:
👉 Add users to a role
Not a fan of the video format? Here’re the steps you need to take to add users to a role in Xperience by Kentico.
- Go to the Role management application.
- Select the role you want to add users to.
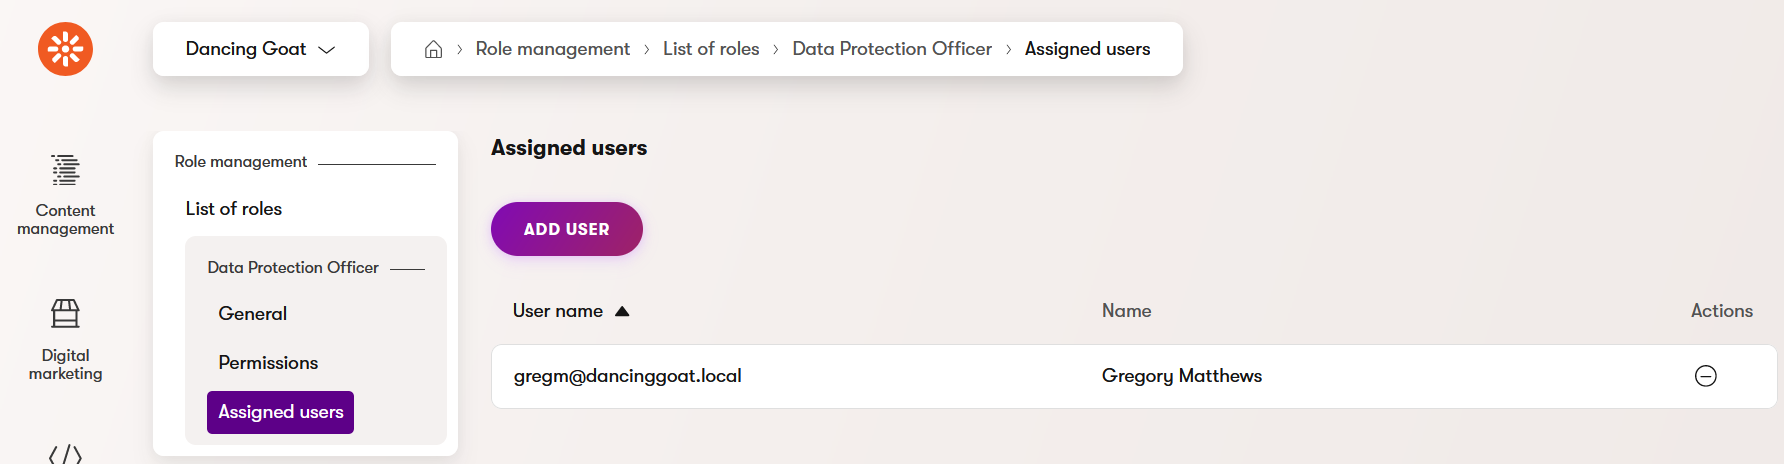
- Go to the Assigned users tab on the left. You can see all users with the particular role.
- You can add more users to this role by selecting Add user.
👉 Update user information (admin)
- Go to the Users application.
- Open the user you want to edit.
- Update:
- First name: e.g., Laura.
- Last name: e.g., Miller.
- Save the changes.
👉 Update my name or username (user)
- Navigate to the application dashboard.
- Go to the User menu in the bottom-left corner.
- Open Account.
- Update:
- First name: e.g., Laura.
- Last name: e.g., Miller.
- Save your changes.
📝 Invite a new user (Data Protection officer)
Let’s create a new user account for a new Data Protection officer that just joined your organization.
- Navigate to the Users application.
- Select New user.
- Add information about the user:
- New user email: e.g., gregm@dancinggoat.local,
- Role: Data Protection Officer.
- Send the invitation.
- Open the newly created user.
- Add:
- First name: e.g., Gregory,
- Last name: e.g., Matthews.
- Save the changes.
📖 Data protection feature overview
Xperience Data Protection helps organizations comply with data protection and privacy regulations, such as the General Data Protection Regulation (GDPR) in the European Union. Once prepared by the developers, it helps manage and protect personal data collected and processed within the Xperience application. Xperience provides a unified interface you can use to:
- Manage your clients’ consent regarding their personal data.
- Handle their requests to access or remove their data.
- Anonymize and encrypt their data to prevent unauthorized access.
Xperience by Kentico’s Data protection feature creates a secure and privacy-focused environment where organizations can handle personal data.
Find out more in the documentation →
👉 Find data Xperience collected about a contact
- Navigate to the Data protection application and open the Right to access tab.
- Insert the contact’s email and use the Search button.
- Xperience displays the contact’s online marketing data.
📝 Send customer information about their data Xperience collected (Right to access)
Let’s help a customer to know which personal data and data about their interactions with your business have your company collected and stored. Handling customer’s requests about their personal data is one of the Data Protection officer’s responsibilities. (Find out more about GDPR-related requirements.)
This feature requires implementing data protection, cookie consent, and activity tracking. Find out more in Kentico Xperience documentation.
- Navigate to the Data protection application.
- Open the Right to access tab.
- Use your customer’s email address and insert it into the search box.
- The application lists all the data your company has collected about this customer.
- Copy the list of collected data.
- Insert the data into a Notepad (or similar tool) on your computer.
- Share the data with the requester.
To test this scenario on the demo website, you need to first generate sample data for GDPR.
Navigate to the Configuration → Sample data generator and use the Generate sample data button. You can then also imitate the contact’s behavior to get more realistic data. Visit your sample website in an incognito window and:
- Agree with the tracking consent.
- Visit several pages using the navigation menu.
- Submit the form on the Contacts page.
- Optional: To test deleting membership:
- Use the user button in the top-right corner register on the website.
- Supply any email and password, for example, test@demo.local and password as a member to test deleting the member object.
Test the scenario with the email of the contact you have imitated previously or the following email: Name-20.Generated.Surname-20@localhost.local.
📝 Delete contact data (Right to be forgotten)
- Navigate to the Data protection application.
- Open the Right to be forgotten tab.
- Use your customer’s email address and insert it into the search box.
- The application lists all the data your company has collected about this customer.
- Use the Select data to delete button.
- Select which data you need to delete based on the customer’s request.
- Use Delete to remove your customer’s data.
- Notify the customer that you have complied with their request via email.
To test this scenario on the demo website, you need to first generate sample data for GDPR.
- Navigate to the Configuration → Sample data generator and use the Generate sample data button. You can then also imitate the contact’s behavior to get more realistic data. Visit your sample website in an incognito window and:
- Agree with the tracking consent.
- Visit several pages using the navigation menu.
- Submit the form on the Contacts page.
- Optional: To test deleting membership:
- Use the user button in the top-right corner to register on the website.
- Supply any email and password, for example, test@demo.local and password as a member to test deleting the member object.
- Test the scenario with the email of the contact you have imitated previously or the following email: Name-20.Generated.Surname-20@localhost.local.
It’s common for developers to prepare a special page that allows your members to request getting this data automatically. Usually, this data is available within the member account profile or on the customer preference center. To learn what data the company has gathered about the user, they must sign into their profile and verify their request, e.g., via email.