
Model content
This page is part of a tutorial, which you should follow sequentially from beginning to end. Go to the first page: Xperience by Kentico overview.
In this step, you’ll:
- In this step, you’ll:
- Create the website channel
- Content types and pages in Xperience
- Create the Home content type and define its fields
- Create the content type for the Medical center page
- Create the content type for navigation items
- Prepare the content type code files
- Content tree-based routing
With the application set up, let’s start building the tutorial website. Our site will have two pages and a simple navigation menu.
- The Home page will have content structured into a header, a text heading, and the text itself.
- The Medical center page will have a header text field and a content field that can be formatted using HTML.
- Both pages will also have a page title field.
- For convenient access by site editors, the navigation menu will also be modeled using pages. These won’t hold any content, however. Instead, we’ll use them to allow editors to select other pages on the site. We’ll then use that data to build the navigation using a data-driven approach.
In this step, we’ll set up a website channel and create content types for the pages that will store the website’s content.
Create the website channel
Every website in Xperience is represented by a channel. The channel has its own domain name configuration and content management interface.
- Return to the Xperience administration in your browser (running under http://localhost:port/admin).
- In the Channel management application, select New channel.
- Fill in the following values:
- Channel name: MEDLAB Clinic Pages
- Channel type: Website
- Website domain: localhost:port (where port is the port number where your application is running).
- Primary language: English
- Select Save.
Content types and pages in Xperience
Content types are the fundamental building block used to model content in Xperience, and they define the data structure of content items.
Website pages are one of the available kinds of content items. Pages are organized in a content tree structure, which you can manipulate within a dedicated website channel application. In most cases, pages in the content tree represent actual pages available on the live site. Pages can either store content directly, or load it from reusable content items created in the Content hub application.
The structure of page data
Content types use fields to define their data structure. Content editors use these fields to edit page content via the Content tab in website channel applications. Each content type has a separate database table storing the values of the defined fields (each field corresponding to a single column) and uses multiple other tables to store additional page-related information.
For example, the Home content type will have three fields. The first two Text fields will hold the page header and the heading, and the third field will be a Text area. Pages based on this content type will have their content stored in the MEDLAB_Home database table. Additional data, such as general content item properties, is stored in several CMS_ContentItem tables, and you can find data related to the page’s position in the content tree hierarchy in the CMS_WebPageItem table.
Create the Home content type and define its fields
In the Content types application, select New content type.
Fill in the following values:
- Content type name: Home (MEDLAB Clinic)
- Namespace: MEDLAB
- Name: Home
- Use for: Pages
Select Save.
Now let’s allow the content type within the MEDLAB Clinic Pages channel.
- On the Allowed in channels tab, Select channels.
- Choose MEDLAB Clinic Pages.
- Select Save.
Next, define the fields used to hold page data.
- Select the Fields tab.
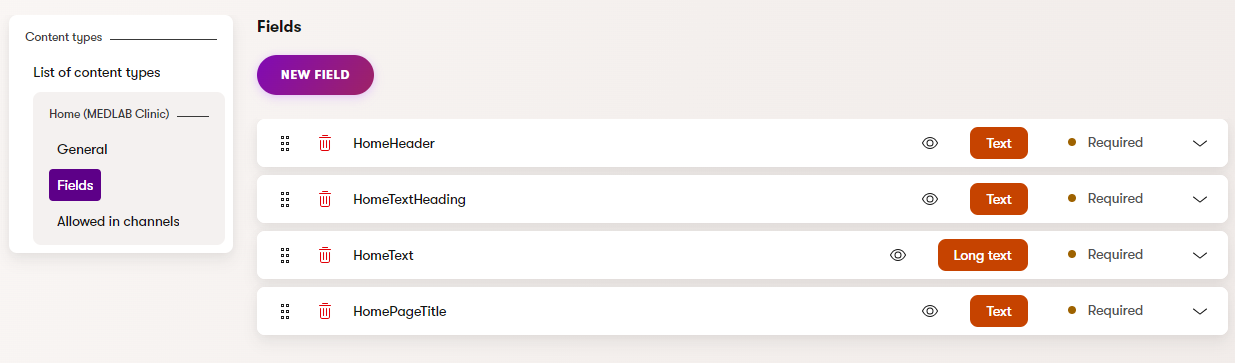
- Start by creating the header field. Select New field and fill in the following values:
- Field name: HomeHeader
- Data type: Text
- Size: 1000
- Field caption: Header
- Form component: Text area
- Scroll down and select Save.
- Repeat the steps for the page heading field. Use the following values:
- Field name: HomeTextHeading
- Data type: Text
- Size: 200
- Field caption: Text heading
- Form component: Text input
- Continue with the page body field:
- Field name: HomeText
- Data type: Long text
- Field caption: Text
- Form component: Text area
- And finally the page title field:
- Field name: HomePageTitle
- Data type: Text
- Size: 200
- Field caption: Page title
- Form component: Text input
This is all we need for the Home content type. Let’s continue by creating the Medical center content type.
Create the content type for the Medical center page
Return to the content type listing in the Content types application and create another content type (select New content type).
Fill in the following values:
- Content type name: Medical center (MEDLAB Clinic)
- Namespace: MEDLAB
- Name: MedicalCenter
- Use for: Pages
Select Save.
Allow the content type within the MEDLAB Clinic Pages channel.
- On the Allowed in channels tab, select Select channels.
- Choose MEDLAB Clinic Pages in the Select allowed channels side panel.
- Select Save.
And define the fields used to hold page data.
- Select the Fields tab.
- Start by creating the header field. Select New field and fill in the following values:
- Field name: MedicalCenterHeader
- Data type: Text
- Size: 200
- Field caption: Header
- Form component: Text input
- Create another field with the following values:
- Field name: MedicalCenterText
- Data type: Long text
- Field caption: Text
- Form component: Rich text editor
- Configuration name: Structured content (Websites)
- And finally the page title field:
- Field name: MedicalCenterPageTitle
- Data type: Text
- Size: 200
- Field caption: Page title
- Form component: Text input
That’s everything for the Medical center content type. The last one left is the Navigation content type.
Create the content type for navigation items
Return to the content type listing in the Content types application and create another content type (select New content type).
Fill in the following values:
- Content type name: Navigation (MEDLAB Clinic)
- Namespace: MEDLAB
- Name: NavigationItem
- Use for: Pages
Clear the Include in routing checkbox. Navigation items only represent menu links to other pages, so you do not want the system’s routing to generate URLs these items.
Select Save.
Allow the content type within the MEDLAB Clinic Pages channel.
- In the Allowed in channels tab, select Select channels.
- Choose MEDLAB Clinic Pages in the Select allowed channels side panel.
- Select Save.
And define the fields used to hold page data.
- Select the Fields tab.
- Start by creating the page name field. Select New field and fill in the following values:
- Field name: NavigationItemName
- Data type: Text
- Field caption: Name
- Form component: Text input
- Create the page link field. Select New field and fill in the following values:
- Field name: LinkTo
- Data type: Pages
- Field caption: Page link
- Form component: Page selector
This finishes the navigation content type, which is also the last content type we’ll need for our website.
Now we need to generate code files that allow us to work with the created content types in the code of our project.
Prepare the content type code files
Before you start adding new pages and their content, let’s make sure you’ll be able to work with these content types in your application. Xperience allows you to generate code files via the command line.
Shut down the application – press
Ctrl+Cin the command line prompt where the application is running.Run the following command from the root directory of your project:
dotnet run --no-build -- --kxp-codegen --type "PageContentTypes" --include "MEDLAB.*"When prompted for confirmation, press
Y. The command generates the code files for the created content types under PageContentTypes/MEDLAB and automatically includes them in the project.Relaunch the site using
dotnet run.
The code generator created code files for the created content types – Home.generated.cs, MedicalCenter.generated.cs, NavigationItem.generated.cs. The classes contain properties matching the fields you’ve created for the content type – HomeHeader, HomeTextHeading, HomeText for the Home content type, for example – as well as other properties shared by all pages in the system. The generated class enables strongly-typed access to all data stored by the page.
Later in the tutorial, we’ll use these classes as containers for page data retrieved from the database.
Content tree-based routing
Because we’ve enabled content tree-based routing in the previous step and most of our content types for pages have the Include in routing property enabled, pages based on the content types will automatically be accessible under URLs that reflect their position in the site’s content tree. We only need to provide views and other related code to present the page content.
For example, let’s say we create a page called Home (based on our Home (MEDLAB Clinic) content type) and place it under the root of our website in Xperience. The created page will automatically be accessible under <domain>/home.
We’ll see the true benefits of this approach once we get to designing the site.
Previous page: Configure the application — Next page: Create pages
Completed pages: 4 of 9