
Welcome new contacts
With marketing automation, Xperience allows you to send automated emails to new contacts with an optimal waiting time between each email.
In this walkthrough, you’ll learn to recognize your newly registered contacts with a welcome email sequence, and in the following days, send them information about your company, services, or special offers.
The following image shows the flow of the Welcome new contacts automated email sequence.

Click here to download the process.
What does the process do?
This process helps you welcome newly registered contacts and follow up by introducing your company and services or by sending them, for example, a discount coupon.
If you plan to send more than two emails, you can easily adjust the process by copying the Wait and Send email steps to send a series with as many emails as you want.
How to make it work?
The following diagram shows an overview of what you are going to do.
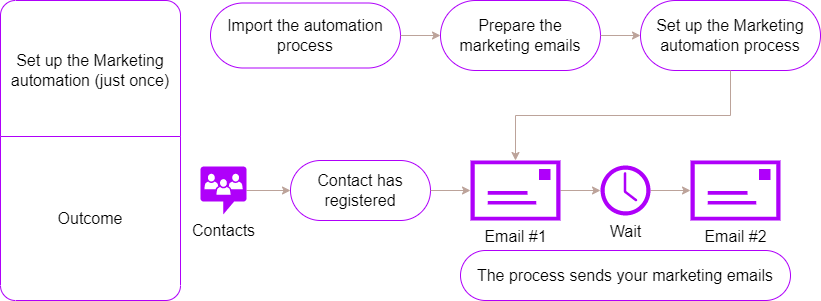
Import the automation process
To import the “Welcome new contacts” process into the Marketing automation application, follow these steps:
Go to the Sites application.
Click Import site or objects.
Upload package.
- Find the .zip file with the Marketing automation process you want to use.
- Keep Preselect all items.
- Click Next.
In Macro re-signing, click Select.
- Choose your user account.
Note: If you don’t have appropriate permissions to sign macros, request them from your website administrator.
- Choose your user account.
In the left column, select On-line marketing → Automation processes.
Go to the Next step.
Select Finish to import your process into the Marketing automation application.
Now that you have uploaded your process, adjust it to match your scenario and send your automated emails.
Prepare the marketing emails
The following steps will guide you through setting up an email to be used in marketing automation.
- Go to the Email marketing application.
- Find your Email feed and click Edit.
- Select the email to edit.
- Choose the Email properties tab.
- Select the Use in Marketing automation checkbox.
Set up the automation process
The following steps will guide you through setting up the process exactly as you need.
Decide if you want to send just one email or divide your message into two (or more) emails.
Make sure all changes you need to make to the process are done before you Enable it.
Go to the Marketing automation application and find your imported process.
Edit the process by clicking on the green pencil icon. You can just follow the yellow notes attached to each step.
The Trigger is already prepared to start the automation for every newly registered contact. You don’t need to change anything here.
Open the Send marketing email 1 step.
Choose the Site.
Select the Email.
- If you want to, you can Edit the email (the editing window will open for you).
- Or you can create a New email from scratch.
We recommend renaming the step according to your internal naming conventions, so that each step is clear for you and your team. You can change the name on the Advanced tab.
Apply the changes.
Open the Wait step.
- Adjust how long the process will hold before sending the following email.
- Apply your changes.
Open the Send marketing email 2 step and set it up similarly to the first email.
Choose the Site.
Select the Email.
- Use Edit if you have already created your email.
- Use New to create your email from scratch.
Rename the step on the Advanced tab to make it clear when the process sends which email.
Apply the changes.
Make sure the process flow is as you intended. Remove or link extra steps if you made any changes to the process.
Make the process active by clicking the Enable button in the upper right corner.
Adjusting the process
If you want to send just one email, delete the Wait and Send marketing email 2 steps, and link Send marketing email 1 with the Finish step.
To send a series of emails, add a Wait step after the Send marketing email, and set the waiting time between sending your emails. Then add another Send marketing email step and set up the email in the same way described above. This way, you can add as many emails as you want.
Run the process
Your process is all set and ready. Contacts who register on your website will automatically receive a Welcome email, followed by another email after the time you specified.
To check if everything went as planned, open your process in the Marketing automation application. In the upper left corner, choose Contacts. You will see a list of contacts under the process, where in the process they are (their process status), and the day and time the process was initiated.