
Using the Pages application
You will learn about:
Important note
Dancing Goat is a specific sample website used for the purposes of the tutorial. The editing experience on your company’s website might be different, e. g. you’ll have different page templates or widgets available.
Before you start working on your website, you need to understand the specifics of Xperience websites.
The website runs as two applications.
- The front-facing site is an MVC application built by developers either on the new ASP.NET Core or on time-tested ASP.NET MVC framework.
- As an editor, you will spend most of the time in the second Xperience application. The second application serves as the content repository and provides the administration interface. In the administration interface, you’ll edit or create pages, add file attachments, or upload imagesto media libraries.
All content changes you make in the administration interface are stored in the website’s shared database. Developers prepared the second live site application to draw the data from the database and display it to the website’s visitors. Both applications run in a web farm and synchronize any changes in data (e.g., page content or settings) and files (e.g., media libraries).
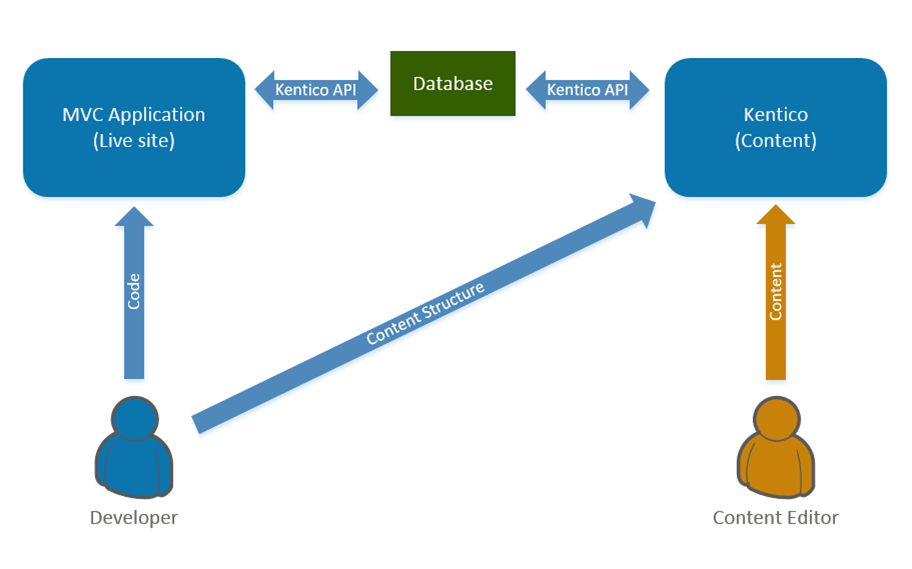
As a content editor, you’re responsible for preparing great content that attracts website visitors.You can leave the worries of how the content is displayed to the designers and developers working on the front-facing application.
To make sure content displays as intended and that the website provides a consistent experience, your developers pre-defined what changes you can make in the website’s administration.
For example, if you decide to move your Home page to your Articles section, you won’t be able to. Developers restricted such an action.
But, let’s say you want to support your message with images on pages built with the page builder. In this case, the developers created widgets you can use to adjust the page’s layout or content.
Accessing the Pages application
![]()
The Pages application is one of the most used Xperience applications among non-technical users. You can access the application in multiple ways:
- Click the Pages application tile on your dashboard.
- Click the Xperience logo to open the application list (or press the F2 key on your keyboard), and select the Pages application. (You can also type “pages” in the search box to filter the application list.)
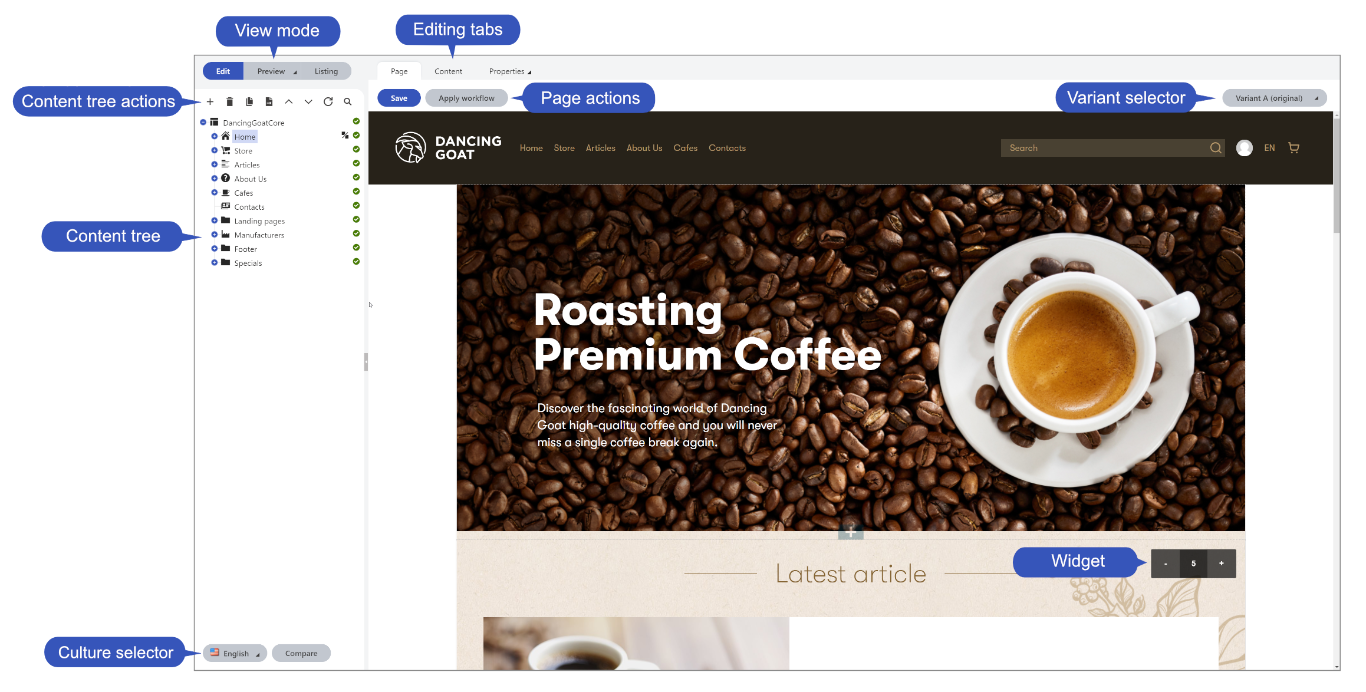
Pages application basics
The Pagesapplication allows you to add and modify content on your website.
The application’s window is divided into two parts. The content treeon the left-hand side displays content items in a tree structure. The tree items are called pages, and you can viewand edit their contenton the right-hand side of the application.
Using the pages, you can store content separately from the design of the live site.
Keep in mind that on Xperience websites, the pages listed in the tree don’t necessarily display on the live site. Rather than website pages where each item has its direct representation on the live site, think of pages in the tree as containers for your content. To see how they are presented on the live site, you can use the Preview mode.
The Pages application offers three view modes in which you can work with content:

- Edit – the default view mode in which you edit the content of the website.
- Preview – displays the latest version of the page. You can use Preview to see what your changes look like before they are published.
- Listing – shows a list of all pages under the currently selected page. You can use the Listing mode to perform bulk operations, such as deleting or translating pages at once.
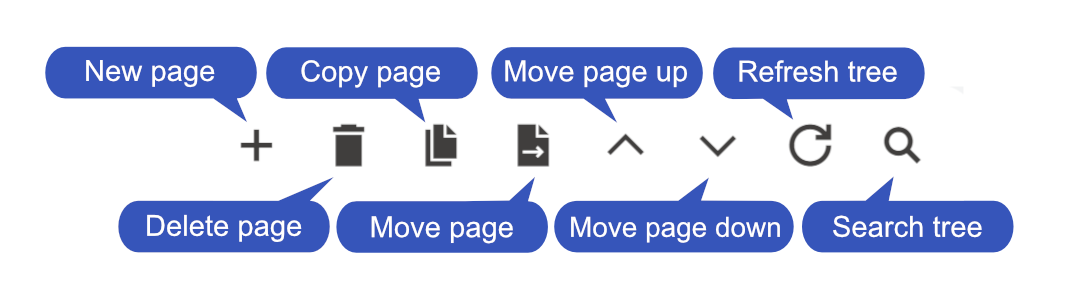
Under the view mode buttons, the action buttons help you create new or organize existing pages in the content tree. However, remember that developers define rules for where you can or cannot move or create pages.
Editing content in the Pages application
Each page is based on a specific page type that defines the structure and the editing experience for its content. You can edit the content of the page on:
- Content tab.
- Page tab.
Editing content on the Content tab
The Content tab allows you to add or manage structured content through fields.
Developers prepared the fields to hold specific content types, such as heading, text, or image. They also ensured that data managed through the fields is presented on the live site precisely as intended.
As an editor, you’ll benefit from the structured content. It lets you focus on creating great content. You don’t need to define the layout and styling of the content.
Working with the Content tab
The Content tab on the About Us > Our philosophy page provides you with the following fields:
- Heading – holds the title of your content.
- Image – allows you to upload a picture that will support your message.
- Text – serves to work with the main body of your content.
- Publish from and Publish to – define the period during which your content is available on the live site.
The Text field uses the Xperience built-in rich text editor. The rich text field editor brings WYSIWYG experience and offers different styling options for your text. Besides basic text-editing options, such as bolding or italicizing, you can add numbered or bulleted lists, adjust text’s alignment, create hyperlinks or add images. To edit the HTML markup of the field, use the Source button.
Task:
Dancing Goat company goes to great lengths to serve the best coffee possible – from carefully sourcing their coffees, hand-picking farmers, to roasting coffees in-house. They want customers who learn more about the company’s philosophy to find out more about the journey coffee takes before it turns into a delicious cup.
Use the Content tab and create a hyperlink from the About us > Our philosophy text to the Coffee Beverages Explained article.
Need help?
Use the following steps to add the hyperlink:
- Sign in to your website.
- Navigate to the Pages application.
- In the content tree, click the (+) button to expand the About Us page’s child items.
- Open the Our philosophy page.
- Use the Insert/Edit link button and create a hyperlink to the Coffee Beverages Explained article.
- Highlight the text you want to link.
- Click the Insert/Edit link button in the editor toolbar. The editor opens a dialog window.
- If necessary, switch to the Content tab in the dialog.
- In the content tree, expand the Articles page and select the Coffee Beverages Explained article.
- Click the Save & Close button in the dialog window.
- Click the Save button to save your changes.
Let’s see what your changes look like on the live site. There’re two ways you can preview your changes.
- You can click the Kentico Xperience logo to open the application list. Use the Live site button at the bottom of the application list. Or,
- Select the About Us parent page in the content tree and click the Preview button to switch to the preview mode.
Next page: Using the page builder