
ASP.NET Core development tutorial
Welcome to the Kentico Xperience ASP.NET Core development tutorial. This tutorial will guide you through the creation of a simple Xperience website using ASP.NET Core.
We’ll build logic that displays data from Xperience on the live site through views and view components composed of HTML, tag helpers, and inline code. In Xperience, content is modeled using page types and stored in pages (each of a specific page type) that hold site content – news, articles, products, etc.
Requirements
This tutorial requires a high level of familiarity with development concepts in the ASP.NET Core framework, as well as experience in C# and access to standard development tools. You will also need an IDE for development, such as Visual Studio or Visual Studio Code.
Please note: The purpose of this tutorial is not to teach the general development principles of ASP.NET Core, but rather to introduce how website development works in Xperience.
You should already be familiar with .NET Core development concepts before you start the tutorial. To quickly get on board, you can use the following free resource:
While we won’t fully leverage the MVC architectural pattern in this tutorial, you’ll find knowing the concepts behind the approach beneficial to understanding how certain Xperience features work.
First, let’s get some basic concepts out of the way:
- Requirements
- First, let’s get some basic concepts out of the way:
- The development model of Xperience
- How the live site works
- How the back-end works
- How the applications share data
- Licensing of Xperience sites
- The benefits of using Xperience
The development model of Xperience
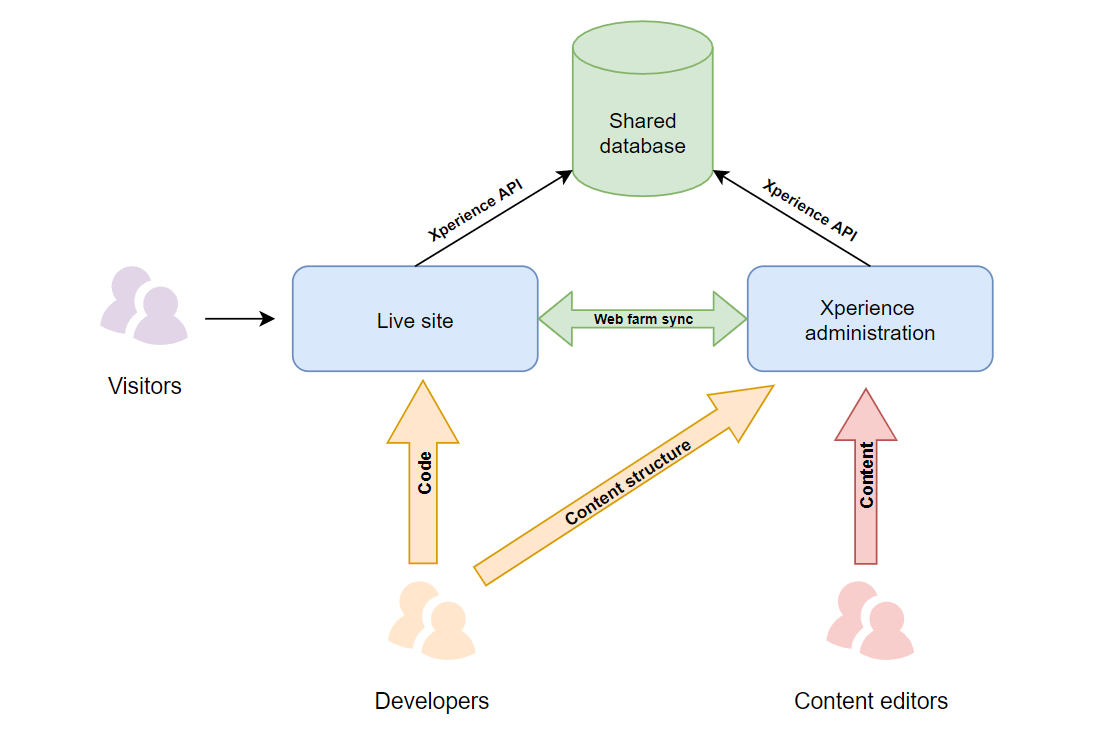
Xperience sites use two separate web applications – a Core application that displays the live site and an Xperience application for the website’s administration.
- ASP.NET Core application (live site) – the front-facing site is presented by a standard ASP.NET Core application, which brings you all the freedom and other goodies provided by the ASP.NET Core framework. The Xperience API is integrated into the application using NuGet packages.
- Xperience application (back-end) – serves as a content repository and provides the administration interface, which includes the default features such as content editing or user management, as well as all custom functionality added thanks to the rich extensibility options the system offers. The back-end application is built on ASP.NET Web Forms.
- Shared database – both applications share the same database and use the Xperience API to work with data. Web farm functionality is used to synchronize changes between the applications for both data cached in the memory (e.g., settings or page content) and files (e.g., media libraries).
How the live site works
Live site web users only interact with the Core application. When a user requests a page through their browser, the application matches the page URL to a corresponding route. The route targets a controller action that processes the request. Typically, the application uses the Xperience API and generated classes from the Xperience application to retrieve page data, and prepare appropriate models that pass the data to corresponding views. The views define the page output that is displayed in the browser.
How the back-end works
Editors manage the content of the website in the Xperience administration interface, mainly in the Pages application. They create pages organized within a content tree and edit content by entering values into page fields (based on the content structure designed by the website’s developers) or by using the page builder interface. The developers display the content on the live site via the Core application through the use of the Xperience API.
How the applications share data
The Core application and Xperience application are configured to run as servers in a web farm. This configuration is possible because both applications use the same database and perform operations through the Xperience API. The web farm synchronization ensures that data and file changes made by one of the applications are immediately reflected in the other.
For example, when a website editor changes the text of a page in the administration interface, the data is updated in the database. The Xperience application then initiates a synchronization task, that the Core application runs to invalidate the matching data in its cache. When a new request for the content comes, the Core application serves the updated content from the database. The same process works for site settings and other values configured through the administration interface, as well as files.
The following scheme summarizes the architecture and data flow of an Xperience site.
Licensing of Xperience sites
If you run the live site and administration applications on different domains, you need to acquire licenses for both domains. However, you only need to purchase a license for the live site and the additional license for the administration is provided for free. Find out more about licensing for Xperience applications in our documentation.
The benefits of using Xperience
The following table sums up the benefits of the Xperience development model:
Developers | Content editors |
|
|
Tutorial sequence
To get the best experience out of this short tutorial, follow the sequence of the pages in the specified order:
- Install an Xperience project
- Configure the Core application
- Create page types
- Add pages to the site
- Add generated page type classes to the Core application
- Create the website layout
- Display the content of the pages
- Create the navigation menu
- See the next steps in Xperience development
Next page: Setting up an Xperience Core project
Completed pages: 1 of 10