
Send an email to imported contacts
To start sending emails from your Kentico Xperience 13 (Xperience) application, your developers don’t need to code an expensive connector between your currently used CRM or emailing solution.
Using marketing automation, Xperience allows you to import contacts from a comma-separated values file and send these contacts an automated email or even a sequence of emails.
The following image shows the flow of the Send an email to imported contacts process.
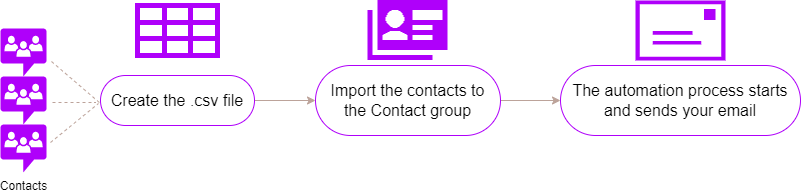
Click here to download the process.
What does the process do?
When you start with email marketing in Xperience, the biggest challenge usually is the lack of contact information (which the system will organically collect through activity tracking). Instead of waiting for the data, you can leverage existing contact data from your CRM or any other email marketing solution that your team uses.
Start by exporting your existing contacts
Every CRM or email tool allows you to export your contact data to Google Spreadsheets or Microsoft Excel. You can save this data into a CSV (comma-separated values) file, import it into Xperience, and send your automated emails.
To correctly import contacts, the first row of your CSV file must contain column names. These columns represent fields on the Contact profile. For illustration, you can download a sample CSV file.

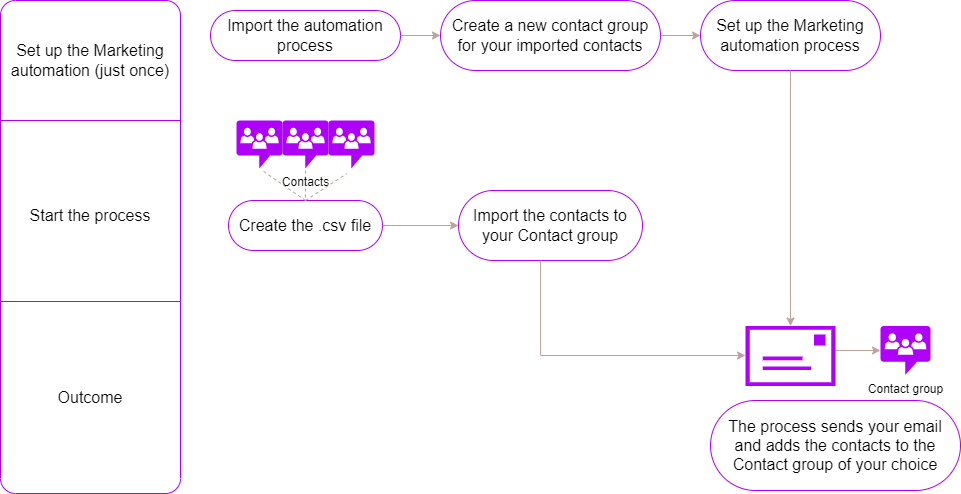
How to make the process work?
The following diagram shows an overview of what you are going to do.
Import the automation process
To import the “Send an email to imported contacts” process into the Marketing automation application, follow these steps:
Go to the Sites application.
Click Import site or objects.
Upload package.
- Find the .zip file with the Marketing automation process you want to use.
- Keep Preselect all items.
- Click Next.
In Macro re-signing, click Select.
- Choose your user account.
Note: If you don’t have appropriate permissions to sign macros, request them from your website administrator.
- Choose your user account.
In the left column, select On-line marketing → Automation processes.
Go to the Next step.
Select Finish to import your process into the Marketing automation application.
Now that you have uploaded your process, adjust it to match your scenario and send your automated emails.
Add imported contacts into a separate contact group
To trigger a process for a contact, there has to be an event that “touches” this contact. Think of this contact group as a filter for your contact database. It will help you:
- Gather all the imported contacts into one list. Using this group, you can later single out your contacts from the rest of your database.
- If your file contains contacts that you have already collected into your database, moving contacts into this group provides the event that triggers the process.
Follow these steps to create a contact group:
Go to the Contact groups application.
Create a New contact group, and choose an appropriate name. (You don’t need to specify a code name. Xperience creates it automatically from the group’s name.)
Add a Description to the group that explains the following to your team:
- the kind of contacts the group collects
- the purpose of the group
Set up the Marketing automation process
Great! You have done all the groundwork. The following steps will guide you through setting up the process exactly as you need.
Go to the Marketing automation application and find the process.
Edit the process by clicking on the green pencil icon. You can just follow the yellow notes attached to each step.
Select the Start triggers step.
Edit the Contact is in group trigger.
- Add the name of your contact group to the Display name.
- Edit the Additional condition, add the Contact is in contact group rule and choose the contact group you created previously.
- Save & Close.
Save the new Start triggers settings.
Go to the Send marketing email step.
- Here you can add the email you want to send to your contacts.
If you’re going to send an existing email, choose it with the Edit button. To use your chosen email, this email must have Use in Marketing automation enabled. You can change this setting in the Email marketing application.
If you want to create a new email, select New and build one from scratch. - Apply the changes.
- Here you can add the email you want to send to your contacts.
Select the Change group step to move your contacts to another contact group. You can delete this step if you don’t want to move your contacts anywhere.
- Select your desired contact group.
- Apply the changes.
If you made any changes to the process, check if the flow of the steps follows as you intended.
Make the process active by clicking the Enable button in the upper right corner.
Now everything is set up. Whenever you upload your CSV file with contact data, your contacts will receive the email and will be added to the selected group.
The process will run only once for any given contact, and send them a single email. Even if you import the same contact again, the email will be sent just the first time.
Adjusting the process
If you want to keep the imported contacts in the newly created contact group, delete the Change group step and connect the Send marketing email and Finished steps.
If you’d like to send a series of emails, add a Wait step after the Send marketing email and set the waiting time between sending your emails. Then add another Send marketing email and set up the email in the same way described above. This way, you can add as many emails as you want.
Make sure all changes you need to make to the process are done before you Enable it.
Run the process
All set! Your process is ready and you can start sending your automated emails.
Go to the Contact management application and choose Import contacts. Select a file you want to upload.
- Tick Import contacts into an existing contact group and select the group to start the automation process for your contacts.
- Map the columns from your file so all the information will be correctly set up for the contacts.
When you are ready, you can Import contacts.
You will immediately see the import results on a summary screen – how many contacts were imported, whether there were any contact duplicates, or if the system didn’t import some contacts. (In the latter case, you can download a report explaining why the contact import process failed.)