
UI pages
UI pages are individual administration pages accessible under a specific URL. They derive their layout from templates in the client application and functionality from classes that represent them on the back end. The URL of each page is derived from its ancestors – pages specify their parent during registration. When extending the administration, you can add new pages to existing applications or create entirely new page structures for custom applications.
A UI page consists of the following components:
- Back-end definition – a class in the Xperience .NET application. Used to retrieve data and describe commands for the UI page.
- Front-end page template – a React component that describes the appearance and layout of the UI page. Formats data received from the back end and invokes commands.
- Registration attribute – ties the back-end definition and a corresponding client template together.
The system provides predefined page back-end definitions and client templates on which most of the pages in the administration are built. These pages are designed to handle the majority of common scenarios and use case requirements – typically listing and editing of objects. Use them as a base when creating custom pages and applications. See Reference - UI page templates for more information.
The following diagram illustrates the full structure of UI pages:
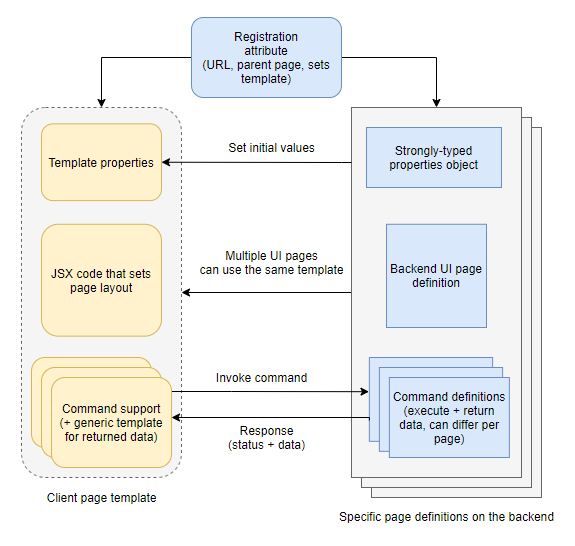
Front end
- JSX React component – a conventional React component that gets invoked by the admin React app when accessing a specific URL. Ensures page layout.
- Template properties – templates can optionally define properties that allow interactivity with the page and parameterization of its contents.
- Page command templates – client templates can define command templates whose behavior is specified by the implementation of back-end command handler methods. See UI page commands.
Back end
- Page definition – the main page definition configures the default properties of the client template. Consists of a C# class that inherits from specific base classes depending on the type of the page.
- Template properties – for templates with properties, back-end page definitions need to contain a strongly-typed definition of client-side properties.
- Command handler methods – the back-end page definition contains methods that handle command execution logic on the back end. See UI page commands.
Write client page template definitions
Before you begin developing client components, add the boilerplate project for admin development to your solution. The boilerplate bootstraps the development of client code for the admin UI by providing a prepared environment with all dependencies and configuration required by Xperience.
Client templates are defined as conventional React components that ensure page layout:
import React from "react";

// Declares a 'ClientPageTemplate' component
export const ClientPageTemplate = () => {
    return (
        <div>
            // Markup and other components providing page layout
        </div>
    );
}
For the template to be visible to the system, it needs to be exported from the client module. Add the export to the entry.tsx file provided by the admin development boilerplate project.
// Exports the 'ClientPageTemplate' component from the module
export * from './path/to/template/component/ClientPageTemplate';

// Other exports
...
Define template properties
Basic templates can’t do much besides provide a layout for the page. To enable more interactivity, add properties to the page.
import React from "react";

interface ClientPageTemplateProperties
{
    readonly title: string;
}

// Declares a 'ClientPageTemplate' component
export const ClientPageTemplate = ( { title } : ClientPageTemplateProperties ) => {

return (
    <div>
        // Sets the page title
        <h1>{title}</h1>
        // Markup and other components providing page layout
    </div>
    );
}
Default values for the template’s properties are filled by the back end when a page based on the template is accessed.
Write back-end definitions for UI pages
Pages for the admin UI must inherit from the Page base class:
using Kentico.Xperience.Admin.Base;

// Defines an admin UI page
public class MyPage : Page
{
}
If the client template used by the page contains properties, the page definition must inherit from Page<TClientProperties> where the generic parameter is substituted for a strongly-typed representation of the client template’s properties:
using Kentico.Xperience.Admin.Base;

// Defines an admin UI page with properties
public class MyPage : Page<PageTemplateClientProperties>
{
}

// Contains properties that match the properties of the client template
// Specify such classes as the generic parameter of Page<TClientProperties>
public class PageTemplateClientProperties : TemplateClientProperties
{
    // For example
    public string Title { get; set; }

    ...
}
Dependency injection support
UI pages support constructor dependency injection by default. You can use DI to resolve instances of external services on which the page depends.
Configure page properties
UI pages contain methods that allow you to manipulate their state at certain points in their life cycle:
ConfigurePageConfigureTemplateProperties
ConfigurePage
The ConfigurePage method allows you to set and configure the back-end state of the page.
The method is called:
- on initial load, when the page is requested from the client
- before a page command handler is called
ConfigureTemplateProperties
To set the initial properties of the client template assigned to the page (populated when the page is first accessed), override the ConfigureTemplateProperties method provided by the base class:
public class MyPage : Page<PageTemplateClientProperties>
{
    // Configures the initial values of the
    public override Task<MyClientTemplateProperties> ConfigureTemplateProperties(MyClientTemplateProperties properties)
    {
        // For example
        properties.Title = "Welcome";
        // Set initial values of other properties...

        return Task.FromResult(properties);
    }
}
Configure page meta attributes
Pages allow you to set the following attributes that affect their behavior within corresponding admin UI applications:
Page render location
The contents of a given page are by default displayed within the “nearest” RoutingContentPlaceholder element of the client-side page template assigned to its parent page. However, you can use the UIPageLocation attribute to specify different display modes.
The attributes takes a PageLocationEnum parameter that sets the render location for the marked page:
MainContent– renders the page in the “nearest”RoutingContentPlaceholderelement of the client-side page template assigned to the parent page.Dialog– renders the page in a modal dialog that overlays the current content.SidePanel– renders the page in a panel displayed on the right-hand side of the screen.
using Kentico.Xperience.Admin.Base;

// Displays the page in a modal dialog overlaying the current content
[UIPageLocation(PageLocationEnum.Dialog)]
public class MyPage : Page<PageTemplateClientProperties>
{
}
Breadcrumbs navigation
Pages are by default always visible within an application’s breadcrumb navigation element. You can use the UIBreadcrumbs attribute to disable breadcrumbs for individual pages.
The attribute doesn’t hide the breadcrumbs navigation element entirely, but prevents the page from showing as a navigable “segment” in the breadcrumb chain.
using Kentico.Xperience.Admin.Base;

// Prevents the page from showing in the breadcrumbs navigation
[UIBreadcrumbs(false)]
public class MyPage : Page<PageTemplateClientProperties>
{
}
For example, you can use the attribute in conjunction with page location to prevent pages opened in modal dialogs from showing in breadcrumbs.
Navigation menu visibility
For more clarity, applications or specific pages can display a navigation menu on the left-hand side. The menu is always visible. However, you can use the UINavigation attribute to prevent certain pages from being offered. For example, you can use the attribute together with page location to hide pages opened in modal dialogs.
using Kentico.Xperience.Admin.Base;

// Prevents the page from showing in the left-side navigation menu
[UINavigation(false)]
public class MyPage : Page<PageTemplateClientProperties>
{
}
Register UI pages
Pages need to be registered in the system before users can access them. To register pages, use the UIPage assembly attribute and specify the following parameters:
Parameter | Description |
| The type of the parent page. Child pages inherit the full URL path of their parents.
|
| The URL segment under which the page is accessed. See the Page URLs and routing section for details. |
| The type implementing the page on the back-end. |
| The name of the page. |
| The name of the client template used by the page. Names of templates provided by the system can be accessed via the Entered in the following format: For custom templates The
|
| The order of the page in corresponding navigation elements (if present). See Application side navigation.
|
using Kentico.Xperience.Admin.Base

[assembly: UIPage(typeof(ParentPage), "slug", typeof(Page), "Page name", "@orgName/projectName/templateName", 0)]
Registered pages are accessible under the specified URL slug.
Register new pages under existing application pages
When adding new pages to existing applications, you need to provide the type of the class implementing the page on the back end. This can be problematic when extending default system applications, or any other third-party extensions that don’t freely distribute their source code.
For this purpose, the admin UI provides the UI tree view available in the System application. The view renders all categories and their assigned UI pages in a hierarchical structure similar to the page content tree in the Pages application.
Selecting a node from the tree displays its registration and configuration metadata, including the uiPageType property that stores the fully qualified name of the class that implements it on the back-end.
The following screenshot shows the metadata of the user listing page from the Users application.

Page URLs and routing
Page URLs are set via the slug property of UI page registration attributes:
UIPageassembly attribute – for child pages of another page in the admin UIUIApplicationassembly attribute – for root pages of new applications in the admin UI
The full URL of a page is determined by the used registration method.
Static URL slugs
Static URL slugs make pages accessible under a specific string.
Allowed characters
Static URL slugs can only consists of the following characters:
- a-z, A-Z
- 0-9
- - (hyphen) and _ (underscore)
[assembly: UIPage(typeof(ParentPage), "slug", typeof(Page), "pageName", "@orgName/projectName/templateComponentName", 0)]
This type of registration results in the following URLs: <XperienceWebAppDomain>/<AdminReactAppPath>/<ParentUrlPath>/slug
[assembly: UIApplication(AppRootPage.IDENTIFIER, typeof(AppRootPage), "approotslug", "appRootName", BaseApplicationCategories.DEVELOPMENT, Icons.Market, "@orgName/projectName/templateComponentName")]
This type of registration results in the following URLs: <XperienceWebAppDomain>/<AdminReactAppPath>/slug
Parameterized URL slugs
Parameterized slugs allow you to generate a dynamic URL for pages at runtime. URL parameterization is important if you need to pass a parameter required by a page further down the hierarchy.
Page URL slugs that are parameterized need to be designated using PageParameterConstants.PARAMETERIZED_SLUG.
using Kentico.Xperience.Admin.Base;

// The 'PARAMETERIZED_SLUG' constant used in the registration notifies the system that the URL slug contributed by this page is parameterized
[assembly: UIPage(typeof(ParentPage), PageParameterConstants.PARAMETERIZED_SLUG, typeof(Page), "pageName", "@orgName/projectName/templateComponentName", 0)]
When generating URLs for such pages, you need to pass correct parameters at runtime. Use the IPageUrlGenerator.GenerateUrl method and its overloads.
Retrieve parameters from the URL
Parameters stored in the URLs of pages can be bound to page properties using the PageParameter attribute. In the constructor, specify a model binder to use when binding parameters:
GuidPageModelBinderIntPageModelBinder
The PageParameter attribute has two constructors. Depending on which is used, the system:
searches for the nearest parameterized URL slug higher in the URL hierarchy and attempts to bind it to the decorated property.
  // Binds the nearest parameter higher in the URL hierarchy
  [PageParameter(typeof(IntPageModelBinder))]
  public int MyProp { get; set; }
binds the parameter supplied by the slug of a specified page and attempts to bind it to the decorated property.
  // Binds the parameter provided by the UserEdit page
  [PageParameter(typeof(IntPageModelBinder), typeof(UserEdit))]
  public int MyProp { get; set; }
If you need to bind and convert parameters to different Types, you can write your own model binders. Create a class that inherits from the PageModelBinder base class and implement its Bind method. Inside the method, convert the obtained URL parameter to the desired type.
using System;
using System.Threading.Tasks;

using Kentico.Xperience.Admin.Base;

public class IntPageModelBinder : PageModelBinder
{
    // Creates a new instance of IntPageModelBinder
    public IntPageModelBinder(string parameterName)
        : base(parameterName)
    {
    }

    // Converts parameter values to integers
    public override Task<object> Bind(PageRouteValues routeValues)
    {
        if (routeValues == null)
        {
            throw new ArgumentNullException(nameof(routeValues));
        }

        var parameterValue = routeValues.Get(parameterName);
        var intParameterValue = int.Parse(parameterValue);

        return Task.FromResult(intParameterValue as object);
    }
}
The following diagram illustrates how parameter retrieval functions.
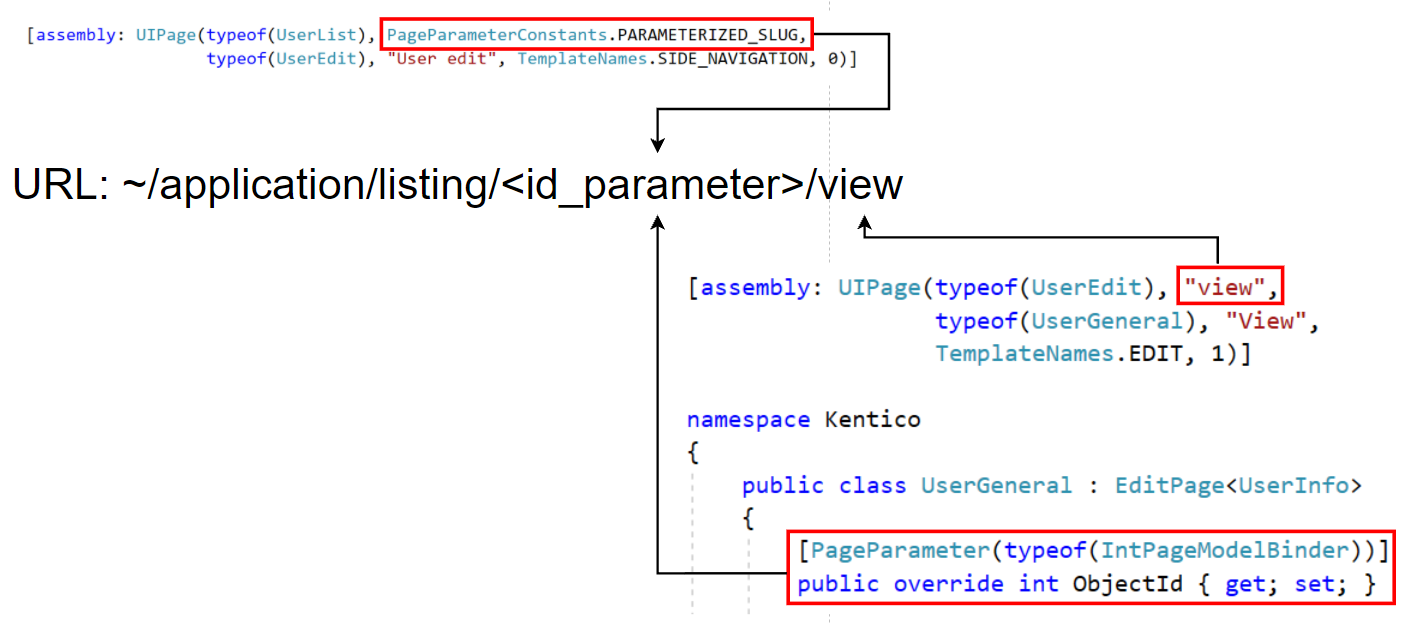
In the diagram, the ObjectId property gets set with the value from id_parameter. The UserGeneral page can then use the bound value within its logic (e.g., to retrieve and display details of the corresponding object).
Generate URLs to other administration pages
You can generate URLs to other pages in the administration interface. This can be useful, for example, if you wish to redirect to other pages from within page commands.
To generate URLs, use the IPageUrlGenerator service and its GenerateUrl method.
using Kentico.Xperience.Admin.Base;

public class CustomPage : Page
{
    // Instance of the service obtained via dependency injection
    private readonly IPageUrlGenerator pageUrlGenerator;

    public CustomPage(IPageUrlGenerator pageUrlGenerator)
    {
        this.pageUrlGenerator = pageUrlGenerator;
    }

    [PageCommand]
    public INavigateResponse GoTo()
    {
        // Redirects to the administration dashboard when invoked from the client
        return NavigateTo(pageUrlGenerator.GenerateUrl(typeof(DashboardApplication)));
    }
}
To generate URLs that lead to pages with parameterized URLs, pass an array of parameters to be substituted. Order the params as they would appear in the resulting URL.
UI pages with forms
To create pages with forms that submit data to the back end, use:
- Object type edit pages for data intended to directly modify a single object type.
- Model edit pages for data not bound to a particular Xperience object.