
Prepare your environment for admin development
This page provides information about the requirements and configuration necessary to get started customizing the Xperience administration interface. Find information about:
Requirements
Depending on the scope of your planned customizations, you need some or all of the following components installed on your machine.
To make changes to existing applications and pages (via page extenders), or add new pages and applications based on existing templates, you will only be making changes to the administration back end. For this, you need:
- A development environment with support for .NET (such as Visual Studio)
If the default set of components is insufficient and you need custom UI page templates, form components, validation rules, and other components for your planned customizations, you will be developing JavaScript modules that plug into the front-end React application. For this, you also need:
- The latest NodeJS LTS version
- A compatible package manager of your choice
- An editor for JavaScript development with TypeScript support (such as Visual Studio Code)
- Boilerplate project for the development of client JavaScript modules
See Admin UI customization model overview for details about the structure of the admin UI customization framework and an overview of its extension points.
Client development boilerplate
Xperience provides a boilerplate project to help you get started writing custom client components for the admin UI. We recommend using the boilerplate to bootstrap your environment. However, using the project is not required. If you are familiar with the way the admin UI consumes custom modules, you can set up a custom process.
The boilerplate project is available as a .NET template as part of the Kentico.Xperience.Templates package. To install it, run the following command in a suitable directory:
dotnet new kentico-xperience-admin-sample -n <project_name>
The project includes:
- a template for developing JavaScript modules for the admin UI with minimum required dependencies and configuration
- a .NET class library project to store back end code and embed the client module
- examples demonstrating customization options
For more information about the contents of the boilerplate project and its default configuration, see Boilerplate project overview.
Naming conventions
JavaScript client modules are registered into the system based on naming conventions that use the organization name and project name. These values can be seen referenced in multiple places throughout the project.
- In webpack.config.js in the client JS module template
- In the .csproj file of the class library containing back-end customizations
- In the Module.cs class file where the client module is registered via
RegisterClientModule
The current version of the boilerplate package comes with hardcoded organization and project names (using a fictional Acme organization and the Web.Admin project name). See Rename the boilerplate project to learn what needs to be changed when renaming the project.
These conventions ensure uniqueness when sharing client modules with other Xperience projects.
Boilerplate project overview
The boilerplate project is made up of two main parts:
NodeJS project overview
The project comes with all required dependencies and recommended configuration, allowing you to immediately start development. The following table highlights important files:
File | Description |
package.json | Contains module metadata and dependencies. By default, the package depends on:
Additionally, the file contains a browserlist configuration for Babel. The configuration mimicks the one used when building @kentico/xperience packages. It was chosen with relatively robust backwards compatibility in mind, given that Xperience packages and their dependencies make use of some of the newest features from the ECMAScript specification. |
webpack.config.js | A configuration for the webpack module bundler. Depends on @kentico/xperience-webpack-config which provides basic webpack configuration required to correctly build modules for the admin UI. |
tsconfig.json | Provides baseline TypeScript configuration for the module. |
babel.config.json | Babel configuration file. Takes the pool of target browsers from package.json. |
.NET class library overview
The class library primarily serves as an entry point for client customizations. Client modules need to be registered before they can be used, which occurs in the following files:
File | Description |
project’s csproj file | Contains directives that set
|
Module.cs | Contains application startup code used to register the client module via available from the base |
Other files included in the class library demonstrate customization options available for the admin UI. See Admin UI customization model overview.
Add the boilerplate to an Xperience project
Before you can start using the boilerplate to develop client code, you need to add it to your Xperience project:
Install the boilerplate project next to your Xperience project’s folder. Requires the Kentico.Xperience.Templates package to be installed.
dotnet new kentico-xperience-admin-sample -n <project_name>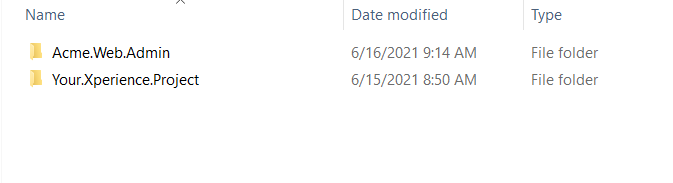
Extract the contents next to your Xperience project’s folder.
Reference the boilerplate project from your Xperience project.
 cd xperience\project\location
 dotnet add reference ..\Acme.Web.Admin\Acme.Web.Admin.csproj
Install all dependencies for client-side development using your package manager and build the package.
 # Switches to the directory containing boilerplate client module code
 cd ..\Acme.Web.Admin\Client
 npm install
 npm run build
Configure the client module in the Xperience web application.
Open appsettings.json of your Xperience project.
Add the module and configure your preferred way of handling client scripts under
CMSAdminClientModuleSettings.appsettings.json"CMSAdminClientModuleSettings": { // Add the module name in the <orgName>-<projectName> format separated by hyphens "acme-web-admin": { "Mode": "" } }
Build the web application project.
Your environment is now ready for the development of admin UI JavaScript modules.
Choose how to serve client scripts
The admin UI customization framework supports multiple methods of accessing client scripts. You set which method to use when configuring the module:
Method | Description |
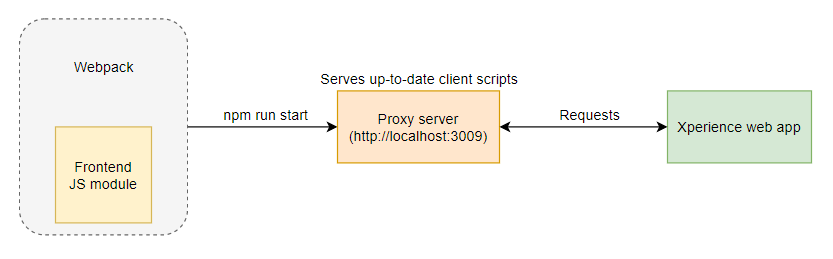
Proxy | The Xperience web application requests client modules from a webpack dev server that runs parallel to the Xperience application. Changes to client code are immediately integrated and don’t require a restart or rebuild of the web application. Before you start developing, the webpack server needs to be manually started by running from the root of the module folder (where package.json is located).
Example appsettings.json module configuration appsettings.json - Proxy mode configuration |
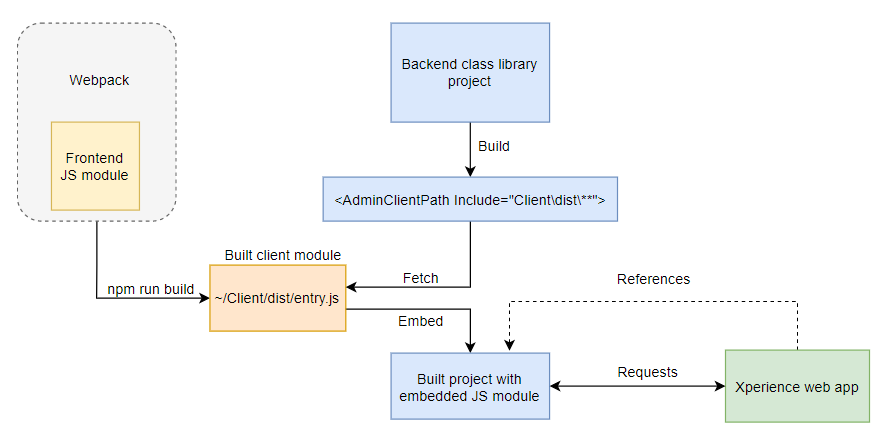
Embedded | Client scripts are stored in an assembly as embedded resources. This is the default method when no mode is explicitly configured for the module. The system looks for embedded modules in the directory specified by the .csproj of the class library holding customizations For changes made to client code to be reflected, you need to:
The following diagram summarizes the behavior of Embedded mode:
When configuring the module in your Xperience application, supply the following parameters:
Example appsettings.json module configuration appsettings.json - Embedded mode configuration Tips
|
Export custom React components
You must export all components that you want to make available from the main Xperience admin UI application via the custom module’s entry.tsx file. This primarily includes all components covered in the customization section, such as UI pages, UI form components, validation and visibility rules.
// Exposes components from the module.
// The export must declare the full path to the given component file.
export * from './custom-layout/CustomLayoutTemplate';
export * from './form-components/ColorSelectorFormComponent';
Keep client packages up-to-date
When updating your Xperience project, remember to also update the dependencies of your admin UI client project – @kentico/xperience-admin-base, @kentico/xperience-admin-components, @kentico/xperience-webpack-config, etc.
Use the npm-update command:
# Switches to the directory containing boilerplate client module code
cd ..\Acme.Web.Admin\Client
npm update
Rename the boilerplate project
The admin UI customization framework relies on naming conventions to register JavaScript modules. All modules follow the organizationName.projectName naming pattern.
You can set these parameters when creating the boilerplate project. This way the project is created and configured with the correct values.
However, you can always rename the project at a later point by changing specific configuration files and folder names. This guide assumes the following values used during boilerplate creation:
- orgName: Acme
- projectName: Web.Admin
Client code
All files referenced in this section are located under ~/Acme.Web.Admin/Client.
Change the
orgNameandprojectNamesettings in Xperience’s webpack configuration under ~/webpack.config.js. This changes the name of the resulting module built by webpack:webpack.config.jsconst baseConfig = (webpackConfigEnvc, argv) => { return xperienceBaseWebpackConfig({ // Change the orgName to your desired value orgName: "acme", // Change the projectName to your desired value projectName: "web-admin", webpackConfigEnv: webpackConfigEnv, argv: argv }); };(Optional) Change the name of the JavaScript module in package.json:
package.json{ name: "acme-web-admin", ... }
Back end code
Edit the .csproj file of your class library project under ~/Acme.Web.Admin and change the following configuration:
Acme.Web.Admin.csproj<PropertyGroup> <TargetFramework><!-- framework_version --></TargetFramework> <!-- Change the organization name --> <AdminOrgName>acme</AdminOrgName> </PropertyGroup> <ItemGroup> <AdminClientPath Include="Client\dist\**"> <!-- Change the project name --> <ProjectName>web-admin</ProjectName> </AdminClientPath> </ItemGroup>Edit ~/Acme.Web.Admin/Module.cs and change:
Module.cspublic class Module : AdminModule { // (Optional) Change the name of the custom module public Module() : base("Acme.Web.Admin") { } protected override void OnInit() { base.OnInit(); // Change the organization name and project name in the client scripts registration RegisterClientModule("acme", "web-admin"); } }