
Developing on Microsoft Azure - best practices
There are usually several different ways of how to set up the development environment for your Azure project. This page provides our recommendations on the best options, explains several pitfalls you might encounter and offers solutions to certain problems.
Database
Production and staging deployments have individual databases
When you use the staging environment for testing your website before promoting it to production, always use different databases for each deployment environment. This ensures that your staging environment, which you use for testing purposes, does not damage your production database.
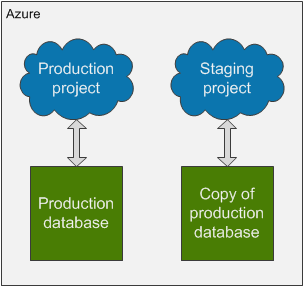
To set your projects this way, modify the connection string in your local project to connect to a different database (you can create a copy of your production database through the Azure management portal) than your production project before you deploy the project to the staging slot.
When you need to switch the staging and production projects but not the databases, you can set different connection strings for each project through the Azure management portal:
- Open the Azure management portal.
- Select your cloud service.
- Switch to the Configure tab.
- Select Production or Staging and configure the CMSConnectionString key for each deployment to connect either to the production database or the copied database.
One deployment has one production database
If you want to increase the number of web role instances in your production project to create a web farm, always use only one database for the whole deployment.
By increasing the number of web role instances, you assign more virtual machines to your project. This creates a web farm. Kentico projects on Microsoft Azure platform are preconfigured to handle web farms automatically – web farm servers are created dynamically according to the assigned virtual machines (instances) and the synchronization between the web farm servers is done using the database updater mechanism.
However, for the web farm to work, all web role instances of your cloud service must use the same database. The only thing you need to do is to set one connection string for your whole production project.
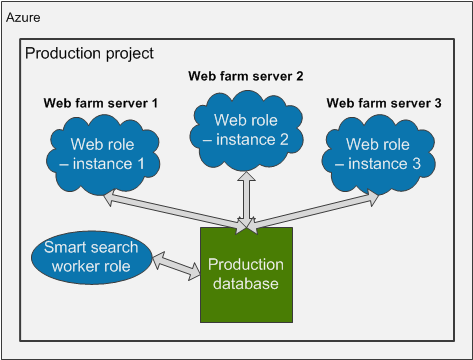
Note: Do not increase the number of instances of the Smart search worker role.
Database connections limit
If you want to increase the database connections limit using the Max Pool Size attribute in the connection string, note that there are limitations to the Azure SQL Database.
The maximum limit of concurrent requests to the database (for the default Web edition of an Azure SQL Database) is 180. This limit is for all web roles and worker roles combined. This means that if you have 2 CMSApp web roles and one SmartSearchWorker role, then you should set the pool to the maximum size of 60.
<connectionStrings>
    <add name="CMSConnectionString" connectionString="Data Source=tcp:YourServerName.database.windows.net,1433;Initial Catalog=YourDatabaseName;User Id=YourUsername@YourServerName;Password=YourPassword;Max Pool Size=60" />
</connectionStrings>
There is no need to increase this value if you do not have specific reasons to do so. If you set a higher limit than allowed by Azure SQL Databases, you might receive error 10928. See Azure SQL Database Resource Governance for details.
Web farms
The number of instances (web farm servers) being used is not higher than the number of web farm servers included in your license
Do not increase the number of instances of your Azure project unless you have obtained a license with a corresponding number of web farm servers included. If you increase the number of instances beyond the number your license allows, the web farm server functionality will stop working completely.
Please contact your account manager to obtain a license for a higher number of web farm servers before increasing the number of instances in your Azure project.
Web.config keys related to web farms are not set
Please do not configure any web.config keys related to web farms in your Azure projects. The Azure projects have web farm mechanisms configured automatically and setting these keys may disrupt the system.
Only certain settings related to web farms can be configured
Because Azure projects have web farm mechanisms configured automatically, certain settings which you can configure in the administration interface do not have any effect on the system. Settings in the Settings application -> Versioning & Synchronization -> Web farm, which do not work as expected are:
- Enable web farm
- Update within request
- Use web farm database updater
- Generate servers dynamically
- Delete generated servers on application end
The other settings, that can be used on Azure, are described in Settings - Web farm.
Enabling web farms on Azure Web Apps
This section applies only to Azure projects deployed in Azure Cloud Services. Other projects do not have web farms configured automatically and these settings work as usual. If you create an Azure Web App by deploying a project from Visual Studio (see Creating Web Apps from Visual Studio), you need to enable web farm functionality manually. See Enabling web farms on Azure Web Apps for details.
Storage
Each development, staging or production environment has its own blob storage
We recommend that every environment you use – local project, staging deployment or production deployment – is connected to a different storage, preferably Azure blob storage. If you use only one storage for all your environments, the system will be inconsistent. For example, deleting a media library file in the local project will lead to missing references in the production project, if the file is used there.
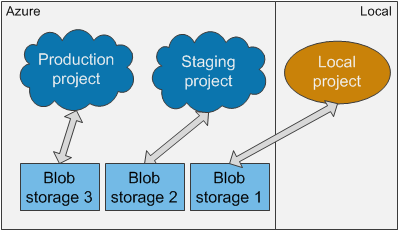
We also recommend that you connect your local development project to an Azure blob storage, instead of the default locally emulated storage. Using the Azure blob storage from the beginning allows you to access the storage from anywhere and may prevent difficulties when moving files between local file system and the blob storage. If you do not abide by this recommendation, you will have to update all media links manually after you move the media files to the blob storage. Or, you will have to deploy the media files together with the project in its file system, which can be problematic, as this usually greatly increases the size of the deployment package.
For synchronizing files and changes between the different storages of each environment, you can use the Content staging module. However, the CMSHashStringSalt key value in the web.config file must be identical in all environments for the Staging module to work properly. See the next section for details.
The CMSHashStringSalt key is identical in all environments
The CMSHashStringSalt key defines the salt value that the system uses in hash functions, for example in macro signatures and media library links. For the content to be synchronized properly through Content staging, the value of this key must be identical in all environments you use. Otherwise, the hash values of objects will be different in different environments. Therefore, make sure that the value of this web.config key is set to a single static value, for example a random GUID, before you deploy your project to the staging or production environment.
<appSettings>
    <add key="CMSHashStringSalt" value="eb2d6fac-8b9e-427c-b98b-3c562dffbb35" />
</appSettings>
Media files stored on blob storage are divided into folders
Storing a large number of media files in a single folder can significantly affect the performance of your project when editing the files in the Media library application.
Instead of storing all files in one folder, create a structure and divide the files into multiple folders. The number of files in one folder directly affects the performance of the Media library user interface.
The Web analytics storage folder is mapped to the server file system
By default, web analytics logs are also stored on the blob storage. The Web analytics module writes and processes logs every minute, which can cause problems on the blob storage with latencies. Moreover, the Web analytics module can create a large number of files, which further degrades the performance of the blob storage.
We highly recommend that you map the folder which stores Web analytics data to the file system of the server. See Mapping the Web analytics storage folder to the server file system for instructions.
Temporary and cached files
The CMSApp web role creates two storage folders, CMSCache and CMSTemp, in its own file system. These folders store temporary files and their capacity is limited by default. It can happen that your project depletes the allocated space and consequently Smart Search stops working or media libraries stop accepting files. This can result in the following error:
“There is not enough space on the disk.”
If this happens, you can temporarily solve these problems by cleaning the CMSCache and CMSTemp folders. In order to solve the problem permanently, you can increase the size of these folders.
To delete files in CMSCache and CMSTemp folders:
- Connect to your web role through remote desktop.
- In the Azure management portal, open your cloud service on the Instances tab and click Connect. Download the remote desktop file, run it and submit remote desktop credentials.
- Locate the C:\Resources\Directory\<GUID>.CMSApp.CMSCache and C:\Resources\Directory\<GUID>.CMSApp.CMSTemp folders and clean the temporary files from them.
Increasing the size of CMSCache and CMSTemp folders
To increase the size of these folders:
- Open your Azure project in Visual Studio.
- Double-click the CMSApp role in CMSAzure\Roles folder.
- Switch to the Local Storage tab.
- On this tab, you can set the size of these folders in Megabytes.
- The Clean on role recycle option defines if the folder should be emptied when the web role is re-imiged form the deployment package (can happen automatically after updates).
You can also set the size of these folders in the ServiceDefinition.csdef file:
<LocalResources>
    <LocalStorage name="CMSTemp" cleanOnRoleRecycle="true" sizeInMB="100000"/>
    <LocalStorage name="CMSCache" cleanOnRoleRecycle="false" sizeInMB="100000"/>
</LocalResources>
You can find details about the allocated resources for web roles in the following article: Virtual Machine and Cloud Service Sizes for Azure (section Sizes for Web and Worker Role Instances). The local resource disk for the default Small web role instance is 224 GB large.