
Working with catalog discounts
You can use catalog discounts to motivate selected customers to purchase more products. If you use catalog discounts, the system offers your products on the live site to all eligible customers for discounted prices. The system also displays the products’ discounted prices to your on-line store administrators while creating/editing orders of your eligible customers.
You can configure catalog discounts to apply only to products specified by rules (macro conditions); the catalog rules use properties of the respective SKUs (product objects), and can include the range of the product price, manufacturer of the product, its public status, etc. You can also specify periods of validity for catalog discounts.
For example, you can provide special Christmas sale discounts to all eligible customers who purchase any products from the selected departments such as Clothing, Electronics, etc. between November 15 and December 23.
The system binds catalog discounts to specific sites, for example to the sample E-commerce Site.
If you run multiple sites and want to use catalog discounts, you thus need to define dedicated catalog discounts for each site.
Adding catalog discounts
You can add catalog discounts in the Catalog discounts application.
- Adding catalog discounts limited by periods of validity
- Adding catalog discounts targeted on selected customers
- Adding catalog discounts limited to selected product scopes
You can combine the catalog discount limitations.
For example, you can add discounts effective on all footwear products throughout January, and targeted on your registered customers.
Adding catalog discounts limited by periods of validity
To add catalog discounts limited by periods of validity:
ClickNew catalog discount.
Enter the catalog discount properties.
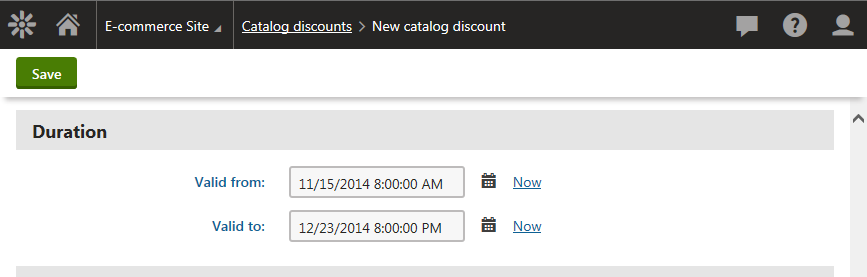
You need to specify the properties in the Duration section:
- Valid from - specifies the start of the period of validity.
- Valid to - specifies the end of the period of validity.
If you leave both properties in the Duration section empty, the discount has unlimited validity.
If you enter the Valid from property but leave the Valid to property empty, the discount has validity unlimited towards the future. The period of validity starts as specified in its Valid from property.
If you enter the Valid to property but leave the Valid from property empty, the discount has limited validity. The period of validity starts upon the discount’s adding to the system and finishes as specified in its Valid to property.
- Click Save.
The system creates a new catalog discount. The system applies the discount only during the discount’s period of validity (if active).
If you open the Catalog discounts application, you can see that the system displays for each listed catalog discount its status:
|
Status |
Description |
|
Active |
The catalog discount is enabled in the system (the Enabled property is turned on). If period of validity is specified for the discount (the Valid from, Valid to properties), the discount is currently effective. |
|
Disabled |
The catalog discount is not enabled in the system (the Enabled property is turned off). If period of validity is specified for the discount (the Valid from, Valid to properties), it has no effect. |
|
Not started |
The catalog discount is enabled in the system (the Enabled property is turned on), and its period of validity is specified (the Valid from, Valid to properties). The discount is currently ineffective because its period of validity has not started. |
|
Finished |
The catalog discount is enabled in the system (the Enabled property is turned on), and its period of validity is specified (the Valid from, Valid to properties). The discount is currently ineffective because its period of validity has finished. |
Adding catalog discounts targeted on selected customers
To add catalog discounts targeted on selected customers:
ClickNew catalog discount.
Enter the catalog discount properties.
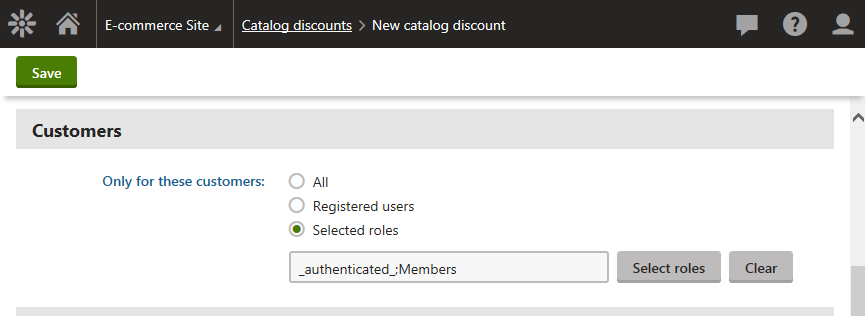
While entering the discount’s properties, make sure you change the value of the Only for these customers property in the Customers section:
All - all customers are eligible for the discount; the default option.
Registered users - only registered customers are eligible for the discount.
Selected roles - only customers in selected roles are eligible for the discount. To add roles:
Click Select roles.
- This opens the Select roles dialog.
Select the required roles.
Click Select.
You can enter roles directly by typing in their code names separated by semicolons, e.g. _authenticated_;Members.
You can add registered customers to roles in the Customers application while editing a selected customer on the Roles tab.
Click Save.
The system creates a new catalog discount. The system applies the discount (if active) only for the selected customers.
If you need to add catalog discounts targeted on custom groups of customers, for example on selected users, contact groups, etc., see Configuring discount rules.
Adding catalog discounts limited to selected product scopes
To add catalog discounts limited to selected product scopes:
ClickNew catalog discount.
Enter the catalog discount properties.
While entering the discount’s properties, make sure you change the value of the Apply to property in the Basics section:
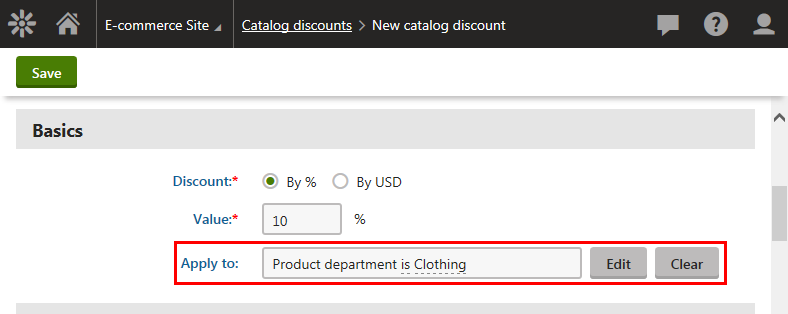
Selecting the discount rules
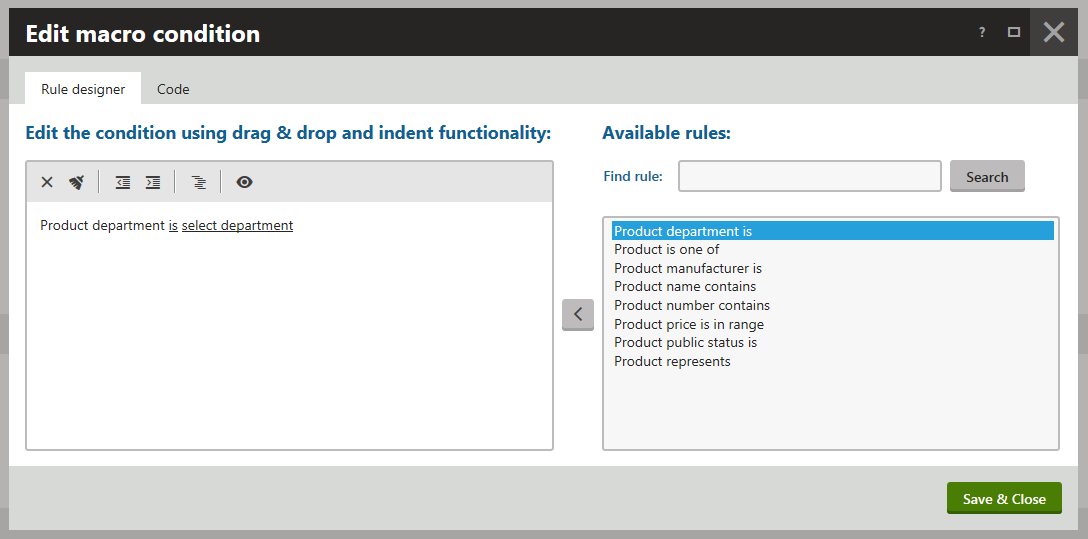
Click Edit condition to edit the Apply to property.
- This opens the Edit macro condition dialog on the Rule designer tab.
Select the required rule in the right part of the dialog.
Click Add rule () to add the rule to the condition.
(Optional) Repeat Steps b. and c. to add more rules.
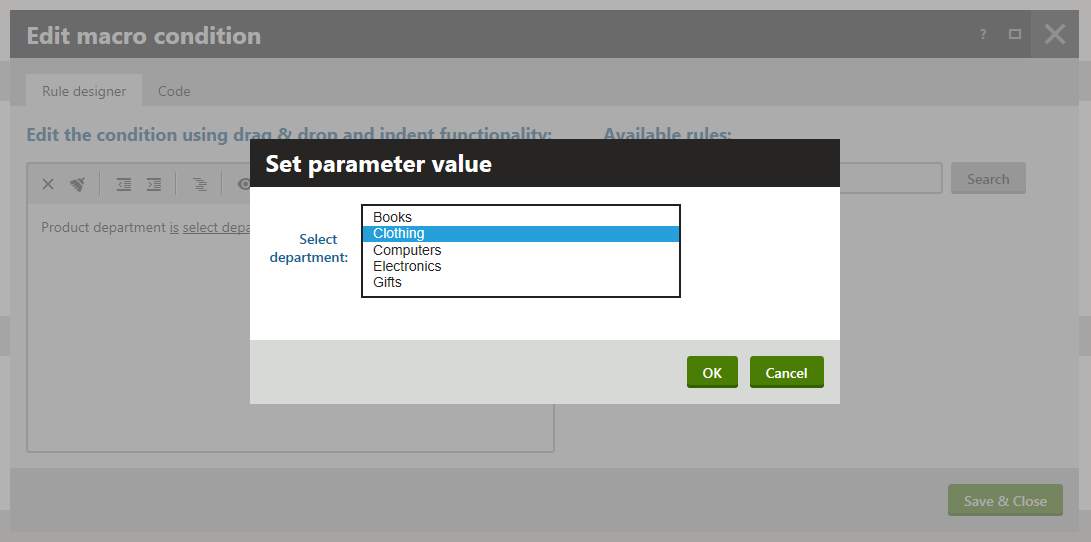
 Specifying the rule parameters
Click the underlined part of the rule in the left part of the dialog.
- This opens the Set parameter value dialog.
Select the parameter.
Click OK.
- The system closes the Set parameter value dialog. The Edit macro condition dialog is open for editing.
(Optional) Repeat Steps a. through c. if the rule contains more parameters, or if you added more rules.
Click Save & Close.
- The system closes the Edit macro condition dialog and saves the condition specifying the selected product scope.
Click Save.
The system creates a new catalog discount. The system applies the discount only if the specified condition is fulfilled (if active).
Modifying catalog discounts
You can modify catalog discounts in the Catalog discounts application.
- Select a catalog discount and click Edit ().
- Modify the catalog discount properties as required.
- Click Save.
You can now use the catalog discount with its updated settings.
Displaying catalog discounts in the invoice
To display catalog discounts applied on the ordered product items in the invoice:
Open the Store configuration application.
Switch to the Invoice tab.
Add the following code into your invoice template:
 {%ContentTable.ApplyTransformation("Ecommerce.Transformations.Order_ContentTable",
 "Ecommerce.Transformations.Order_ContentTableHeader",
 "Ecommerce.Transformations.Order_ContentTableFooter")#%}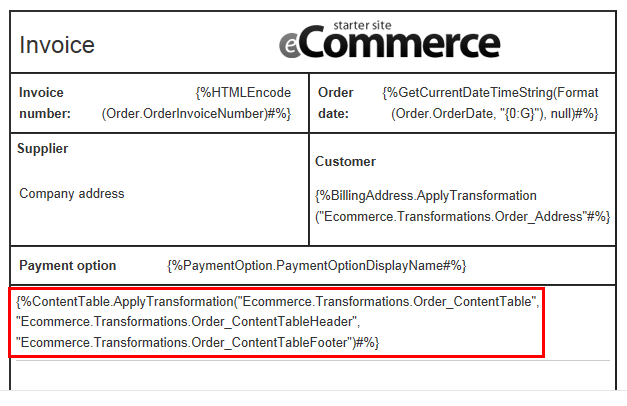
Click Save.
If you now review an existing order on the Invoice tab, you can see that the invoice includes information about catalog discounts applied on the ordered product items.
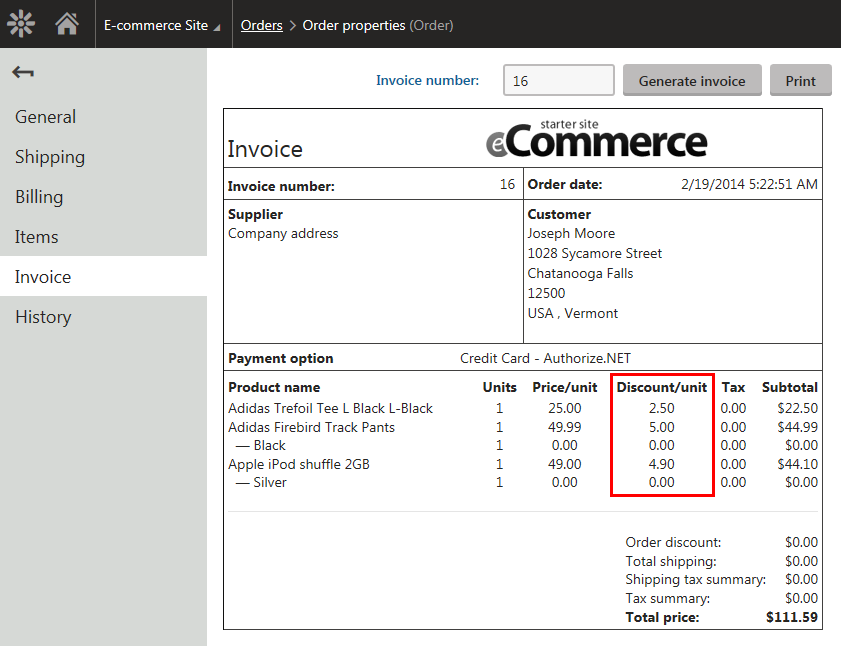
The ordered product items and the related information including the applied catalog discounts are displayed by the Ecommerce.Transformations.Order_ContentTable transformation.
You can edit the transformation in Document types -> Edit () E-commerce - Transformations on the Transformations tab.
Displaying product discounts on the live site
The system allows you to attract the customers by showing them what economical and convenient purchases they can make in your on-line store. Specifically, the system can display for the products their original and discounted prices. The system can also display for selected products special status labels, for example Sale, New, Featured, etc.
Offering products at discounted prices
You can motivate your customers to purchase more products by offering the products at discounted prices.
The Kentico E-commerce Solution sample product listing pages can display the products with the original and discounted prices. Whether and how the system displays the prices depends on the products’ configuration, and availability of catalog discounts:
|
Product price |
Product list price |
Catalog discount |
Description |
|
defined |
defined |
doesn’t apply |
The list price is crossed out and the price is highlighted. |
|
defined |
not defined |
applies |
The price is crossed out and the price reduced by the discount is highlighted. |
|
defined |
defined |
applies |
The list price is crossed out and the price reduced by the discount is highlighted. |
|
defined |
not defined |
doesn’t apply |
Only the price is displayed for the product; the price is highlighted. (The system displays only one price for the product). |
The Kentico E-commerce Solution sample product details pages can display the products with the original and discounted prices. The amount (and percentage of the original prices) that the customers can save is also displayed. Whether and how the system displays this information depends on the products’ configuration, and availability of catalog discounts:
|
Product price |
Product list price |
Catalog discount |
Description |
|
defined |
defined |
doesn’t apply |
The list price, displayed as List price, is crossed out and the price, displayed as Your price, is highlighted. |
|
defined |
not defined |
applies |
The price, displayed as List price, is crossed out and the price reduced by the discount, displayed as Your price, is highlighted. |
|
defined |
defined |
applies |
The list price, displayed as List price, is crossed out and the price reduced by the discount, displayed as Your price, is highlighted. |
|
defined |
not defined |
doesn’t apply |
The system displays for the product only the price as Total price. |
You can specify the products’ Price and List price properties while editing the products on the General tab.
Alternatively, you can specify these properties in the Pages application while editing the corresponding product documents on the Form tab.
List price stands for the recommended retail price (RRP) or manufacturer’s suggested retail price (MSRP) of the product. The list price typically is determined by factors such as supply, demand and manufacturing costs.
Offering products highlighted with statuses
You can motivate your customers to purchase selected products by showing product statuses, e.g. Sale, New, Featured, etc.
You can specify the products’ statuses by modifying their Public status properties on the General tab.
Alternatively, you can specify the products’ statuses in the Pages application while editing the corresponding product documents on the Form tab.
Configuring the pages to display product discounts
The sample product listing pages and sample product details pages contain web parts using transformations that can display product discount information (product prices and statuses).
|
Kentico sample pages |
Web part |
Transformation |
|
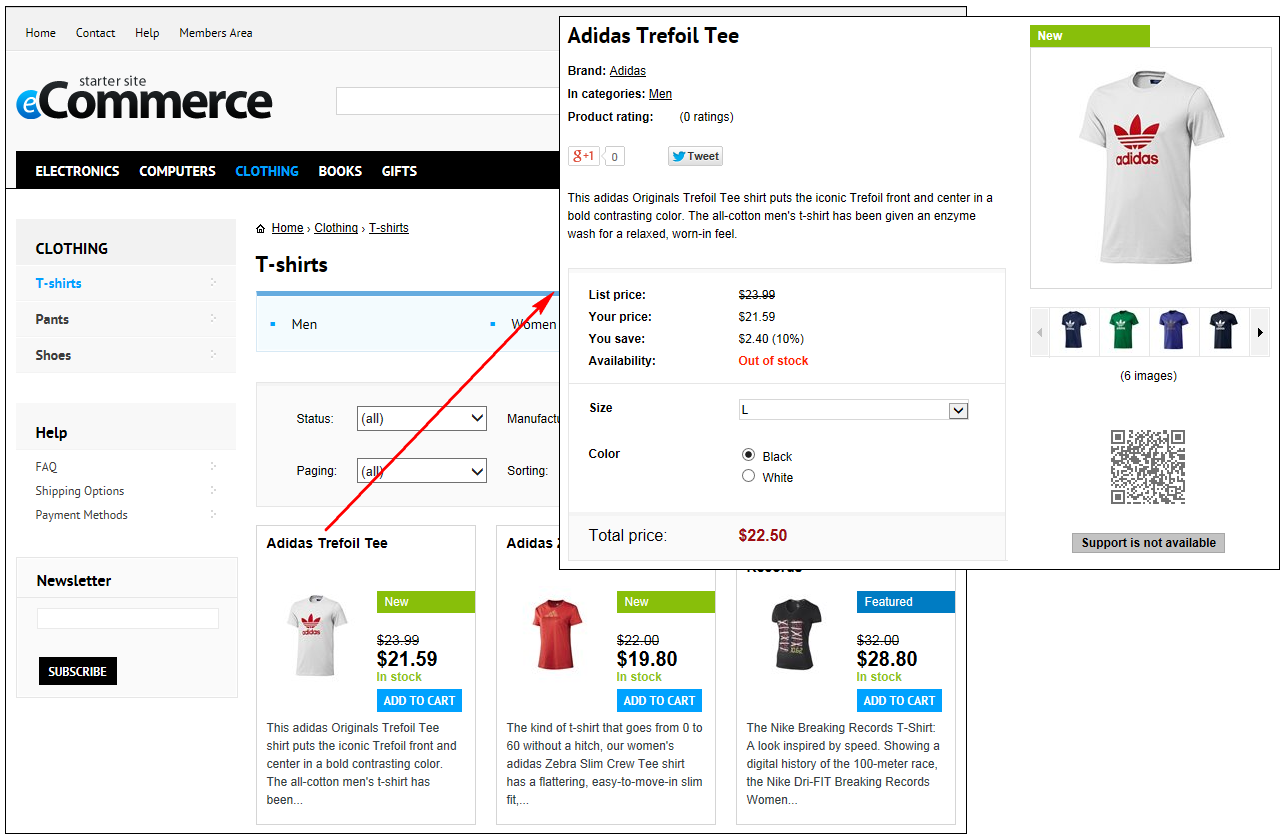
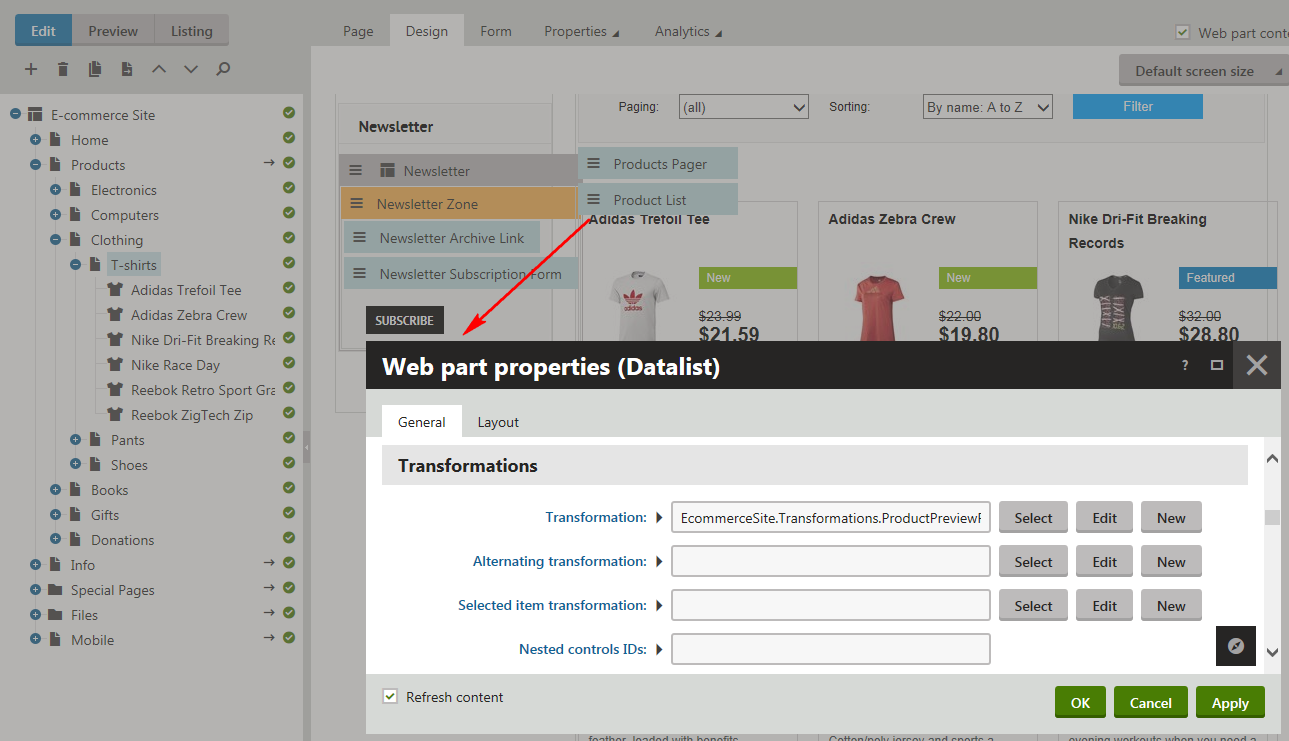
Product listing pages, e.g. the T-shirts page |
Product List |
EcommerceSite.Transformations.ProductPreviewForThreeColumnsLayout |
|
Product details pages, e.g. the Adidas Trefoil Tee page |
Product Detail |
EcommerceSite.Transformations.ProductDetail |
|
Product details pages, e.g. the Adidas Trefoil Tee page |
Product Main Image |
EcommerceSite.Transformations.ProductDetailGalleryProductImage |
To configure a product listing/product details page to display product prices and product statuses:
Open the Pages application.
Select the required page from the content tree.
Switch to the Edit -> Design tab.
Add appropriate web part(s) to the selected web part zone(s).
You can do this by copying the web part(s) from any sample product listing/product details page.
- If you are editing your custom product listing page, add the Product List web part.
- If you are editing your custom product details page, add the Product Detail and Product Main Image web parts.
Modify the web parts’ Transformation properties as required.
Product listing pages
If you want the page to display product prices, i.e. the currently valid price and the undiscounted price (if available), make sure the transformation contains the following code:
  <span class="retailPrice"><%# If(GetSKUOriginalPrice() > 0, GetSKUFormattedOriginalPrice(), "") %></span>
  <span class="price"><%# GetSKUFormattedPrice() %></span>
If you want the page to display product statuses (if available), make sure the transformation contains the following code:
<span class="indicator <%# GetSKUIndicatorProperty("PublicStatusName") %>"><%# Localize(GetSKUIndicatorProperty("PublicStatusDisplayName")) %></span>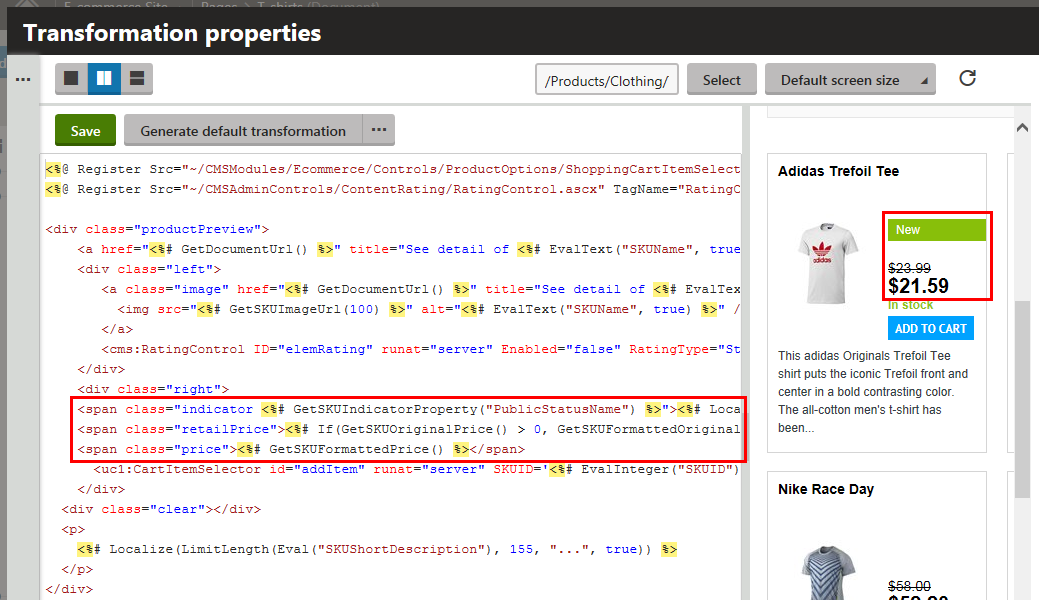
Product details pagesIf you want the page to display product prices, i.e. the currently valid price and the undiscounted price (if available), and the amount (percentage of the original price) that the customers can save, make sure the transformation contains the following code:
  <table>
        <% if(GetSKUPriceSaving() > 0){ %>
        <tr>
            <td class="label">
               <span class="retailPrice">List price: </span>
            </td>
            <td>
                <span class="lineThrough"><%# GetSKUFormattedOriginalPrice() %></span>
            </td>
         </tr>
         <tr>
            <td class="label">
                 <span class="yourPrice">Your price: </span>
            </td>
            <td>
                 <span><%# GetSKUFormattedPrice() %></span>
            </td>
         </tr>
         <tr>
            <td class="label">
                <span class="instantSavings">You save: </span>
            </td>
            <td>
                <span><%# GetSKUFormattedPriceSaving() + " (" + GetSKUPriceSaving(true) + "%)"  %></span>
            </td>
          </tr>
        <% } %>
   </table>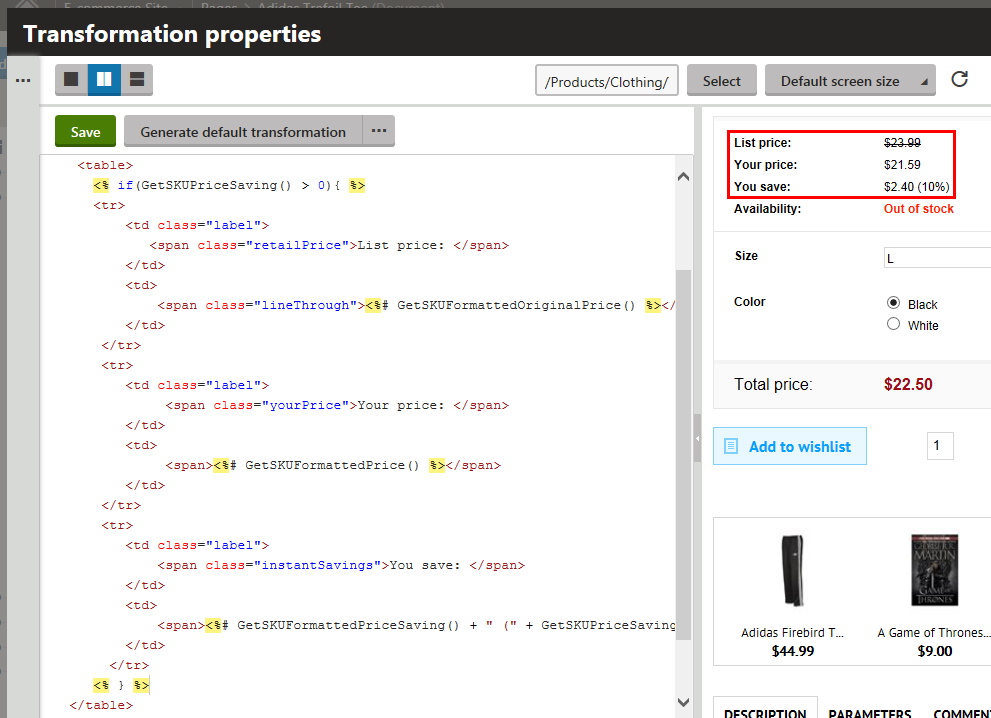
If you want the page to display the product’s status (if available), make sure the transformation contains the following code:
  <div class="productPublicStatus">
      <span class="<%# GetSKUIndicatorProperty("PublicStatusName") %>">
        <%# Localize(GetSKUIndicatorProperty("PublicStatusDisplayName")) %>
      </span>
  </div>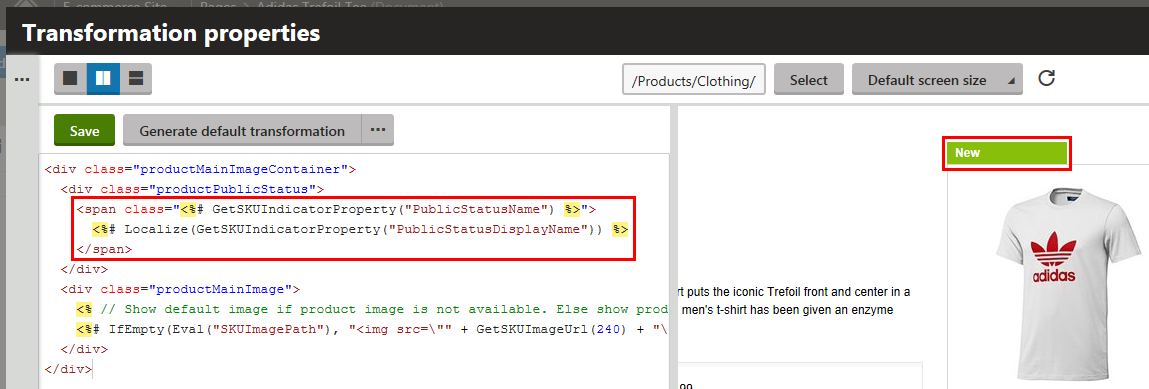
(Optional) Modify other properties of the web part(s) if required.
Click OK.
If your customers now view the page on the live site, they can see the product’s discount information.
Managing access to catalog discounts for selected users
In Kentico, managing access to catalog discounts for selected users is managing corresponding E-commerce Solution permissions for the roles to which the users are assigned.
- Open the Roles application.
- Select the required site.
- The system displays a list of all roles available on the selected site.
- Edit () the selected role.
Adding the users to the role
First, you need to make sure that the selected users are in appropriate roles. This is because you cannot add permissions directly to the users but to the roles to which the users are assigned.
- Switch to the Users tab.
- Click Add users.
- This opens the Select users dialog.
- Select the user(s).
- Click Save & Close.
The system closes the Select users dialog and adds the selected user(s) to the current role. Now you can manage access to catalog discounts for the selected user(s) by assigning / unassigning the corresponding E-commerce permissions for the role.
Alternatively, you can add registered customers to roles in the Customers application while editing a selected customer on the Roles tab.
Assigning / unassigning permissions for the role
Switch to the Permissions tab.
Select Module (Permissions for, left).
Select E-commerce (Permissions for, right).
- The system displays a list of all E-commerce permissions available for the current role.
Enable/disable the permissions as required.
Permission
Description
Read discounts
Allows users in selected roles to access discounts and free shipping offers.
Modify discounts
Allows users in selected roles to create, modify and delete discounts and free shipping offers.
Read configuration
Allows users in selected roles to access E-commerce configuration, i.e. the on-line store settings, discount rules, etc.
Modify configuration
Allows users in selected roles to modify E-commerce configuration.
The system allows/restricts for all users in the current role the selected permissions. The users now have / do not have the permissions and can / cannot access catalog discounts.
You can hide catalog discounts from the administration interface for selected users by disabling the corresponding UI elements for the roles to which the users are assigned.
Please refer to Reference - Managing UI elements for more details.
Removing catalog discounts
You can remove catalog discounts from your on-line store in the Catalog discounts application.
- Select a catalog discount.
- Click Delete ().
- Confirm that you want to remove the discount (OK).
The system removes the catalog discount from your on-line store.
Reference
General |
|
|
Name |
The name of the catalog discount used in various parts of the system’s administration interface, e.g. in catalog discounts lists. The system can display this name also to your on-line store customers while viewing the details of the product price in the Product price detail dialog. |
|
Code name |
The string identifier of the catalog discount object used by developers in the code. Unless there is a reason to set a particular value, you can leave the default (automatic) option, and the system generates an appropriate code name. |
|
Description |
To make the catalog discount easier to use and maintain, you can add an explanation about the scenarios for which the discount is intended, etc. |
|
Enabled |
Indicates if the catalog discount is enabled in the system (active). While calculating the price of product (product option) items added to the shopping cart, the system skips disabled discounts. |
Basics |
|
|
Discount |
Here you can specify the form of discount:
|
|
Value |
Indicates an absolute discount value (in your on-line store main currency) or relative discount value (in per cent). The system reduces the price of the product items that the customer adds to the shopping cart (including all selected product options) by the discount value and calculates all applicable taxes accordingly. |
|
Apply to |
Here you can enter the condition(s) that must be fulfilled for the system to apply the catalog discount. By utilizing rules (user-friendly representations of macro expressions), you can write any condition according to your specific requirements. Clicking Edit opens the Edit macro condition dialog, which allows you to add rules through a graphical interface. You can click Clear to remove the current content of the condition field. Example: All products and Product number contains 1255 The condition ensures that the catalog discount is only applied if the product number contains 1255. For details about available macro options and syntax, please refer to Macro expressions. |
Duration |
|
|
Valid from |
Indicates since when the catalog discount is valid. You can click Now to insert the current date and time or you can click to choose the date and time from the calendar. For unlimited validity, leave the field empty. |
|
Valid to |
Indicates until when the catalog discount is valid. You can click Now to insert the current date and time or you can click to choose the date and time from the calendar. For unlimited validity, leave the field empty. |
Customers |
|
|
Only for these customers |
Allows you to specify customers eligible for the catalog discount:
|
Discount calculation |
|
|
Priority |
Here you can specify in what sequence the system applies the listed active catalog discounts (if any). Enter 1 for the highest priority. |
|
Apply further discounts with lower priority |
Here you can specify if the system applies catalog discounts with a lower priority (if any) after applying the current catalog discount. |