
Managing page templates
All documents (pages) on Kentico websites are based on page templates. Templates define the basic structure and components of pages without the content added by editors.
To access the main management interface for all page templates in the system, open the Page templates application. The system organizes templates into categories. You can edit individual templates by selecting them in the category tree.
To edit the properties of the template assigned to a specific document in the Pages application:
- Select the document in the content tree
- Open the Properties -> Templates tab.
- Click Edit template properties.
OR
- Open the document’s Design tab.
- Right-click the green template header and click Edit template.
When editing templates, you can set the following page template properties on the General tab:
|
Page template property |
Description |
|
Template display name |
The name of the template displayed to users in the administration interface. |
|
Template code name |
A unique identifier of the template. |
|
Category |
Sets the category where the template is stored in the page template catalog. |
|
Template description |
Here you can enter a description for the template. Users can see this description when selecting page templates in the catalog (for example when creating new pages). |
|
Thumbnail |
Allows you to set the image that represents the template in the page template selection catalog. You can choose between two types of images:
|
|
Clone as ad-hoc for new documents |
Only available if the Template type is Portal page. When a user creates a new page with a template that has this option enabled, the system automatically creates an ad-hoc copy of the template and assigns it to the page. This allows users to immediately modify the design of the new page without affecting the default re-usable template. Note: The system always clones templates as ad-hoc when creating wireframes, even if this setting is disabled for the assigned template. |
|
Template type |
The following types of page templates are available:
|
|
Master template |
Only available if the Template type is Portal page. Indicates if the pages that use the template are designated as Master pages. Enabling this option also causes the template to be selectable as the root master page template in the New site wizard. |
|
Page nesting |
Only available if the Template type is Portal page. Determines how documents based on the template display their content inside ancestor pages in the content tree.
|
|
File name |
Only available if the Template type is ASPX page or ASPX + Portal page. Specifies the path to the .aspx file that serves as the page template’s source. You can either choose the using the Select button, or enter the path manually. The tilde character (~) represents the root directory of the project folder, e.g. ~/CMSTemplates/CorporateSite/Blog.aspx |
|
Default controller |
Only available if the Template type is MVC. Sets the name of the controller class containing the MVC action that the system performs when pages using this template are accessed. Do not type the Controller suffix of the class name. For example, if the class is called NewsMVCController, enter NewsMVC. The system first searches for the specified class in the CMS.Controllers.<current site code name> namespace. If the class cannot be found there, the CMS.Controllers.Global namespace is searched. |
|
Default action |
Only available if the Template type is MVC. Specifies the exact action defined within the controller class that the system performs when loading pages based on the template. |
Limiting the use of page templates
When editing page templates in the Page templates application, you can:
- Assign templates to specific websites on the Sites tab. Users can only work with the template on the selected websites.
- Add further limitations through template scopes (by default, page templates can be used anywhere on the websites to which they are assigned).
Scopes simplify the user experience by reducing the number of templates available for selection in specific parts of the website. To define scopes for a page template:
Important: Template scopes are not a security feature. After assigning a template to a page, users can move the page to a location that is not allowed by the given template’s scopes.
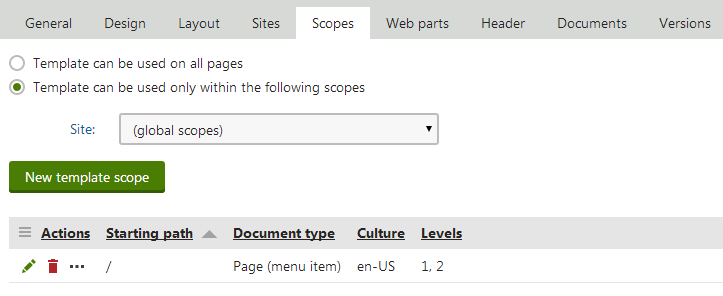
Open the Scopes tab of the template’s editing interface.
Select Template can be used only within the following scopes.
Choose the Site where the scope will apply.
- You can only choose the sites to which the template is assigned.
- Global scopes are valid on all sites in the system.
Click New template scope.
Set the parameters of the scope:
- Starting path - defines a sub-section of the website where the template can be used. Allows the exact document with the entered path and all of its descendants (subpages).
- Document type - allows the template only for documents of the selected type.
- Culture - allows the template for document versions in the selected culture (language).
- Levels - you can allow the template only for documents on specific levels in the content tree hierarchy.
Click Save.
You can add any number of scopes for each template. Users can select the template for documents that fulfill the requirements of at least one of the scopes.
Defining head content for templates
You can add custom head content for page templates, such as links to external CSS stylesheets or JavaScript files.
- Open the page template’s editing interface.
- Switch to the Header tab.
- Type in the required head content.
- Click Save.
The system inserts the content into the <head> element in the output code of all pages that use the given template.
For documents that use portal engine templates, the head content can also be inherited by subpages. The inheritance depends on the following options, which you can enable on the Header tab of each page template:
- Allow descendant templates to inherit the header - if enabled, the head content of the template can be inherited by documents on lower levels in the content tree.
- Inherit headers from the templates of ancestor documents - indicates if documents based on the template are allowed to inherit head content from the templates of documents that are above them in the content tree.
Note: The header inheritance works according to the page nesting settings of documents — pages can only inherit head content from ancestor pages where they are nested. This way, the system only adds the head content to pages that actually display the page template containing the header definition.
Finding which documents use a given template
To view a list of all documents (pages) in the system that use a specific page template, open the Documents tab of the template’s editing interface.
You can access individual documents in the list through the following actions:
- Edit document - opens the document in the Edit mode of the Pages application.
- Navigate to document - opens the page on the live site.
Editing the XML source of a template’s web parts
The system stores the content and configuration of web parts placed on page templates as XML data. If you cannot use the Design tab due to an error caused by an incorrectly configured web part, you can fix the issue on the Web parts tab of the given page template’s editing interface. The tab allows you to edit the XML source directly.
- You can modify the values of properties for all web parts on the template.
- You can remove web parts from the template by deleting entire <web part> elements.