
Configuring websites for SEO
This page describes the Kentico settings that can affect your website’s SEO.
Editing the metadata of pages
An important SEO consideration is the metadata of individual pages. To edit the metadata of a page:
- Open the Pages application.
- Select the corresponding document in the content tree.
- Open the Properties -> Metadata tab.
You can set the following SEO-related properties:
|
Property |
Description |
|
Page title |
The page title is displayed to users in the header of their browser (or tab) when the page is viewed. Many search engines use this title for the page in their search result lists. The system adds the content of the field into the <title> element in the HEAD section of the page’s output. |
|
Page description |
A brief description of the page and its purpose. The description can be used for SEO purposes and when performing searches on the website. The system adds the content of the property as a description meta element in the HEAD section of the page’s output. Some search engines index this tag. |
Global metadata settings
You can configure a prefix for the page title and description for all documents. Use the corresponding settings in Settings -> Content. The settings allow you to set the prefixes and also the overall format of the page title.
The default page title format is: {%prefix%} - {%pagetitle_orelse_name%}
The title format consists of the prefix value, followed by the page title value. If the page title value is not set, the document name is used.
Macro expressions in metadata
Use macro expressions in format (% ColumnName %} to dynamically insert values of document fields into metadata values.
SEO settings
You can configure most of the SEO functionality of your website through the Settings application in the URLs and SEO category. The settings here are divided into three main sections.
Search engine optimization (SEO)
Before search engines can provide results that link users to your website, they need to index the site using web crawlers (robots). The settings in this section allow you to use standard techniques for giving instructions to crawlers. You can also enable several options that help crawlers easily and accurately index the pages on your website.
|
Setting |
Description |
|
Google sitemap URL |
These two settings set up the URL of the website’s Google (XML) sitemap and the path of the source document. The sitemap allows you to instruct web crawlers how to index the site’s pages. See also: Google Sitemaps |
|
Google sitemap path |
|
|
Robots.txt path |
Specifies the path of the document that generates the website’s robots.txt file. See also: Managing robots.txt |
|
Allow permanent (301) redirection |
If enabled, the system uses permanent (301) redirection instead of standard temporary (302) redirection. This is highly recommended, because it allows web crawlers to properly react to any changes made on your website and pass page rank to the new or main URL. |
|
Move ViewState to the end of the page |
If enabled, the system places the ViewState field at the end of the output code generated for pages. This helps search engine crawlers process more page content. |
|
Use NOFOLLOW for user links |
If enabled, the system instructs search engine crawlers not to follow links posted by users on Forums, Message boards or in Blog comments. This is achieved by including the rel=“nofollow” attribute in the output code of all such link tags. This can prevent damage to your website’s search ranking caused by user‑generated links that lead to unrelated content. The setting can also help stop spammers from passing page rank to other sites. |
|
Default replacement document |
See the Assigning replacement documents for deleted pages section below. |
Assigning replacement documents for deleted pages
Removing documents can have a negative effect on your website’s traffic. Visitors may find it confusing if pages suddenly become unavailable (for example if they have a deleted page bookmarked). Another thing to consider is that deleted pages might be indexed by search engines, which then provide invalid links in their search results until they re‑index the site’s content.
You can mitigate these problems by setting up other documents as replacements when deleting pages:
Open the Pages application.
Select the document that you wish to remove.
Click Delete ().
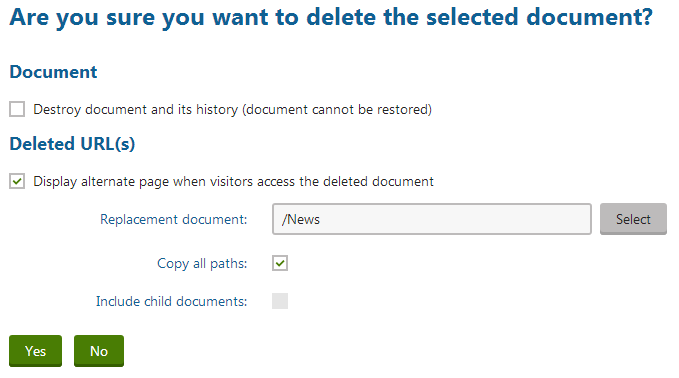
Select the Display alternate page when visitors access the deleted document check box.
Specify the path of the Replacement document.
- The field loads a default value from the Default replacement document setting of the current website, but you can enter a different path for each specific case.
Enable or disable the following configuration options:
- Copy all paths - if checked, the website uses the replacement document for all possible URL paths of the deleted document (including any document aliases). If false, the replacement only covers the main URL of the deleted page, i.e. the corresponding document’s custom URL path (if one is specified) or alias path.
- Include child nodes - if checked, the website uses the replacement document for all child documents removed along with the deleted page.
Click Yes.
Once you confirm the deletion, the system automatically adds document aliases to the replacement document. These aliases ensure that the website serves up the replacement page whenever a visitor requests the URLs of the deleted document. When combined with permanent 301 redirection, the replacement aliases also properly inform search engine crawlers about the change in your website’s structure.
SEO - URLs
The settings in this section allow you to configure URL rewriting that focuses on avoiding issues with duplicate content, i.e. having the same content available under multiple URLs. Such problems can have a negative effect on search ranking, so it is recommended to set up a unified URL format.
|
Setting |
Description |
|
Use URLs with trailing slash |
Specifies how the rewriter handles trailing slashes in URLs. Possible options:
|
|
Redirect document aliases to main URL |
Enabling this setting ensures that documents always have only one valid URL and other aliases are redirected to this main URL. The main URL of a document is determined either by its alias path, or custom URL path if one is specified. Note: You can override this setting for individual document aliases through their Alias redirection property. For more information about document URLs, see Setting document aliases. |
|
Redirect invalid case URLs to their correct versions |
Determines how the system handles the letter case of characters in URLs. Available options:
|
|
Redirect documents to main extension |
If enabled, the system ensures that all document URLs use the current main extension. The main URL extension is the first one specified in the Friendly URL extension setting. Any URLs with a different extension are automatically redirected to a corresponding URL with the main extension. |
|
Process domain prefix |
Determines how the rewriter handles the www domain prefix in the website’s URLs. You can leave the domain as it was entered or have it rewritten to either always or never include the www prefix. Note: This setting does not apply for IP addresses and top‑level domains. |
|
Default page |
Allows you to redirect (permanent 301) all possible URLs that access the home page of your website to one single URL. Using a unified home page URL is highly recommended, because it prevents the duplicate content problem on your website’s most important URL. You can choose from the following options for the home page URL:
Important: This setting only works correctly if the website is hosted on IIS 7 or newer, and uses an application pool with an Integrated Managed pipeline mode. |
SEO - Cultures
The options in this section are important when performing search engine optimization of multilingual websites. The following settings allow you to set up unique URLs for different language versions of pages in a search engine friendly format.
|
Setting |
Description |
|
Force domain culture |
If checked, the system generates the domain name in document URLs based on the current content culture. Whenever a user switches to a different language on the website, the URL is redirected to the corresponding domain name. You can assign cultures to domains by editing () your site in the Sites application:
Note: You cannot use this option in combination with language prefixes. |
|
Use language prefix for URLs |
If enabled, the system generates document URLs with language prefixes. A language prefix is a subdirectory inserted into the URL. The name of the prefix matches the culture code (or culture alias) of the content culture selected on the website. Example: <domain>/en-US/Home.aspx |
|
Allow URLs without language prefixes |
If enabled, URLs without language prefixes are allowed. Otherwise the system redirects such URLs to a corresponding URL that includes a language prefix. Only applies if Use language prefix for URLs is enabled. |
See also: