
A/B testing pages
Kentico EMS required
Features described on this page require the Kentico EMS license.
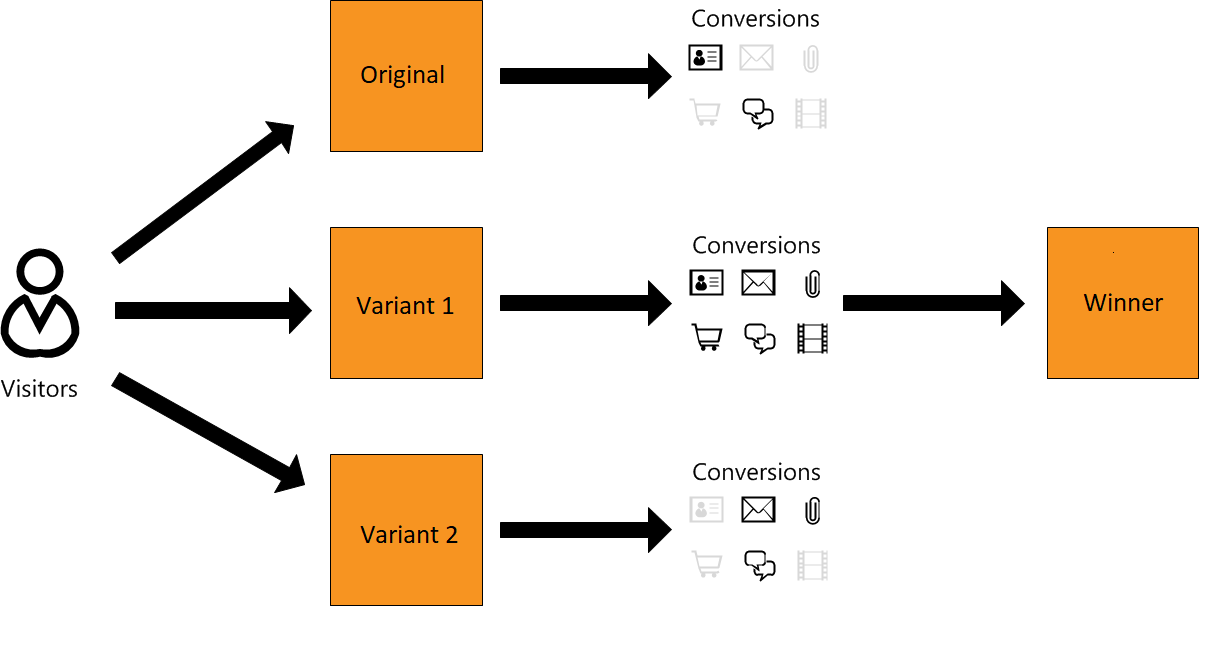
A/B testing is an experiment that compares one or more alternative versions of a page (variants) against the original, gauging their efficiency at accomplishing selected goals (visitor conversions). The measured conversions are based on visitor actions that can range from simple – a banner click or a form submit, to complex – placing an item into the shopping cart, or performing a full purchase.
During a test, all page variants receive roughly the same visitor traffic and compete with each other for the highest conversion number or weighted value. After a test concludes, statistical analysis based on configured test parameters helps select a winning variant. When a variant is promoted as the test winner, it replaces the original content of the page.
Kentico supports the following forms of A/B testing:
- Content (page) A/B testing – allows you to test different variants of page content against one another.
- Email A/B testing – allows you to test different variants of marketing emails against one another.
A standard workflow when A/B testing pages usually entails:
- Creating an A/B test together with one or more variants.
- Configuring the test by setting conversion goals and other metrics.
- Starting the test and gathering behavioral data and statistics based on its configuration.
- Evaluating test results with the help of provided analytics.
- Selecting a winning variant based on the collected insights.
Page builder requirements
Content A/B testing functionality is tightly connected with the page builder feature. A/B tests may only be created for pages that support the page builder functionality (i.e. page types that have the Page tab displayed in the Pages application).
Moreover, individual test variants may only differ in page builder content – this includes widgets and their configuration and assigned page templates. You cannot set different content of page fields for specific A/B test variants.
How A/B testing works
When a live-site user navigates to a page with a running A/B test, the system assigns them a randomly selected variant from the given A/B test variant pool. Over the course of the test’s duration, each page variant should receive roughly the same amount of visitor traffic.
Moreover, to maintain a consistent appearance of the tested page for repeat visitors, Kentico stores a CMSAB<A/B test code name> cookie containing the identifier of the selected variant in the visitor’s browser. This cookie also ensures that all conversions performed by A/B tested users get logged under the assigned variant. The cookie expires within 2 months after the last visit on the tested page.
Creating A/B tests
Create a new A/B test by following these steps:
A/B testing and workflows
When testing pages subject to workflow, you may only create A/B tests and manipulate variants when the page is in an editable workflow step. See Using workflows for more information about workflow steps.
- Open the Pages application.
- Select a page you wish to A/B test in the content tree.
- Switch to the Page tab.
- Click Create A/B variant.
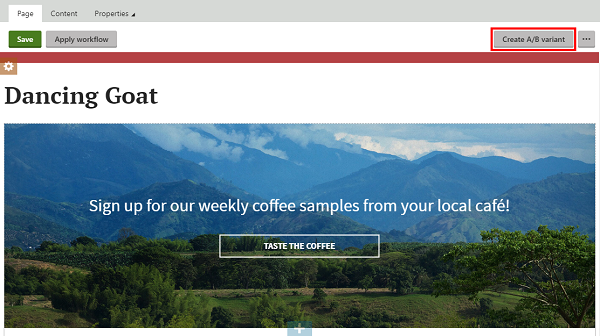
The system automatically creates a new A/B test, named after the page and the currently selected culture, and displays the first page variant.
The A/B test is always created for one specific culture version of a page. If you wish to test all culture versions on a multilingual site, you need to create an A/B test (together with variants) for each culture separately.
The Create A/B variant button changes into a selector that allows you to switch between variants and further interact with the page’s A/B test.
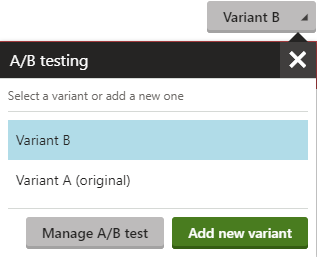
- Manage A/B test – opens a modal dialog that allows you to configure, start, and evaluate an A/B test created for the corresponding page.
- Add new variant – creates a new A/B variant by directly copying all saved content from the currently selected A/B variant.
You have created an A/B test together with variants. Continue by creating additional variants and editing variant content. You can define any number of A/B variants for the test.
Tip: The ![]() status icon allows you to quickly identify A/B tested pages in the content tree. The icon’s color is black for tests that have not started yet, dark blue for running tests, and orange for finished tests before a variant has been selected as the winner.
status icon allows you to quickly identify A/B tested pages in the content tree. The icon’s color is black for tests that have not started yet, dark blue for running tests, and orange for finished tests before a variant has been selected as the winner.
Defining additional variants
To create additional test variants:
- Open an A/B tested page in the Pages application.
- Click the A/B testing selector.
- Click Add new variant.
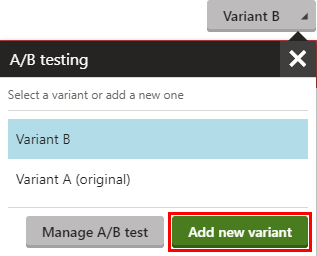
The system creates a new variant and makes it active on the Page tab, allowing for immediate editing. The variant is created as a direct copy of the previously selected variant.
Editing test variants
After you have created an A/B test and its variants, make the desired changes to the variant’s content.
- Open an A/B tested page in the Pages application.
- Choose the variant you want to edit using the selector in the upper right.
- (Optional) You can rename the variant by clicking the edit () icon. Variant names are limited to 100 characters.
- Edit the variant’s content (e.g., by swapping or re-configuring widgets, or choosing a different page template).
- Save your changes.
Variant content recommendations
When creating A/B test variants, we do not recommend making significant changes in the page’s overall content, such as switching to a completely different topic. A/B testing is suitable for smaller changes that keep the same general page concept. For example, you can adjust the text of headings and “call to action” buttons, or fine-tune the design, color and layout of page elements.
Changes that completely overhaul the concept of the page for individual variants could be interpreted as serving different content under a single URL, which could have a negative impact on your site’s search engine optimization (SEO).
Deleting test variants
If you wish to permanently delete a test variant:
- Open an A/B tested page in the Pages application.
- Click on the A/B testing selector in the upper right.
- Hover your mouse cursor over the variant you want to delete.
- Click the delete () icon.
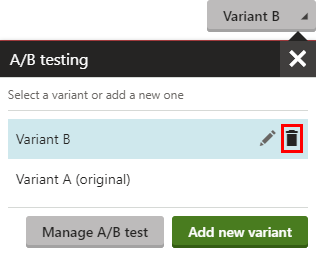
You have deleted the variant and its content from the system.
Configuring and starting A/B tests
Before starting an A/B test, configure its behavior on the Settings tab:
- Edit an existing A/B test:
- Open the Pages application.
- Select a page with an A/B test.
- Click on the A/B testing selector.
- Click Manage A/B test.
- Open the A/B tests application.
- Edit () an A/B test.
- Switch to the Settings tab.
- Configure general test parameters.
- Assign conversions you wish to track to the test.
- Save your changes.
The A/B test is now configured and ready to start on the selected Start date.
Configuring general test parameters
General test parameters, located under the General section, allow you to set the test’s Start and End dates and provide internal metadata about the test:
|
Property |
Description |
|
Display name |
The name of the A/B test displayed in the administration interface. |
|
Description |
Can be used to enter a text description for the test in order to give information about its purpose, goals, etc. |
|
Start |
Set the starting date and time for the test. You can use the Calendar button () to select the exact date and time. Alternatively, you can start a test immediately by clicking Start test on the Overview tab. |
|
End |
Set the date and time at which the test finishes. You can use the Calendar button () to select the exact date and time. A/B test duration – we do not recommend running tests for very long intervals or indefinitely. This could be interpreted as serving deceptive content by search engines and have a negative impact on your site’s search engine optimization (SEO). Re-configuring or altering running A/B tests Avoid making any modifications, such as adding or deleting variants, to already running tests. Changing test parameters midway may skew the data and provide inaccurate results. |
After you have configured general test parameters, continue by assigning tracked conversions.
Assigning conversions
Visitor conversions are the metrics that you use to evaluate the test’s variants (using the reports on the Overview tab). Newly created A/B tests do not track any conversions by default. You need to specify the types of conversions you wish to track for each A/B test under the Conversions and Traffic section:
- Click Add conversion next to the Conversions field.
- Select a conversion from the Visitor activity drop-down list.
- Enter the desired conversion value into the Value field.
- For some conversion types, such as Purchase of a specific product or Page visit, you may need to input additional information.
- Click Apply.
- Click Save after you are done adding the required conversions.
You can also optionally configure the Visitor targeting and Included traffic fields:
- Visitor targeting – a macro condition that filters which visitors are included in the test.
- Included traffic – sets the percentage of page visitors included in the test.
Excluded visitors always see the original variant of the tested page and their actions on the website do not trigger any conversion logging.
Excluded visitors and dynamic conditions
Once the system determines that a visitor is excluded from a specific test based on the Visitor targeting condition or the Included traffic setting, that visitor remains excluded for the entire duration of the test (unless the visitor clears their browser cookies). This ensures that the user’s experience on the website remains consistent.
Keep this behavior in mind when configuring Visitor targeting conditions. If a visitor views a tested page and does not fulfill the condition, they remain excluded for that specific test, even if the circumstances change and the condition result could potentially be different during a later visit. For example, if you have a condition based on the “Contact is subscribed to the specified newsletter” rule, visitors who are not subscribed to the newsletter remain excluded from the test, even if they return later after subscribing.
A/B test conversions
By default, you can assign the following visitor actions as conversions. Your site’s developers may have implemented additional conversion types not listed here:
|
Visitor activity |
Required action |
Notes |
|
Form submission |
The visitor submits a form. |
You need to select the form for which submissions are tracked as a conversion. |
|
Newsletter subscription |
The visitor subscribes to a newsletter. |
You need to select the newsletter for which subscriptions are tracked as a conversion. If the newsletter has double opt-in enabled, the conversion is only logged after the subscriber confirms their subscription. |
|
Page visit |
The visitor views a page. |
You need to specify which page is tracked by entering a Page URL value. Open the given page on the live site and copy the full URL from the browser bar (including the protocol and domain name, for example: https://domain.com/Services/Premium ). The domain name must match the Presentation URL on which your MVC site is running. The system automatically removes any query string parameters and fragment identifiers from the URL (such as UTM parameters). |
|
Product added to shopping cart |
The visitor adds a product to their shopping cart. |
You need to select the product which is tracked. If multiple units of the selected product are added to the cart within a single action, the conversion is logged only once. |
|
Purchase |
The visitor completes an order via your site’s checkout process. |
Conversions are logged for all orders (containing any products). To track the purchase of a specific product, add the Purchase of a specific product conversion to the A/B test. By default, the system automatically logs the total price (grand total) of the given order as the conversion’s Value. This is disabled if you set your own Value for the conversion. |
|
Purchase of a specific product |
The visitor completes an order containing the selected product. |
You need to select the product which is tracked. By default, the system automatically logs the total price of all units of the given product within the completed order as the conversion’s Value. This is disabled if you set your own Value for the conversion. |
|
User registration |
The visitor registers and becomes a user. |
If your website requires email confirmation for new registrations (see Enabling user registration for technical information about implementing this scenario), the conversion is only logged after the new user confirms their subscription. |
Limiting tests based on visitor consent
By default, the system serves A/B testing variants and logs subsequent conversions for all visitors. The A/B testing functionality does not collect or store any personal data and all statistics are anonymous. It is NOT legally necessary to add a consent condition in typical scenarios. However, if your website’s data protection policy requires such a condition for any reason, you can use the following approach:
- Make sure that contact tracking is enabled for your website.
- Prepare the consent that you wish to use for A/B testing.
- To simplify consents for visitors, you can reuse your site’s main contact tracking consent for the purposes of A/B testing.
- If you wish to use an additional consent for A/B testing, create a new one and then provide a way for visitors to give agreements (e.g. using a form with a field based on the Consent agreement component). Note that the system associates consents with contacts, so visitors need to give both contact tracking consent and the additional A/B testing consent in this scenario.
- Edit the given A/B test and select the Settings tab.
- Click Edit next to the Visitor targeting setting and perform the following:
- Add the Contact has agreed with consent rule.
- Click select consent in the rule designer, choose the related consent, and click Set parameter.
- Click Save & Close.
- Save the test settings.
With this configuration, the A/B test only affects visitors who consent to being tracked as contacts and have given an agreement with the additional A/B testing consent if one is specified. Other visitors always see the original variant of the tested page and their actions on the website do not trigger any conversion logging.
Evaluating A/B tests
Each test contains a filterable performance summary of individual variants on its Overview tab:
Open the Pages application.
Select a page with an A/B test.
Click on the A/B testing selector.
Click Manage A/B test.
– OR –
Open the A/B tests application.
Edit () a running A/B test.
The overview tab is horizontally divided into two sections:
- A filterable results graph allowing you to inspect the performance of individual conversions.
- An overview of all page variants and their performance.
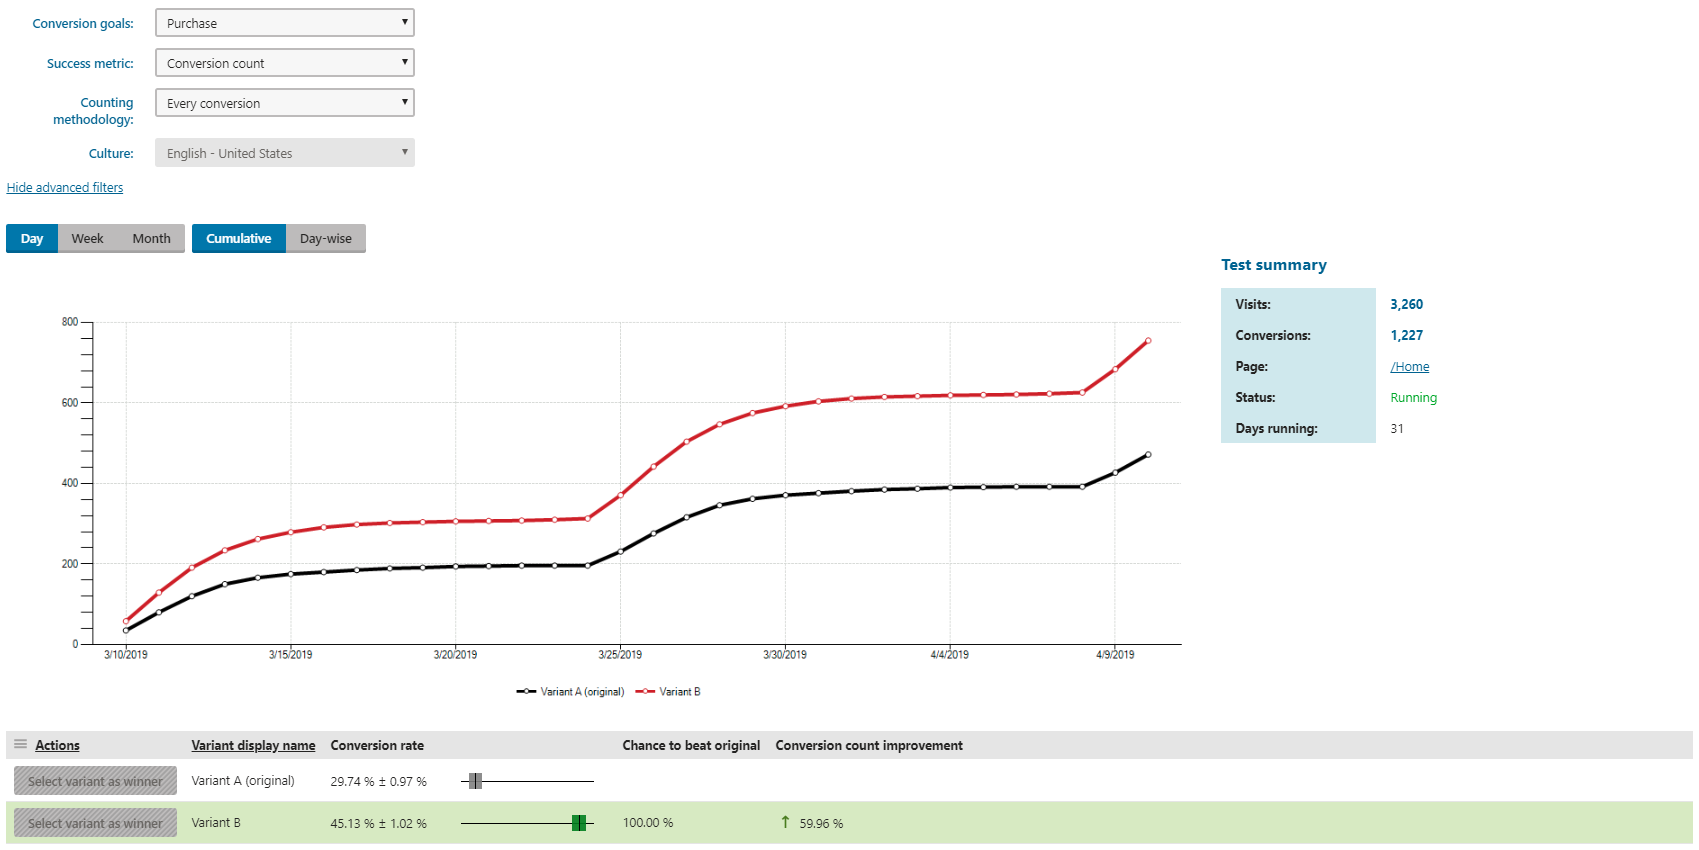
Conversion goals
In the Conversion goals drop-down list, you can select the conversion you want to evaluate. The displayed graph shows how each variant performs for the selected conversion.
Success metric
Using the Success metric drop-down list, you can change the conversion data visualized by the graph:
- Conversion rate – expresses what percentage of total visitors performed the conversion selected in the Conversion goals drop-down list.
- Conversion value – displays conversion values for the conversion selected in the Conversion goals drop-down list.
- Average conversion value – displays the average value of the logged conversions for the conversion selected in the Conversion goals drop-down list.
- Conversion count – displays the number of conversions for the conversion selected in the Conversion goals drop-down list.
Counting methodology
In the Counting methodology drop-down list, you can change the kind of data visualized by the graph:
- Visitor conversion – the number of visitors that performed at least one conversion on the page during any of their visits. A single visitor with multiple conversions is counted once.
- Visit conversion – the number of visits during which visitors performed at least one conversion. A single visit with multiple conversions is counted once.
- Every conversion – the total number of conversions performed by visitors across all visits.
Chance to beat the original
Chance to beat original is a percentage that expresses the confidence that you can have in a variant outperforming the original. For example, a 97% Chance to beat original means that the variant outperforms the original in 97% of cases. This number is based on data the test has collected to date and may change during repeated observations. We strongly recommend you let each A/B test run for at least 14 days and let it gather 100 or more conversions and then decide on the outcome of the test. Otherwise, you risk selecting a sub-par variant as a winner.
Chance to beat original is calculated only when evaluating the Conversion rate or Conversion count metrics.
Each variant’s significance is set to 95% (p-values of 5% or lower). That is, once the system determines the variant outperforms the original in 95% or more cases, the variant is marked as significant and its background turns green.
The following picture shows the original variant at the top and two variants, each with a different Chance to beat original.
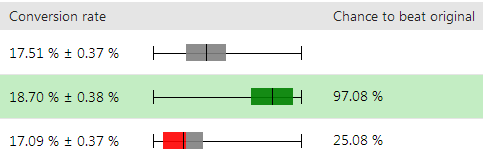
The Conversion rate column displays the calculated mean conversion rates together with their corresponding confidence intervals. The adjacent box plots visualize the calculated intervals. Confidence intervals of treatment variants overlapping with the original are rendered grey. Overlapping confidence interval generally signal a lack of statistical significance – the test cannot conclusively prove the treatment variant performs better than the original (the higher the overlap, the higher the uncertainty).
The Chance to beat original column displays the percentage confidence, based on collected test data, the system has in the variant outperforming the original (as described above).
Selecting a winner
After a test has finished, you can select one of the test’s variants as the winner of that particular experiment. The selected variant then replaces the original page.
- Open the test’s overview tab.
- Click Select variant as winner.

Always wait for the test to gather enough data before you select a winner (extend its duration, if necessary). Also, make sure that you analyze different success metric/counting methodology combinations.
After you select a winning variant, the test automatically concludes and becomes archived. You can view the test data (conversion rates, variant performance, test configuration, etc.) of archived tests by editing () the test in the A/B tests application. However, all defined variants are permanently deleted.
On the A/B tested page, the testing environment is reset, enabling the start of another experiment.