
Using the Registration form and Custom registration form web parts
You can allow visitors to register on your site using the following web parts:
Using the Registration form web part
The Registration form provides a basic ready-made registration form. You can place the web part onto any page without setting any properties. Adjust the properties if you want to modify the default behavior of the registration form.
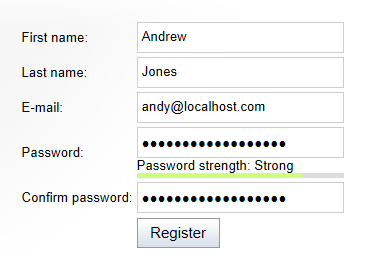
The password field in the form supports validation according to the password policy specified for the website and also calculates and displays the relative strength of the currently entered password. To learn more about the security options, see the Password strength policy page.
Using the Custom registration form web part
Use the Custom registration form for situations where you want a different registration form than the one provided by the Registration form web part. For example when you want users to provide different information during registration or if you wish to customize the form’s layout.
The following example demonstrates how to add a custom registration form to your site. You need to prepare the custom registration form as an alternative form for user objects.
Creating an alternative form for the User system object
- Open the Modules application.
- Edit () the Membership module.
- Open the Classes tab.
- Edit () the User (cms.user) class.
- Switch to the Alternative forms tab.
- Click Create new form above the list.
- Fill in the following details:
- Display name: My registration form
- Make new fields hidden: yes (checked) - ensures that the alternative does not display new fields added to the object by default.
- Combine with user settings: yes (checked) - ensures that the form contains all data fields related to users, including user settings.
- Click Save.
The system creates the alternative form and opens the form’s editing interface.
Defining the form fields and layout
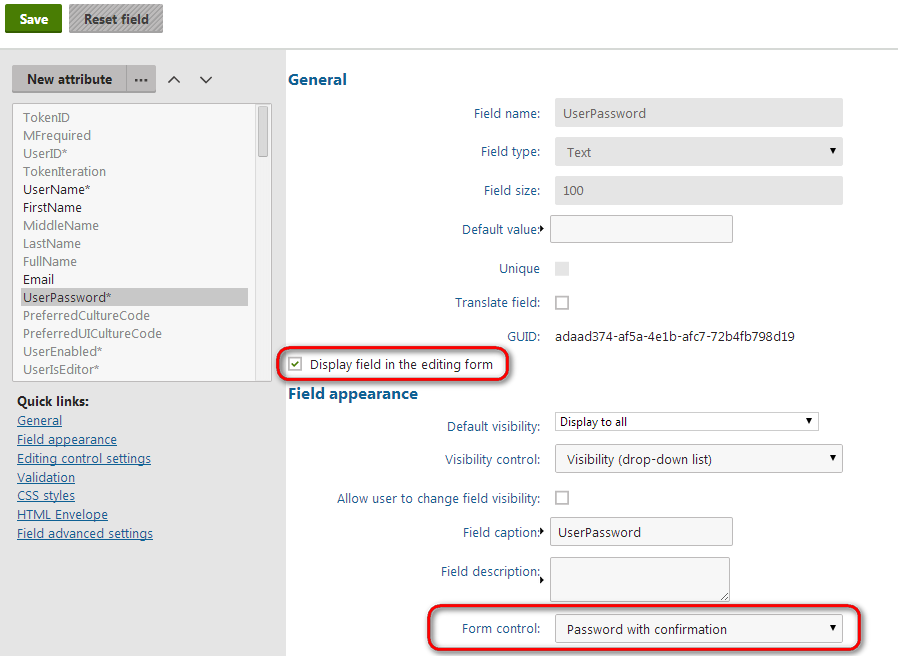
Switch to the Fields tab of the alternative form’s editing interface.
- Here you can see the fields (database columns) that the system stores for User objects.
Select the UserName field in the list on the left, and select the Display field in the editing form check box.
Click Save to confirm the change.
Repeat the same for the following fields:
- FirstName
- UserPassword
For the UserPassword field, choose the Password with confirmation option in the Form control selector.
Go through the remaining fields and uncheck Display field in the editing form.
Adjusting the form layout
To define the registration form’s layout:
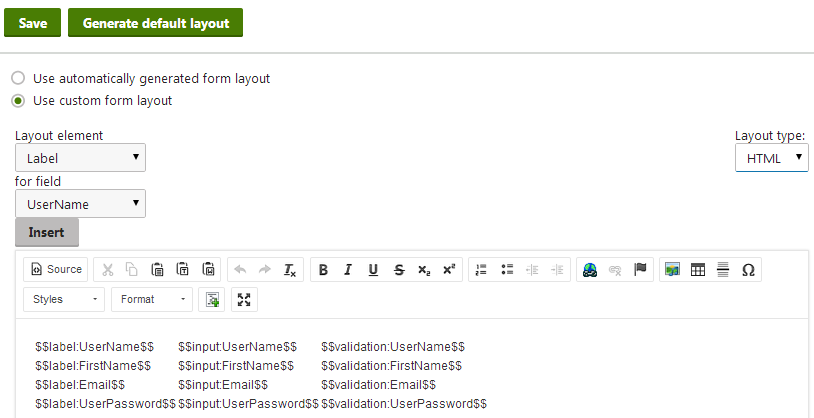
- Switch to the Layout tab of the alternative form editing interface.
- Select Use custom form layout.
- Click Generate default layout. A default table layout appears in the editor. You can adjust the layout according to your requirements.
- Click Save when you are finished.
Placing the form on a page
- Open the Pages application.
- Select or create a page where you want to add the registration form in the content tree.
- Switch to the Design tab.
- Add the Custom registration form web part onto the page.
- Select My registration form (cms.user.MyRegistrationForm) as the value of the web part’s Alternative form property.
If you switch to the live site and view the page, you can see the custom registration form that you created. You can now try to register using the form and verify that the user has been created in Configuration -> Users.