
OAuth for email servers
Kentico can connect to email servers using OAuth 2.0 token-based authorization. OAuth is supported for:
- SMTP servers for sending emails
- Mail servers for monitoring bounced emails (POP3)
OAuth provides a more secure alternative to basic authentication, which uses a simple combination of a username and password. Many mail services are deprecating support of basic authentication, leaving OAuth as the only viable authentication type. A notable example is Microsoft Exchange Online, which begins disabling basic authentication after October 1, 2022 (see Deprecation of Basic authentication in Exchange Online).
Requirements
Hotfix: OAuth for email servers is only available after applying hotfix 12.0.101 or newer.
You need to have HTTPS set up for both your Kentico administration and live site.
Communication between Kentico and specific email services is ensured by an OAuth provider. By default, the system includes an OAuth provider for Microsoft Exchange Online (see Creating OAuth credentials for Microsoft Exchange Online). Other email services require implementation of a custom provider.
Managing OAuth credentials
To use OAuth authentication for an email server, you need to prepare credentials and generate an access token. Manage OAuth credentials in the Email OAuth credentials application within the Kentico administration.
You can use the created OAuth credentials to configure connections to mail servers throughout the system:
- Default SMTP server (Settings → System → Emails → Default SMTP server)
- Additional SMTP servers (SMTP servers application)
- Bounced email server (Settings → On-line marketing → Email marketing → POP3 settings)
- Email testing (System → Email)
In the email server configuration, select OAuth 2.0 as the Authentication type, fill in the username for the connection and then choose valid OAuth credentials.
Creating OAuth credentials for Microsoft Exchange Online
Start by preparing an application in the Microsoft Azure portal:
Register an application with the Microsoft identity platform.
Add the following Redirect URI (under Authentication):
- https://<site domain>/CMSModules/EmailEngine/Pages/OAuth2AccessTokenDialog.aspx?redirected=1
(insert your site’s fully qualified domain name, including the application path or virtual directory)
- https://<site domain>/CMSModules/EmailEngine/Pages/OAuth2AccessTokenDialog.aspx?redirected=1
Add the following API permissions for your application – Microsoft Graph > Delegated permissions:
- OpenId permissions > offline_access
- POP > Pop.AccessAsUser.All
- SMTP > SMTP.Send
- User > User.Read (included by default for new applications)
Record your applications Application (client) ID and Directory (tenant) ID values (you can find them on your application’s Overview in the Azure portal).
Add a client secret for your application and record the secret’s value.
Use the OAuth authentication service provided by Azure Active Directory (Azure AD) to enable your application to connect with POP or SMTP protocols to access Exchange Online in Office 365. See the Authenticate an IMAP, POP or SMTP connection using OAuth article for more information.
Enable SMTP AUTH for your mailboxes
You also need to ensure that SMTP AUTH is enabled for your mailboxes in the Microsoft 365 admin center.
See the Enable or disable authenticated client SMTP submission (SMTP AUTH) in Exchange Online article for detailed instructions.
Next, create OAuth credentials for your Azure AD application in Kentico:
- Open the Email OAuth credentials application in the Kentico administration.
- Click New OAuth credentials.
- Fill in the following values:
- Display name: any suitable name to identify your email application
- OAuth provider
- Assembly name: CMS.EmailEngine
- Class: CMS.EmailEngine.MicrosoftExchangeOAuthProvider
- Client ID: your application’s Application (client) ID
- Client secret: the client secret created for your applicaiton
- Click Save.
- Enter your application’s Directory (tenant) ID into the Tenant ID field.
- Click Save again.
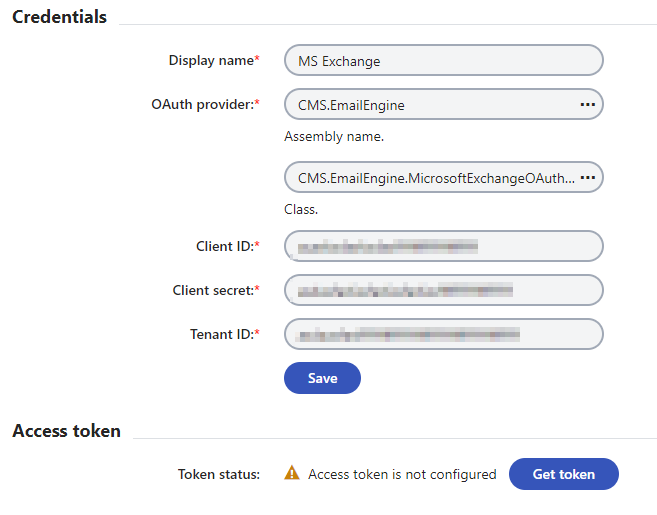
- Click Get token to generate and store an OAuth access token for your application.
You can now use the created OAuth credentials to configure connections to SMTP or POP3 servers in Kentico.
Access token validity
OAuth access tokens have limited validity and expire after some time. However, Kentico automatically refreshes the access token as the previous one expires.
Implementing custom OAuth providers
OAuth providers ensure secure communication between Kentico and specific email services. To use OAuth authentication for email services other than Microsoft Exchange Online, your developers need to create an appropriate provider.
Open your Kentico solution in Visual Studio.
Add a custom assembly (Class Library project) to the solution, or re-use an existing assembly.
Reference the project from both your live site and Kentico administration (CMSApp) projects (for MVC sites).
Add a new class under the custom project, implementing the
IEmailOAuthProviderinterface (available in theCMS.EmailEnginenamespace).Basic structure of an OAuth provider classusing CMS.EmailEngine; public class CustomOAuthProvider : IEmailOAuthProvider { // Determines whether the email service requires a Tenant ID for OAuth authentication // If true, adds the 'Tenant ID' field to the editing form in the Kentico 'Email OAuth credentials' application public bool RequiresTenantID => false; // Allows you to override the ASPX editing page for credentials in the Kentico 'Email OAuth credentials' application // Only needed if your email service requires non-default configuration options in the Kentico 'Email OAuth credentials' application // Return null to keep the default authorization dialog (~/CMSModules/EmailEngine/Pages/OAuth2AccessTokenDialog.aspx) public string CustomAuthorizationDialogPath => null; // Gets the URL used to request an authorization code, which contains all the necessary information (client id, requested scopes, etc.) // The authorization code retrieval flow begins by redirecting the user to this URL // Parameters: // redirectUrl - a URL where the OAuth provider redirects whilst providing the authorization code ('redirect_uri' query string parameter). // state - a unique generated value used to prevent CSRF attacks. We recommend adding the value as a 'state' query string parameter to the authorization URL. // credentials - the OAuth credentials object created in Kentico storing the Client ID, Client secret, etc.). public string GetAuthorizationUrl(string redirectUrl, string state, EmailOAuthCredentialsInfo credentials) { ... } // Trades the provided 'authorizationCode' for an access token // Set the access token, token expiration and a refresh token into the EmailOAuthCredentialsInfo credentials object public void CompleteAuthorization(string authorizationCode, string redirectUrl, EmailOAuthCredentialsInfo credentials) { ... // You need to save the EmailOAuthCredentialsInfo object after setting the required values credentials.EmailOAuthCredentialsAccessToken = "oauthtoken_value"; credentials.EmailOAuthCredentialsTokenExpirationUtc = DateTime.UtcNow.AddSeconds(tokenExpiration); credentials.EmailOAuthCredentialsRefreshToken = "refreshtoken_value"; EmailOAuthCredentialsInfo.Provider.Set(credentials); } // Refreshes the EmailOAuthCredentialsAccessToken credentials public string RefreshToken(EmailOAuthCredentialsInfo credentials) { ... // You need to save the EmailOAuthCredentialsInfo object after setting the updated token values credentials.EmailOAuthCredentialsAccessToken = "new_oauthtoken_value"; credentials.EmailOAuthCredentialsTokenExpirationUtc = DateTime.UtcNow.AddSeconds(tokenExpiration); credentials.EmailOAuthCredentialsRefreshToken = "new_refreshtoken_value"; EmailOAuthCredentialsInfo.Provider.Set(credentials); } }
Now create OAuth credentials for your email service in Kentico:
- Open the Email OAuth credentials application in the Kentico administration.
- Click New OAuth credentials.
- Configure the credential properties for your provider:
- Display name – any suitable name to identify your email service.
- OAuth provider – select your OAuth provider class.
- Fill in all required credentials for the given email service (Client ID, Client secret, etc.).
- Click Save.
You can now use the created OAuth credentials to configure connections to SMTP or POP3 servers in Kentico.