
Displaying product variants on MVC sites
If your on-line store contains products with product variants, you will need to display variants on your MVC site among products. Product variants are, in a nutshell, products with pre-defined product options.
Supported functionality
Regarding configurable products, Kentico currently supports only product variants. Product options without created variants are not supported.
However, you can create a product detail page for the product variants’ parent with product attribute selectors. That way, you can achieve the similar functionality as with attribute product options. Only in the background, the configurable options are product variants. See Displaying variants with attribute selection to learn more.
To display product variants, use the Kentico.Ecommerceintegration package. You can use either the default KenticoVariantRepository class that takes care of working with product variants or your own implementation of the IVariantRepository interface.
Tip: To view the full code of a functional example directly in Visual Studio, download the Kentico MVC solution from GitHub and inspect the LearningKit project. You can also run the Learning Kit website after connecting the project to a Kentico database.
The following process presumes you already have a working product details pages for standard products as described in Displaying product details on MVC sites.
Open your MVC project in Visual Studio.
To your product model, add the following properties and methods. They add a list of all product variants of a specific product and also the currently selected variant.
         public readonly List<Variant> ProductVariants;
         public SelectList VariantSelectList { get; set; }
         public int SelectedVariantID { get; set; }

         /// <summary>
         /// Creates a new product model with variants.
         /// </summary>
         /// <param name="productPage">Product's page.</param>
         /// <param name="priceDetail">Price of the selected variant.</param>
         /// <param name="variants">Collection of selectable variants.</param>
         /// <param name="selectedVariantID">ID of the selected variant.</param>
         public ProductViewModel(SKUTreeNode productPage, ProductPrice priceDetail, List<Variant> variants, int selectedVariantID)
             : this(productPage, priceDetail)
         {
             // Fills the selectable variants
             ProductVariants = variants;

             // Continues if the product has any variants
             if (variants.Any())
             {
                 // Pre select variant
                 var selectedVariant = variants.FirstOrDefault(v => v.VariantSKUID == selectedVariantID);

                 if (selectedVariant != null)
                 {
                     IsInStock = !selectedVariant.InventoryTracked || selectedVariant.AvailableItems > 0;
                     SelectedVariantID = selectedVariantID;
                 }

                 // Creates a list of product variants
                 VariantSelectList = new SelectList(variants.Select(v => new SelectListItem
                 {
                     Text = string.Join(", ", v.ProductAttributes.Select(a => a.SKUName)),
                     Value = v.VariantSKUID.ToString()
                 }), "Value", "Text");
             }
         }
To your product controller, change the action of displaying pages to fill the product model, and add a method that displays the desired variant.
         /// <summary>
         /// Displays product detail page of a product or a product variant specified by ID of the product's or variant's page.
         /// </summary>
         /// <param name="id">Node ID of the product's (variant's) page.</param>
         /// <param name="productAlias">Node alias of the product's (variant's) page.</param>
         public ActionResult Detail(int id, string productAlias)
         {
             // Gets the product from Kentico
             SKUTreeNode product = GetProduct(id);

             // If the product is not found or if it is not allowed for sale, redirects to error 404
             if ((product == null) || !product.SKU.SKUEnabled)
             {
                 return HttpNotFound();
             }

             // Redirects if the specified page alias does not match
             if (!string.IsNullOrEmpty(productAlias) && !product.NodeAlias.Equals(productAlias, StringComparison.InvariantCultureIgnoreCase))
             {
                 return RedirectToActionPermanent("Detail", new { id = product.NodeID, productAlias = product.NodeAlias });
             }

             // Gets all product variants of the product
             List<Variant> variants = variantRepository.GetByProductId(product.NodeSKUID).OrderBy(v => v.VariantPrice).ToList();

             // Selects the first product variant
             Variant selectedVariant = variants.FirstOrDefault();

             // Calculates the price of the product or the variant
             ShoppingCart cart = shoppingService.GetCurrentShoppingCart();
             ProductPrice priceDetail = selectedVariant != null ? pricingService.CalculatePrice(selectedVariant, cart) : pricingService.CalculatePrice(product.SKU, cart);

             // Initializes the view model of the product or product variant
             ProductViewModel viewModel = new ProductViewModel(product, priceDetail, variants, selectedVariant?.VariantSKUID ?? 0);

             // Displays the product detail page
             return View(viewModel);
         }

         /// <summary>
         /// Loads information about the demanded variant to change the page content.
         /// </summary>
         /// <param name="variantID">ID of the selected variant.</param>
         [HttpPost]
         public JsonResult Variant(int variantID)
         {
             // Gets SKU information based on the variant's ID
             SKUInfo variant = SKUInfoProvider.GetSKUInfo(variantID);

             // If the variant is null, returns null
             if (variant == null)
             {
                 return null;
             }

             // Calculates the price of the variant
             ProductPrice variantPrice = pricingService.CalculatePrice(variant, shoppingService.GetCurrentShoppingCart());

             // Finds out whether the variant is in stock
             bool isInStock = variant.SKUTrackInventory == TrackInventoryTypeEnum.Disabled || variant.SKUAvailableItems > 0;

             // Creates a JSON response for the JavaScript that switches the variants
             var response = new
             {
                 totalPrice = variantPrice.Currency.FormatPrice(variantPrice.Price),
                 inStock = isInStock,
                 stockMessage = isInStock ? "Yes" : "No"
             };

             // Returns the response
             return Json(response);
         }
Add a variant selection to your view.
 @if (Model.ProductVariants.Any())
 {
     <div class="cart-item-selector" data-variant-action="@Url.Action("Variant")">
         <p>
             Choose your desired variant:
             @Html.DropDownListFor(m => m.SelectedVariantID, Model.VariantSelectList, new { @class = "js-variant-selector" })
         </p>
     </div>
 }

 @Scripts.Render("~/Scripts/jquery-2.1.4.min.js")
 @Scripts.Render("~/Scripts/variantSelector.js")
Adjust the button for adding the product or product variant to the shopping cart.
     @* Add to cart button *@
     using (Html.BeginForm("AddItem", "Checkout", FormMethod.Post))
     {
         <input type="hidden" name="itemSkuId" id="selectedVariantID" value="@Model.SelectedVariantID" />
         <label>Qty</label>
         <input type="text" name="itemUnits" value="1" />
         <input type="submit" name="AddItem" value="Add to cart" />
     }
Add a JavaScript file that dynamically switches between variants (changes the view’s content) when the selection changes.
  (function () {
     'use strict';

     var url = $('.cart-item-selector').data('variant-action'),
         stockMessage = $("#stockMessage"),
         totalPrice = $('#totalPrice'),
         selectedSKUID = $('#selectedVariantID');

     $('.js-variant-selector').change(function () {
         var id = $(this).val();
         updateVariantSelection(id);
     });

     function updateVariantSelection(variantId) {
         $.post(url, { variantID: variantId }, function (data) {
             stockMessage.text(data.stockMessage);

             totalPrice.text(data.totalPrice);
             selectedSKUID.val(variantId);
         });
     }

 }());
Visitors of your site can now browse and switch among products and product variants.
Changing the product image for different variants
You may find useful to display a different image for every product variant. For example, if you sell T-shirts, you may want to display a red T-shirt when a red variant is selected and a blue T-shirt when a blue variant is selected.
To be able to display a different image for each variant:
Enabling to specify an image path for each variant
Change the default setting of the variant detail layout to include a selector for its image.
- Open the Modules application in Kentico.
- Edit the E-commerce module.
- Switch to the Classes tab.
- Edit the SKU class.
- Switch to the Alternative forms tab.
- Edit the Variant properties form.
- Switch to the Fields tab.
- Select SKUImagePath in the field panel.
- Select the Display field in the editing form check box.
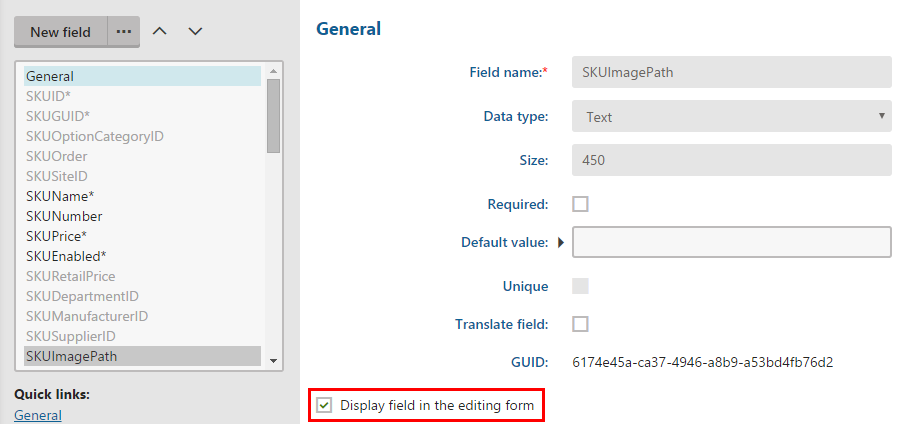
- Click Save.
When you now edit a product variant, you can see a selector for an image. By default, Kentico tries to display an image of the product variant. If the variant does not contain any image, the system uses an image of the variant’s parent product.
Displaying product variant images in MVC application
This process assumes your MVC application can display product variants as described above.
Open your MVC project in Visual Studio.
Add a recognizable ID tag to the image in the variant detail’s view. If you used the same process as described above, add it to the Detail view.
<img id="js-product-image" ... />Add the image to the JavaScript handling changes of the selected variant. When using the process above, change the variant’s image in variantSelector.js in the updateVariantSelection method.
 var productImage = $("#js-product-image");

 function updateVariantSelection(variantId) {

     ...

     productImage.attr("src", data.imagePath);
 }
Add the image path for the specific variant to the response created in the controller. When used the process above, add the path to the response in the Variant method.
             var response = new
             {
                 // ...

                 imagePath = Url.Content(variant.ImagePath)
             };
Your product detail pages now display a different image for every variant. If the variant does not have any image specified, the system uses the parent product’s image.
Displaying variants with attribute selection
If you do not want to display a separate product detail page for every variant, you can use selectors (such as drop-down lists or check boxes) at their parent’s detail page.
To choose variants based on attribute selection instead of specific pages:
Create a view model for product option categories (for example, the ProductOptionCategoryViewModel).
- The view model should contain information needed to select and display the variant’s options.
To your controller action that takes care of displaying the product detail page (the Detail action in the ProductController from the example above), add loading of the variant that you want to display by default (e.g. the cheapest variant) and its product option categories.
             // Gets the cheapest variant from the product
             List<Variant> variants = mVariantRepository.GetByProductId(product.NodeSKUID).OrderBy(v => v.VariantPrice).ToList();
             Variant cheapestVariant = variants.FirstOrDefault();

             // Gets the product's option categories.
             IEnumerable<ProductOptionCategory> categories = mVariantRepository.GetVariantOptionCategories(sku.SKUID);

             // Gets the cheapest variant's selected attributes
             IEnumerable<ProductOptionCategoryViewModel> variantCategories = cheapestVariant?.ProductAttributes.Select(
                 option =>
                     new ProductOptionCategoryViewModel(option.SKUID,
                         categories.FirstOrDefault(c => c.ID == option.SKUOptionCategoryID)));
When initializing the product view model (ProductViewModel in the example above), add also the default variant and the list of all product option categories. Extend the view model accordingly.
Adjust your controller action that takes care of displaying the product variant detail page (the Variant action in the ProductController from the example above).
- In the variant’s controller action, you can also process the information about the availability of the specific variant.
If you followed the example above, you might need to adjust your JavaScript file that takes care of switching among variants.
Adjust your view that displays product variants (the Detail view in the example above).
If you want to display the default text for drop-down lists (for example, please select) specified in theDefault textfield when editing the category, access the DefaultText property of the ProductOptionCategory class (in the Kentico.Ecommerce integration package).
Your visitors can now configure product variants with attribute selectors.
You can see a working example on our MVC Dancing Goat sample site.